An array of 3D-printed parts for old sewing machines.

Printed Sewing Machine Parts Extend Singer’s Range

[Grow Your Own Clothes] had finally found their ideal sewing machine for doing zig-zag stitches (/\/\/\) and converting to a treadle drive (mechanically foot-fed) — a Singer 411G. This is a well-respected workhorse of a machine, and if you see one in a secondhand store, you might want to grab it. The only problem is that its multi-step zig-zag stitch is a 4-stepper and not a 3-step, which is what [GYOC] prefers. Having heard it was possible to hack them into doing a 3-step, [GYOC] set out to learn Tinkercad and grow their own sewing machine parts.

A 3D-printed cam lets this machine do the zig-zag in three steps instead of four.
The new zig-zag top hat cam in place.

So once upon a time, sewing machines didn’t just do a bunch of things out of the box. They needed an array of plastic cams to do different stitches, kind of like trading out the element or disk in a typewriter to print in italics. While most machines still have exchangeable feet for different needs and special parts for sewing things like buttonholes, most domestics now have decorative stitches and their cams built in.

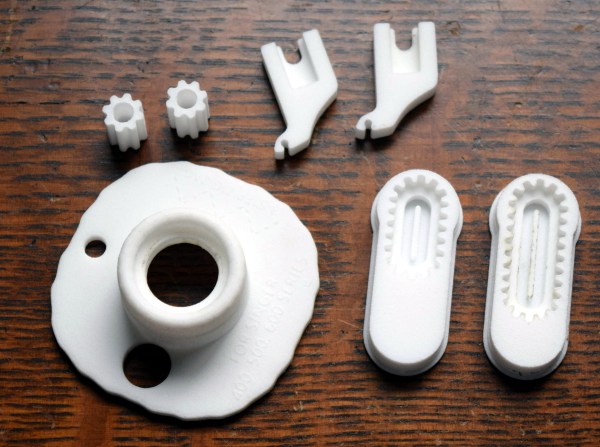
The 3-step zig-zag cam was just the beginning. [GYOC] decided to make a few more parts before their Tinkercad knowledge faded: a needle adapter with an improved design, some tension stud sprockets for a different machine, and a couple of buttonhole templates for making different sizes with a buttonholer. Although they aren’t giving away the files for free, all of these parts are available quite cheaply in their Shapeways store.

Got an old machine you don’t know what to do with? Try converting it to a computerized embroidery machine.

Thanks for the tip, [Raphael]!

Master craftsperson turns a huge bolt into a pneumatic engraving tool.

Impressive Hack Turns Bolt Into Pneumatic Engraver

Did you ever see one of those videos that causes you to look at an everyday object in a new light? This is one of those videos (embedded below). And fortunately for us, there’s a write-up to go along with it in case you don’t always understand what’s going on.

In this case, what’s going on is that [AMbros Custom] is masterfully turning a stainless steel M20 bolt into a pneumatic engraving tool. Yeah, you read that correctly. But the most amazing thing about this hack is the minimum of tools used to do it. For one thing, there’s not a lathe in sight — [AMbros Custom] just chucked it into the drill or added a few nuts and clamped it in a vise.

So, how does it work? [AMbros Custom] hooks it up to a compressor, which causes the piston inside to go up and down, agitating the engraving bit. If you don’t want to watch the video, there are a ton of build pictures in the write-up.

What else can you do with a bolt? If you have the tools, you can do plenty. You could even turn one into a secret cash stash for buying more large bolts.

Continue reading “Impressive Hack Turns Bolt Into Pneumatic Engraver”

Illustrated Kristina with an IBM Model M keyboard floating between her hands.

Keebin’ With Kristina: The One With The Cat Keyboard

Special thanks to [Maarten], who stumbled upon this old gem of a geekhack thread by [suka]. It’s essentially a show and tell of their DIY keyboard journey, complete with pictures. [suka]’s interest started with a yen for ergonomic keyboard layout alternatives. They soon found the geekhack forum and started lurking around, practicing layouts like Neo and AdNW, which [suka] still uses today.

A pair of num pads wired up to a Teensy becomes a keyboard.When it was time to stop lurking and start building something, [suka] got plenty of support from the community. They knew they wanted a split ortho with a trackpoint and plenty of thumb keys. [suka] started by building them from old Cherry keyboards, which are easier to come by in Germany.

The first build was a pair of num pads turned landscape and wired up to a Teensy, but [suka] wanted those sweet, clacky Cherry MX switches instead of MLs. So the second version used a pair of sawed-off num pads from old MX boards.

When the Truly Ergonomic came out, it got [suka] interested in one-piece splits. Plus, they were tired of carrying around a two-piece keyboard. So their next build was a sexy monoblock split with a laser-sintered case and keycaps. But that was ultimately too uncomfortable, so [suka] went back to split-splits.

Everyone takes a different path into and through this hobby, and they’re all likely to be interesting. Is yours documented somewhere? Let us know.

What Could Have Been: The Dygma Raise

I do some streaming here and there, mostly for the sense of focus I get out of being live on camera. I like to find out what my people in chat are clacking on, and one of them told me they have a staggered split called the Dygma Raise. I hadn’t heard of it before that day, but this keyboard has been around for a few years now.

This same person told me that Dygma might make an ortholinear version sometime soon, but apparently Dygma wanted it that way from the beginning. According to the timely video below sent to the tips line by [deʃhipu], Dygma’s original plan was a split ortho with few keys and presumably a layer system.

Continue reading “Keebin’ With Kristina: The One With The Cat Keyboard”

A scrolling name badge that uses LED matrices.

Scrolling Name Badge Is Sure To Break The Ice

Most makerspaces and hackerspaces have one night per week or month where the ‘space is open to the public in order to entice new people into joining up. Whereas most members just write their name in Sharpie on a piece of masking tape, [Madison] wanted to do something extra. And what better way to get people interested in your ‘space than by wearing something useful that came out of it?

The badge runs on an ATtiny45 and uses three 8×8 ultra-bright LED matrices for scrolling [Madison]’s name. It’s powered by a tiny LiPo battery that is boosted to 5 V. This build really shows off a number of skills, especially design. We love the look of this badge, from the pink silkscreen to the the typography. One of the hardest things about design is finding fonts that work well together, and we think [Madison] chose wisely. Be sure to check it out in action after the break.

Custom name badges are a great way to start conversations no matter where you go. Here’s one that uses EL wire and LEDs that light up in sequence for an animated effect.

Continue reading “Scrolling Name Badge Is Sure To Break The Ice”

A portable Bluetooth turntable.

Bluetooth Record Player Puts A New Spin On Vinyl

You know, we were just discussing weird and/or obsolete audio formats in the writers’ dungeon the other day. (By the way, have you ever bought anything on DAT or MiniDisc?) While vinyl is hardly weird or (nowadays) obsolete, the fact that this Bluetooth record player by [JGJMatt] is so modern makes it all the more fantastic.

Not since the Audio-Technica Sound Burger, or Crosley’s semi-recent imitation, have we seen such a portable unit. But that’s not even the most notable part — this thing runs inversely to normal record players. Translation: the record stands still while the the player spins, and it sends the audio over Bluetooth to headphones or a speaker.

Inside this portable player is an Arduino Nano driving a 5 VDC motor with a worm gear box. There really isn’t too much more to this build — mostly power, a needle cartridge, and a Bluetooth audio transmitter. There’s a TTP223 touch module on the lid that allows [JGJMatt] to turn it off with the wave of a hand.

[JGJMatt] says this is a prototype/work-in-progress, and welcomes input from the community. Right now the drive system is good and the Bluetooth is stable and able, but the tone arm has some room for improvement — in tests, it only played a small section of the record and skidded and skittered across the innermost and outermost parts. Now, [JGJMatt] is trying two-part arm approach where the first bit extends and locks into position, and then a second arm extending from there and moves around freely.

Commercial record players can do more than just play records. If you’ve got an old one that isn’t even good enough for a thrift store copy of a Starship record, you could turn it into a pottery wheel or a guitar tremolo.

Cracking Open The Prince Floppy After The Purple Reign

Readers of a certain vintage will no doubt remember the time when Prince eschewed his royal position and became an unpronounceable symbol. People had no choice but to refer to him as TAFKAP, The Artist Formerly Known As Prince, and members of the music press were sent a 3.5″ floppy disk with a font file containing a single character — that gender-transcending shape that would soon become another one of Prince’s guitars. But it’s 2021, and now you can get it from the Internet Archive. Fun fact: the file wasn’t ever locked down. In fact, the symbol was available on Prince’s Compuserve and fan club CD-ROM.

While some people trawl auction sites for overalls and weird keyboards, others look for ridiculous items from the zeitgeist, like a copy of this floppy. Take [Anil Dash] for instance. [Anil] finally pulled the trigger after 15 years of debating this particular purchase. [Anil]’s interest was reignited after reading this analysis of whether the symbol could ever be put into Unicode. (Between being trademarked, a logo, and a personal character, it’s ineligible for inclusion.)

Earlier this week, [Anil] teamed up with Adafruit to extract the data from the floppy. The Twitter thread that ensued led readers to another old source of the font — the 1994 game Prince Interactive. We wonder if they broke out the oscilloscope, though it doesn’t look like it.

Thanks for the tip, [pt and limor]!

A disposable wireless phone charger made from molded cardboard pulp.

Charging Phones With The Power Of Paper Pulp

Here it is, the most exciting reveal since the Hackaday Prize ceremony — [Eric Strebel] uses the pulp mold he designed and built over the three previous videos. In case you missed our coverage so far, [Eric] set out to design an eco-friendly wireless charger that’s meant to be disposable after six months to a year of use, and looks good doing it.

[Eric] started by cutting up a lot of cardboard and pulping it in a brand-new Oster blender that honestly looks to be pretty heavy duty. Pulping consists of blending the cardboard bits with water until a soupy chili-like consistency is reached. That blender lasted all of 20 minutes before breaking, so [Eric] promptly replaced it with a Ninja, which was way more up to the challenge of cardboard.

To do the actual molding, [Eric] mixed his pulpy chili with ~30 L of water in a tub big enough to accommodate the long brass mold. He dipped the mold to gather a layer of pulp and pulled it, and then pressed the wireless charger in place to create a pocket for it in the final, dried piece which he later replaced with an acrylic disk of the same diameter. [Eric] points out that a part like this would probably dry within ten minutes in an industrial setting. Even though he set it on top of a food dehydrator, it still took 4-5 hours to dry. Soup’s on after the break.

This isn’t [Eric]’s first wireless charger. A few years ago, he prototyped a swiveling version in urethane foam that does portrait or landscape.

Continue reading “Charging Phones With The Power Of Paper Pulp”