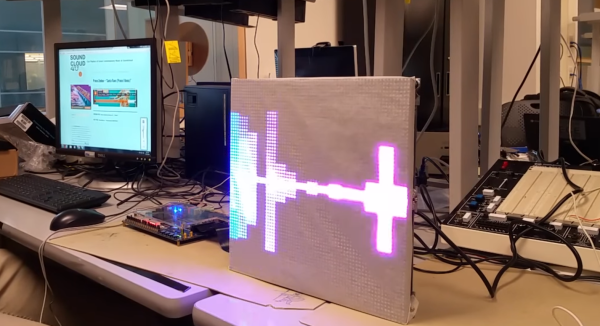
[Sam Miller], [Sahil Gupta], and [Mashrur Mohiuddin] worked together on a very fast LED matrix display for their final project in ECE 5760 at Cornell University.
Real time!
They started, as any good engineering students, by finding a way to make their lives easier. [Sam] had built a 32×32 LED matrix for another class. So, they made three more and ended up with a larger and more impressive 64×64 LED display.
They claim their motivation was the love of music, but we have a suspicion that the true reason was the love all EEs share for unnaturally bright LEDs; just look at any appliance at night and try not be blinded.
The brains of the display is an Altera DE2-115 FPGA board. The code is all pure Verilog. The FFT and LED control are implemented in hardware on the FPGA; none of that Altera core stuff. To generate images and patterns they wrote a series of python scripts. But for us it’s the particle test shown in the video below that really turns our head. This system is capable of tracking and reacting to a lot of different elements on the fly why scanning the display at about 310 FPS. They have tested display scanning at twice that speed but some screen-wrap artifacts need to be worked out before that’s ready for prime time.
The team has promised to upload all the code to GitHub, but it will likely be a while before the success hangover blows over and they can approach the project again. You can view a video interview and samples of the visualizations in the videos after the break.
Thanks to their Professor, [Bruce Land], for submitting the tip! His students are always doing cool things. You can even watch some of his excellent courses online if you like: Here’s one on the AVR micro-controller.
With more and more previously industrial processes coming online in the home shop, people are finding that getting the information that was previously provided by the manufacturer of a hundred thousand dollar machine for their three hundred dollar Shenzen special is not easy.
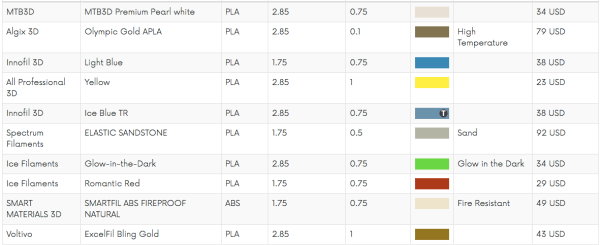
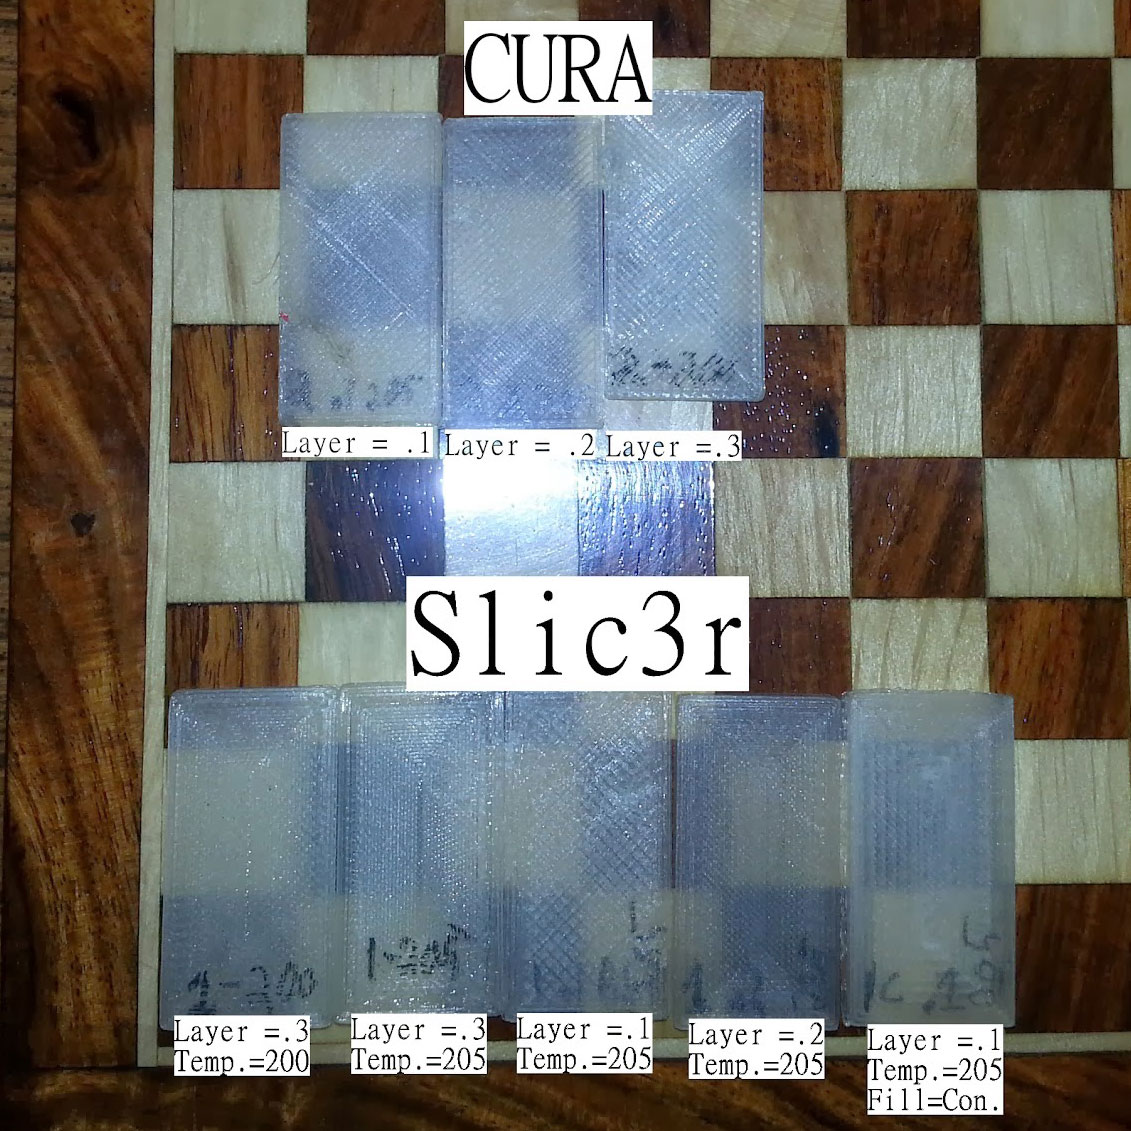
Some early work from UFID shows how even different Slic3rs can change the expected material properties of a filament.
A common example is this, a hacker purchased themselves a brand new 3D printer off amazon for a price too good to be true. After a week of tinkering with it, a small fire, and a few replacement parts later, they get it to work. After they’ve burned through, perhaps literally, the few hundred grams of filament that came with the printer at the setting recommended by the manufacturer, they do a small blanket order of the different filaments out there. Now comes the trouble, each printer is a little different and each filament has different properties. Most people find that the second spool of filament they feed into their printer doesn’t work at all. What’s the quickest way to get the right temperature, cooling, and feed settings for your printer configuration?
This isn’t a problem for the expensive machines. Epilog, a manufacturer of laser cutters, provides a grid of settings for each material you’re likely to cut, tuned to the different properties of each model of laser cutter they sell. Same goes for the expensive industrial 3D printers, each (very expensive) spool of material has the setting sitting in a chip in the casing. When the spool is slotted in the machine, it reads the settings and adjusts accordingly. All the work of tuning was done in a lab somewhere and the print is, theoretically, guaranteed.
Your Oshpark order would get delayed, your Lulzbot support case would be dropped, Teensies would ship late, and the Amp Hour would just be the EEVBlog Podcast if this bar burnt down, but it was a great event!
While we were at the Bay Area Makerfaire 2016, we had a chance to talk to [Gauthier de Valensart] and buy him a beer at the Hackaday Meet-up. [Gauthier] is from Belgium where he is the founder of a start-up with one of those fancy new TLDs: filaments.directory. The goal of filaments.directory is to create a database of 3D printer materials and link that up with a user’s 3D printer settings. The eventual goal being, much like the industrial printers, a user would be able to simply scan a barcode, or wave the spool over an RFID reader to input the needed settings into his slicing software or printer.
This sounded familiar to me, not the least because I had started work on it as an extension for repables.com when that was a larger focus in my life. In fact, I remember, while I was kicking the idea around to people at MRRF, that they kept telling me someone else was working on a similar project. I wanted to introduce [Gauthier] to the person who was working on the project back then. Since I was at a bar full of people in the industry, I sort of helplessly rotated in my spot trying to find someone who might remember. I spied [whosawhatsis], a common attendee of MRRF, and asked him. Okay, that was easy, [whosawhatsis] informed us that is was his project… introduction complete. Goes to show you what a good networking event buying a bunch of nerds beer can be.
They got a pretty okay logo while they were at it.
The project was called, “Universal Filament Identification System,” and it proposed to, “… eliminate the guess-work,” by, “…developing a method for tagging, tracking, and identifying filament for 3d printing in machine-readable formats…” The project appears to be mostly dead now and its domain is a placeholder. I think it suffered from the standard open source feature creep, but the idea is sound.
Which gets us to the questions. There are a lot of difficulties with creating such a system. The first being the data collection. Who should be responsible for measuring the filaments, the materials for laser cutting, or any other process that needs tuned settings? The ideal track, of course, would be for the manufacturers to hold themselves accountable and report on the settings for their filaments. However, many filament manufacturers rely on the ignorance of users to sell dodgy products, it’s only in the interest of a few top-quality ones to do so. If the users do so, then how will the information provided be vetted? You definitely don’t want someone’s ignorance about a faulty thermistor to encourage you to run PLA at 280C.
More and more difficulties arise. How should the information be transferred, etc. What properties should even be recorded? UFID was going as far as to use a color sensor to keep track of colors between batches from 3D printer manufacturers. In the end it’s about creating standards in a standard-less industry by using crowdsourcing. Either way, take a look at what [Gauthier]’s doing (and send him some feedback), read the backlogs of UFID, think about how annoying it was to get the right settings for a laser cutter the last time you used one, and let us know your thoughts in the comments.
Even the city’s welcome sign is held high by two prosthetic arms.
In the show Full Metal Alchemist, there’s a city called Rush Valley whose main and only business are the high performance prostheses called Automail. Engineers roam the street in Rush Valley; the best have their own shop like that of the high-end clothiers in Saville Row. Of course; it’s all fantasy set in a slightly ridiculous Japanese cartoon, but while walking through this year’s Maker Faire I began to wonder if is a future that may come to be.
The problem with prosthetics is the sheer variety of injuries, body types, and solutions needed. If an injury is an inch higher or an inch lower it can have a big effect on how a prosthetic will interact with the limb. If the skin is damaged or the nerves no longer function a different type of prosthesis will be needed. Some prostheses are to replace a lost limb, others are to assist an ailing body in order to return it to normal function. More than a few are simply temporary aides to help the body along in its healing efforts. Unfortunately, this means that it’s often the case that larger companies only sell the prostheses people are most likely to need; the rarer cases are often left without a solution.
The e-Nable project doesn’t mess around.
However, we see hackers stepping up and not just working on the problems, but solving them. One of our semifinalists last year, openbionics, inspired one of the projects we’ll be talking about later. There are robotic legs. We met a guy at MRRF who has been 3D printing hands for his son from the E-nable project.
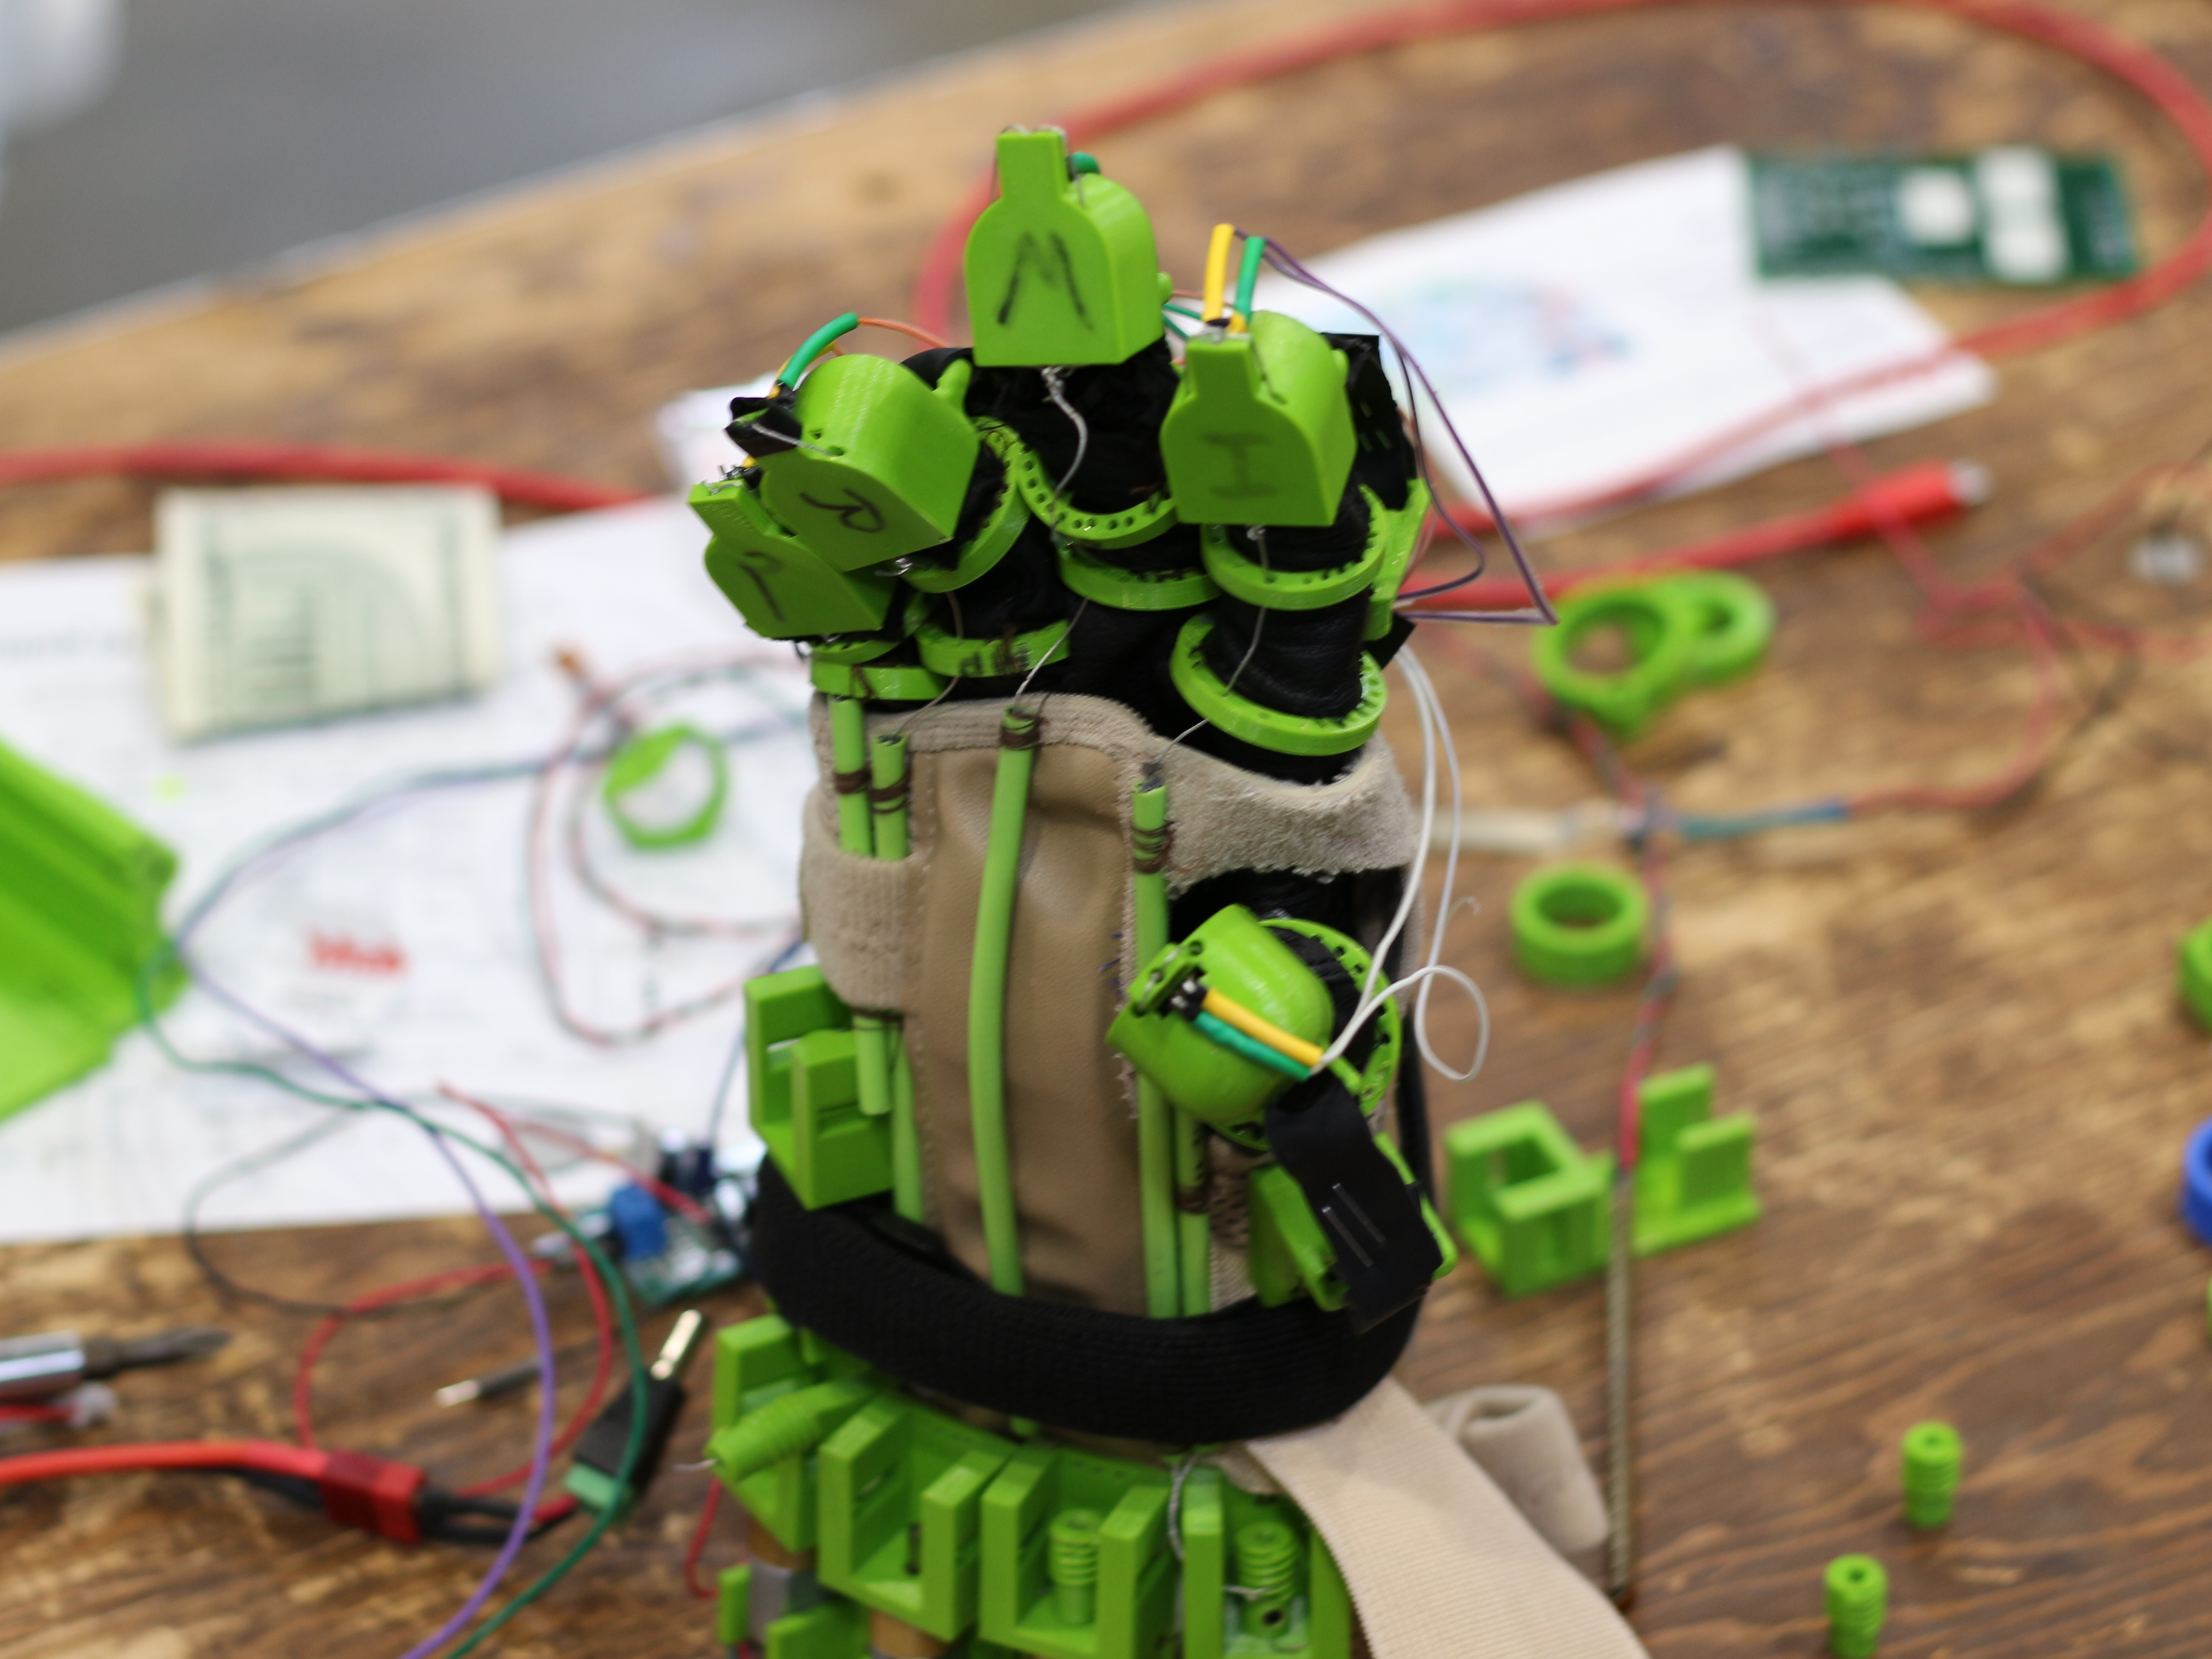
Along these lines, we saw two really cool projects at Maker Faire this year: The first is the Motor-Assistive Glove, or MAG. MAG is designed to help people with Peripheral Neropathy regain some use of their hands while they go through the lengthy road to recovery. Perhipheral Neuropathy is a disease, usually resulting from diabetes, toxin exposure, or infection, where the nerves are damaged in such a way that typically the hands and feet are no longer mobile or feel sensation in a useful way. Once the disease is in full swing, a previously able person will find themselves unable to do simple things like hold a can of soda or grasp a doorknob firmly enough to open it.
The Motor Assistive Glove
We had a chance to interview one of the members of the MAG team, [Victor Ardulov], which you can see in the following video. [Victor] and his group started a research project at the University of Santa Cruz to develop the Motor-Assistive Glove. The concept behind it is simple. People with Peripheral Neuropathy typically have some movement in their hands, but no strength. The MAG has some pressure sensors at the tips of the fingers. When the user puts pressure on the pad; the glove closes that finger. When the pressure is off; the glove opens. The concept is simple, but the path to something usable is a long one.
It’s been nearly four years since we covered [Thiago]’s OpenPLC project. He never stopped working on it, and now it’s in a highly polished state.
If you read our initial coverage of this project, it would be easy to assume that he just wanted to control some halloween decorations. He is actually a PhD student at the University of Alabama in Huntsville. His research topic is SCADA (aka Industrial Control Systems) cyber security. His goal was to find vulnerabilities in PLCs and, hopefully, fix them. However, no PLC manufacturer releases their source code, and he was having trouble getting a deep understanding of something so closed.
So, since no one was going to open their code and hardware for him he simply made his own. OpenPLC can be programmed in all 5 IEC 61131-3 languages: ST, IL, LADDER, FBD and SFC. On top of that, it lowers the barrier of entry to developing this kind of industrial hardware by being compatible with all the favorites Arduino, Raspberry Pi, Windows, Linux, etc.
“The OpenPLC is the first fully functional standardized open source PLC. We believe that opening the black-box of a PLC will create opportunities for people to study its concepts, create new technologies and share resources.”
[Robert Glaser] kept all his projects, all of them, from the 1960s to now. What results is a collection so pure we feel an historian should stop by his house, if anything, to investigate the long-term effects of the knack.
He starts with an opaque projector he built in the third grade, which puts it at 1963. Next is an, “idiot box,” which looks suspiciously like “the Internet”, but is actually a few relaxation oscillators lighting up neon bulbs. After that, the condition really sets in, but luckily he’s gone as far as to catalog them all chronologically.
We especially enjoyed the computer projects. It starts with his experiences with punch cards in high school. He would hand-write his code and then give it to the punch card ladies who would punch them out. Once a week, a school-bus would take the class to the county’s computer, and they’d get to run their code. In university he got to experience the onset of UNIX, C, and even used an analog computer for actual work.
There’s so much to read, and it’s all good. There’s a section on Ham radio, and a very interesting section on the start-up and eventual demise of a telecom business. Thanks to reader, [Itay Ramot], for the tip!
We suppose [Dan Beaven] got up one day and said, “I’ll make my own resin 3D printer, with resin management and an advanced separation mechanism!” It’s a build log that shows just how possible it is to roll your own resin printer.
Prints on a dime!
The machine isn’t finished yet, but the example prints coming off it are already very impressive. [Dan] stopped the print midway to get this photo of the detail on the stairs in the standard rook torture test.
[Dan] wants a lot of features from his machine that some of the more polished commercial printers are only now offering. One really nice one is the sliding and twist separation instead of tilt. This will allow for cleaner separation between layers during a print, a lower failure rate, and also faster print times.
He also added resin management with a peristaltic pump. This reduces the size of the build vat, and less resin will be exposed to the elements and wasted. It also means that the printer can run unattended. In the resin handling area of the printer he’s also added a carbon air filter. This lets him run higher performing resins without gassing him out of house and home with fumes.
We like how [Dan] just runs right ahead and puts the printer together. He even points out kludges on the machine that are holding it together long enough for him to print a more functional part for the 3D printer– on the 3D printer. We look forward to the next installment.
My heyday in programming was about five years ago, and I’ve really let my skills fade. I started finding myself making excuses for my lack of ability. I’d tackle harder ways to work around problems just so I wouldn’t have to code. Worst of all, I’d find myself shelving projects because I no longer enjoyed coding enough to do that portion. So I decided to put in the time and get back up to speed.
Normally, I’d get back into programming out of necessity. I’d go on a coding binge, read a lot of documentation, and cut and paste a lot of code. It works, but I’d end up with a really mixed understanding of what I did to get the working code. This time I wanted to structure my learning so I’d end up with a more, well, structured understanding.
However, there’s a problem. Programming books are universally boring. I own a really big pile of them, and that’s after I gave a bunch away. It’s not really the fault of the writer; it’s an awkward subject to teach. It usually starts off by torturing the reader with a chapter or two of painfully basic concepts with just enough arcana sprinkled in to massage a migraine into existence. Typically they also like to mention that the arcana will be demystified in another chapter. The next step is to make you play typist and transcribe a big block of code with new and interesting bits into an editor and run it. Presumably, the act of typing along leaves the reader with such a burning curiosity that the next seventeen pages of dry monologue about the thirteen lines of code are transformed into riveting prose within the reader’s mind. Maybe a structured understanding just isn’t worth it.
I wanted to find a new way to study programming. One where I could interact with the example code as I typed it. I wanted to end up with a full understanding before I pressed that run button for the first time, not after.
When I first read about literate programming, my very first instinct said: “nope, not doing that.” Donald Knuth, who is no small name in computing, proposes a new way of doing things in his Literate Programming. Rather than writing the code in the order the compiler likes to see it, write the code in the order you’d like to think about it along with a constant narrative about your thoughts while you’re developing it. The method by which he’d like people to achieve this feat is with the extensive use of macros. So, for example, a literate program would start with a section like this: