A Typewriter For The Paperless Age

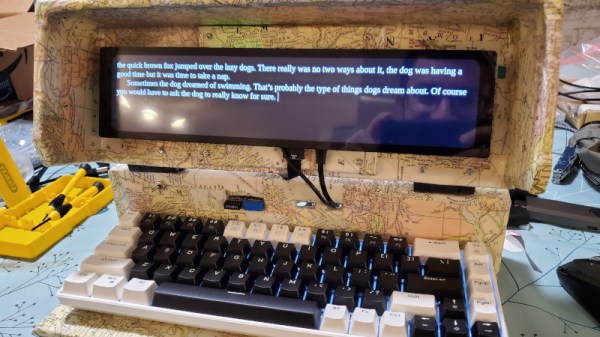
Writing is, as any of the Hackaday crew will tell you, a task which requires concentration. For your best work there’s a need to be in that elusive Zone, and for some that means making the experience as distraction free as possible. For them there’s an entire class of minimalist word-processors and text editors which reduce the UI to nothing more than the text. [Adam Blumenberg] has taken this a step beyond software with his digital typewriter, a single-purpose Raspberry Pi-based cyberdeck that serves only for distraction-free writing.

There’s not a lot in the way of descriptive text at the above link but in a way there doesn’t need to be as the photographs tell the story. A mechanical keyboard and a wide but not very tall display fit with the Pi in a fairly rudimentary wooden case, and running Focuswriter it leaves very little in the way of distraction. In that sense it’s not quite so much a cyberdeck in its application as something more like the smart digital typewriters from a few decades ago without the printer, but we can see that it makes for a very handy writing implement. Sadly the job of writing for Hackaday requires constant access to online sources on a larger screen, or we’d be tempted to try one ourselves.

The one-purpose writing computer is an idea we’ve seen before from time to time, for example in this one with an e-paper display.

A Casio Game Console With A Sticker Printer? Why Didn’t We Get It!

To work in the computer games business in the mid-1990s was to have a grandstand seat at a pivotal moment. 32-bit gaming was the order of the day and 3D acceleration was making its first appearance in high-end PC graphics cards, so perhaps the fastest changes ever seen in gaming happened across a few short years. It’s a shock then after spending that decade on the cutting edge, to find a ’90s console we’d never heard of from a major manufacturer. The Casio Loopy was a Japan-only machine which targeted a female gaming demographic, and featured a built-in sticker printer as its unique selling point.

On the face of it the Loopy was up there with the competition, featuring a similar 32-bit SuperH processor to the Sega Saturn paired with a megabyte of RAM, but staying with cartridges as the rest of the industry moved towards CDs led to its games being space-limited and expensive. At the same time the original PlayStation was winning developers from the cartridge model with a lower-cost barrier to entry, so the Loopy failed to capture a market and was off sale by 1996. We can see that its graphics may have been a little dated for the 32-bit era and that sticker printer would have driven parents crazy with requests for expensive cartridges, but we can’t help wishing it had made it out of Japan like their portable computers did.

Thanks [Stephen Walters] for the tip.

Header: Incog88, CC BY-SA 3.0.

Can An 8-Bit Light Gun Work On A Modern TV?

It’s an accepted part of retro gaming lore, that 8-bit consoles perform best when used with an original CRT TV. One of the reason for this is usually cited as being because the frame buffer and scaler circuit necessary for driving an LCD panel induces a delay not present on the original, and in particular this makes playing games which relied on a light gun impossible to play. It’s a subject [Nicole Branagan] takes a look at, and asks whether there are any ways to use a classic light gun with a modern TV.

Along the way we’re treated to an in-depth look at the tech behind light gun games, how the gun contained a photodiode which on the NES was triggered by the brief showing of a frame with a white square where the target would sit, and on the Sega consoles by a white screen with an on-board timer counting the screen position at which the gun was aimed.

The conclusion is that the delay means you won’t be playing Duck Hunt or Hogan’s Alley on your 4K TV, but interestingly, all is not lost. There are modified versions of the games that take account of the delay, or an interesting lightgun emulator using a WiiMote. We’d be happy at playing either way, just as long as we can take pot-shots at the annoying Duck Hunt dog.

Light gun image: Evan-Amos, Public domain.

The Clock, Another Way To Modify The Sound Of A Synth Chip

The Philips SAA1099 is perhaps one of the lesser-known among the crop of 1980s-era 8-bit sound generator chips, but with three stereo voices onboard it makes a capable instrument for chiptune experimentation. It’s attracted the attention of [Folkert van Heusden], who’s tried the novel experiment of seeing what happens when a sound chip’s clock is varied.

A quick search of the internet reveals that the chip, which appeared in early Sound Blaster cards, is intended to have an 8 MHz clock. He’s hooked it up to an Arduino as a variable clock source, which surprised us but it seems an ATmega328’s timer is faster than we expected.

There are a couple of WAV files, and as expected the clock frequency has a significant effect on the pitch. The samples just sweep up and down without much attempt at making a sound you’d want to hear, but it does raise an interesting possibility of adding a further pitch bending ability to the capabilities already in the chip. When these circuits were new we couldn’t control a clock on a whim with the 8-bit processors of the day, so of course none of us thought to try this at the time. He’s tried it, so you don’t have to.

The SAA1099 has been mentioned in these pages only once, as a chip used in peripherals for 1980s Czech computers.

Why The RP1 Is The Most Important Product Raspberry Pi Have Ever Made

We’ve had about a week to digest the pending arrival of the Raspberry Pi 5, and it’s safe to say that the new board from Cambridge has produced quite some excitement with its enhanced specifications and a few new capabilities not seen in its predecessors. When it goes on general sale we expect that it will power a slew of impressive projects in these pages, and we look forward with keen anticipation to its companion Compute Module 5, and we sincerely hope eventually a Raspberry Pi 500 all-in-one. It’s the latest in a line of incrementally-upgraded single board computers from the company, but we think it conceals something of much greater importance than the improvements that marked previous generations. Where do we think the secret sauce lies in the Pi 5? In the RP1 all-in-one PCIe peripheral chip of course, the chip which provides most of the interfacing on the new board. Continue reading “Why The RP1 Is The Most Important Product Raspberry Pi Have Ever Made”

Can A $3200 Kit Convert Your Car To Electric Power?

Whether hardcore petrolheads like it or not, we appear to be living through the final years of the internal combustion engine. In many countries there are legislative timetables in place for their eventual phasing out, and even those which remain in production are subject to ever more stringent emissions legislation. If there’s a problem with the EVs with which we’re expected to replace our fossil fuel vehicles it’s the cost, those things are still very expensive. An Aussie student has an interesting idea that’s won the James Dyson Prize: a low cost conversion for existing vehicles that bolts onto their rear wheel hubs.

Electric conversion of fossil fuel cars is nothing new, indeed we’ve brought you news of units designed to replace the original engine and transmission. Neither are wheel hub motors new, but the difference with this system is that it doesn’t require significant mechanical modification to the vehicle. It retains the old engine, and this motor sits inside each rear wheel.

It almost seems too good to be true, but a closer reading shows the rotor bolted on one side to the old wheel hub and on the other side to the wheel. The stator meanwhile is bolted to the existing brake caliper mountings. This would lead to a slightly wider track and a greater unsprung weight, but we can see that it would work. Besides the motor there’s a battery pack for the spare wheel well and a set of electrically-powered systems to supply the brake servo vacuum and other services. The idea is that this whole kit could be fitted for 5000 Australian dollars, which is somewhere south of $3200 USD. It’s not perfect and it still involves hauling around the dead weight of an unused engine, but we can see it might still have a niche. If, and that’s a big if, it ever makes it to market, that is.

Making A Concrete Sign

While paging through the feed a few days ago our attention was caught by something a little away from the ordinary in Hackaday terms, a DIY video about creating cast concrete signage from [Proper DIY] which we’ve placed below the break. A deceptively easy-looking mould-making process has a few tricks that  will make the difference between a hard-wearing sign that lasts for years, and a lump of concrete.

So, to make a cast concrete sign, you throw together a mould with some letters, and chuck in some concrete? Not so fast, because the key appears to be preparation, and ensuring that there are no 90-degree corners on the mould parts. The letters are carefully shaped and sealed with varnish before being attached to the mould with silicone adhesive, and all the corners are beveled. Finally a light oil is used as a release agent, and hefty vibration takes care of any air bubbles.

The result is a set of signs, but we can see these techniques finding uses outside signage. For example, how about casting using a 3D printed mould?

Continue reading “Making A Concrete Sign”