A Pi Camera To Be Proud Of

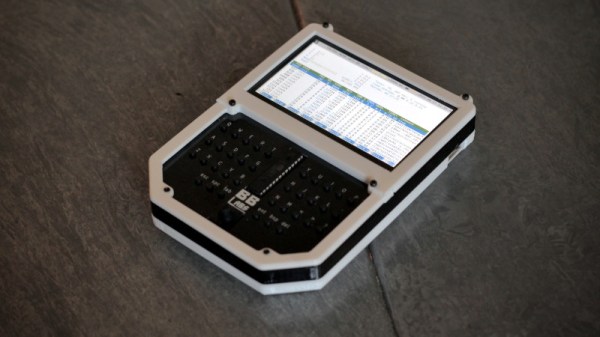
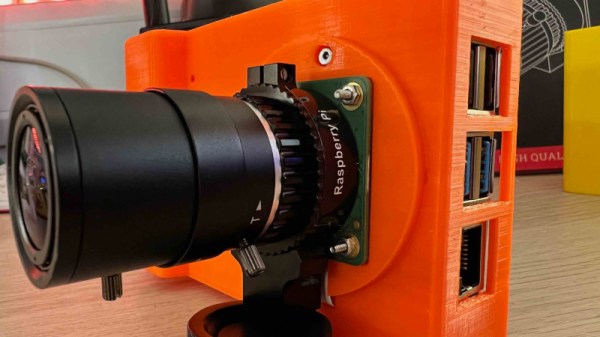
The Raspberry Pi HQ camera has appeared in a variety of builds since its introduction back in 2020, and has brought with it many opportunities for photographic projects to compete with the professionals. The latest we’ve been sent is from [Kevin McAleer], who has taken the camera with a full-size Pi and clothed it in a case very similar to the crop of mirror-less compact cameras.

Inside the box is a Waveshare touchscreen that fits on the GPIO header, and a NanoWave 5000 mAH USB battery pack. The camera module fits on the front of the unit, with the C-mount ready to take a lens. Software is still a work in progress and is promised to be a Python script controlling the various camera programs. There are enough Pi camera projects for software to be a matter of choice and taste.

We like the form factor and we like the use of the very compact NanoWave battery, so we think this is a design with some possibilities. Perhaps a cover over the Pi ports might be of use though for general robustness in the face of everyday photography. The question remains though, whether it can come close to the performance of even a budget mirror-less compact camera, and we’re guessing that will depend as much on the operator skill, lens quality, and software capabilities as it does on the Pi HQ module. We look forward to seeing what comes of this project, but meanwhile you can see a video with all the details below the break.

Continue reading “A Pi Camera To Be Proud Of”

A Raspberry Pi Handheld Computer You Might Want To Use

Amid the many wonderful form factors being explored by the makers of cyberdecks, there’s one that’s emerged which harks back to an earlier generation of portable computers: the handheld pad with a keyboard. These units are typically around the size of a hardback book, with the upper half being a screen and the lower a keyboard. The latest to come our way is from [Richard Sutherland], and it’s a very tidy pad computer indeed.

Inside the well-designed layered 3D printed case is the frequently-chosen Raspberry Pi 4, along with a PiSugar power supply board and 5,000 mAH battery and a 4.3″ touchscreen display. The keyboard has seen a lot of care and attention, featuring high-quality tactile switches that follow the Miryoku keyboard layout. He says it’s a thumb-typing keyboard, but anyone looking for more can either adapt the design to their liking or simply plug in an external board when faster typing is needed.

We like the pad computer trend as it offers useful computing power in a far more convenient format than a laptop, and we think this is a particularly nice one. It would be nice to see where people take this design, and who knows, we might give one a try for writing some Hackaday articles. If you’d like to see more pad computer goodness, we recently showed you one built in the shell of a classic Amstrad.

You Paid For This Paper. Now You Can Read It Without Paying Again

There is probably very little among the topics covered here at Hackaday that doesn’t have its roots somewhere in scientific research. Semiconductor devices for example didn’t simply pop into being in Bell Labs or Texas Instruments, the scientists and engineers who created them did so standing on the shoulders of legions of earlier researchers who discovered the precursor steps that made them possible. As many readers will know, scientific research for its own sake is expensive, so much so that much of it is funded by governments, from your taxes. The research papers with the findings are then hidden from public view behind paywalls by the publishers who distribute them, an injustice which should soon be over for Americans, thanks to a White House memorandum paving the way for federally funded research to be freely available to the public at no cost by no later than 2025.

The academic publishing business originates in the days when paper was king, and it has several tiers. Officially an academic journal is usually the product of a professional body in its field, but it is normal for the publishing itself to be contracted out to a specialist academic publishing company. They accept submissions of papers, edit them, and arrange peer reviewers, before publishing the journals. Originally this was a paper process, but while journals are still printed it’s the Internet through which they are now read. The publishers pay nothing to the researcher for their paper and often only a nominal sum to the reviewers for their input, but charge a hefty subscription for access to the content. As you might imagine it’s an extremely lucrative business, so as this Hackaday scribe saw when she worked in that industry, the publishers and the learned bodies are in no hurry to kill their golden goose.

This move to open access may make few immediate waves outside the world of scientific publishing, but it affirms the principle that taxpayers should be able to see the fruits of their spending. As such it will be of benefit to less-well-off researchers and institutions worldwide. Rest in peace Aaron Swartz, if only you could have seen this day!

White House pic: Matt H. Wade, CC BY-SA 3.0.

Buy The Right To Build A Nakagin Tower Anywhere

We’re guessing that among Hackaday’s readership are plenty of futurists, and while the past might be the wrong direction in which to look when considering futurism, we wouldn’t blame any of them for hankering for the days when futurism was mainstream.

Perhaps one of the most globally iconic buildings of that era could have been found in Tokyo, in the form of the Nakagin Capsule Tower, Kisho Kurokawa’s 1972 Metabolist apartment block. This pioneering structure, in which individual apartments were conceived as plug-in units that could be moved or changed at will, never achieved its potential and was dismantled, looking more post-apocalyptic than futuristic in early 2022, but it could live on in both digital form and reconstructed elsewhere as the rights to its design are being auctioned.

Unfortunately there appears to be some NFT mumbo-jumbo associated with the sale, but what’s up for auction is a complete CAD model along with the rights to build either real or virtual copies of the building. It’s unlikely that any Hackaday readers will pony up for their own Metabolist skyscraper, but the interest lies not only in the love of a future that never quite happened, but in the engineering behind the structure. Where this is being written as in many other places there is simultaneously a chronic housing shortage and a housing system wedded to the outdated building techniques of a previous century, so the thought of updated equivalents of the Nakagin Tower offering the chance of modular interchangeable housing in an era perhaps more suited to it than the 1970s is an intriguing one. Now that we’re living in the future, perhaps it’s time to give futurism another chance.

Regular readers will have spotted this isn’t the first time we’ve brought you a taste of futuristic living.

Header: Svetlov Artem, CC0.

Telephoto Lens Without The Fiscal Pain

If you’re in the market for a telephoto lens, the available range of optics for your camera is limited only by the size of your bank account. So when [Pixels and Prisms] promises a telephoto for $13 USD it has to be worth a second look, right? Where’s the catch.

The lens has a 3D printed shell containing the optics, with associated focusing and aperture, and has a mount designed for Canon cameras to give a result with 163 mm focal length and f/2.5 . When a Canon lens costs many times more it’s evident that there is some compromise involved, and it comes in the lens system being very simple and comprised of off-the-shelf surplus lenses without the great effort put in by the manufacturer to correct distortion. The result is nonetheless a very creditable lens even if not the first choice for a paparazzo in pursuit of an errant politician.

The real interest for us in this open source project comes in it being something of an experimenter’s test bed for lenses. There’s no need to use the combination shown and the design can be readily adapted for other lenses, so spinning one’s own lens system becomes a real possibility. Plus it’s achieved the all-too-easy task of engaging a Hackaday writer’s time browsing the stock of the Surplus Shed.

We’ve featured a lot of lens projects over the years, but they more often take an existing camera lens as a starting point.

An ASCII Terminal Like It’s 1974

It’s quite probable that any of you who have built a keyboard will have done so using a matrix of keys connected to a microcontroller, or if you are old-school, a microprocessor. A CPU can scan the keyboard matrix with ease, and pass whatever is typed either to whatever software it is running, or to a host computer. There was a time however when available CPUs were not considered powerful enough to do all this and also perform a useful task, so a keyboard would have its own decoder chip that would output ASCII over a parallel interface. It’s an era [John Calhoun] harks back to with Adam74, a little ASCII terminal which takes its input from that 7-bit parallel port.

In the place of a forest of TTL chips which might have graced the originals, within that attractive curved laser cut acrylic case is an LCD display and a Teensy microcontroller board. There’s a level shifter for the classic 5 volt logic, and of course a small buzzer for the essential BEL character. In these days when a parallel interface is relatively rare, he describes the rediscovery of alternate earth lines in a ribbon cable to minimize cross-talk. Should you wish to try your own, everything can be found on GitHub.

All in all it’s a fun way to rediscover an old idea.

Why Didn’t We Think Of Making A Remote Trigger Button?

One of the many functions a digital oscilloscope offers over its analog ancestors is a trigger button. Alongside the usual electronic means of triggering the instrument, you can reach over and press a button to “freeze-frame” the action and preserve the trace. Sometimes doing it repeatedly it can become a chore to reach for the ‘scope. That’s where [Kevin Santo Cappuccio]’s remote trigger button comes in.

The button itself is about as simple a hack as it gets. The ‘scope was carefully dissected and some fine wires laid from the contacts within the front panel to a connector on the case. From there a cable goes to a box with a momentary action button switch. Plug in the box, and you can trigger the ‘scope from a distance!

We have to admit to rather admiring this hack, as needing to trigger the ‘scope is a well-known problem here. It’s easy to stab the wrong button and lose what you are looking for, so we’re rather surprised we didn’t think of this one ourselves. But then again from another viewpoint, it involves dissecting an expensive instrument which is best left unmolested. Perhaps manufacturers should consider adding this functionality.

This may be the most straightforward oscilloscope hack we’ve shown you, but it’s certainly not the first.