How To Become A Lego Submariner

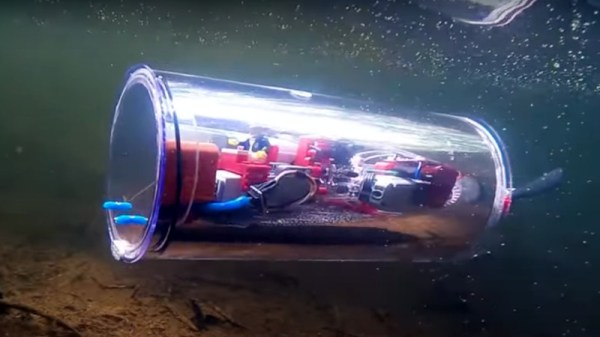
A submarine is by necessity a complex and safety-critical machine, but the principle upon which it depends is quite simple. The buoyancy is variable by means of pumping water in and out of tanks, allowing the craft to control the depth at which it sits. The [Brick Experiment Channel] has a series of posts describing in detail the construction of a working submarine, with a hull made from a plastic tube and mechanics made from Lego.

In this submarine the buoyancy tank is a syringe operated by a Lego motor, and the propulsion comes courtesy of a pair of Lego motors driven through ingenious magnetic couplings to avoid a shaft seal. To monitor depth there is both a laser distance sensor and a pressure sensor, and there is a Raspberry Pi Zero to control the whole show.

In the video below the break you can see the craft in action as it zips around a swimming pool at different depths, before setting off on a longer journey with on-board footage along a shady creek. It’s an extremely practical submarine, and one we wish we could try.

This is version 4.0, and it shows.  We had a look at version 3.0 last year, and it’s by no means the first submarine we’ve featured, here’s one made from PVC pipe.

Continue reading “How To Become A Lego Submariner”

Beautiful Inductors, Now Not Such A Lost Art

As ferrite technology has progressed into a mastery of magnetic permeability, the size of inductors has gone down to the point at which they are now fairly nondescript components. There was a time though when inductors could be beautiful creations of interleaving layers of copper wire in large air-cored inductors, achieved through clever winding techniques. It’s something that’s attracted the attention of [Brett], who’s produced a machine capable of producing something close to the originals.

Part of the write-up is an investigation of the history, these coils were once present even at the consumer level but are now the preserve of only a few highly secretive companies. They are still worth pursuing though because they can deliver the high “Q” factor that is demanded in a high quality tuned circuit. The rest of the write-up dives in detail into the design of the wire feeder, and the Arduino motor control of the project. There should be enough there for any other experimenters to try their hands at layered inductors, so perhaps we’ll see this lost art make a comeback.

Custom coils are a regular requirement for anything from radios, to musical instruments, to switching power supplies, so it’s not surprising that quite a few projects featuring them have made it here. One of the more unusual of late has been one that winds toroids.

A Home Made Sewing Machine May Be The Only One

The sewing machine is a tool that many of us will have somewhere around our workshop. Concealed within it lies an intricate and fascinating mechanism. Some of us may have peered inside, but very few indeed of us will have gone to the effort of building our own. In case you had ever wondered whether it was possible, [Fraens] has done just that, with what he claims may be the only entirely homemade sewing machine on the Internet.

If you’ve ever studied the history of sewing machines you’ll notice that it bears a striking resemblance to some of the earliest commercial machines, with a relatively short reach and an entirely open construction. The main chassis appears to be laser-cut acrylic while all the fittings are 3D-printed, with machined brass bushes and aluminum rods for the other metal parts. The design utilizes a hand crank, but is also pictured with a DC motor. It makes for a fascinating illustration of how sewing machines work. Sadly we can’t see any design file links (Update: He’s contacted us to tell us they’re now on Thingiverse.), so you might have to be inventive if that’s the way you want to build your own. Take a look at it in the video below the break.

Fancy a sewing machine but don’t fancy making your own? We’ve got the guide for that, and for filling the rest of your textile bench.

Continue reading “A Home Made Sewing Machine May Be The Only One”

A No-Calibration Metal Detector

A traditional early project for someone discovering a love for electronics has been for many years a metal detector. This would mean a few transistors back in the day, but today it’s more likely to involve a microcontroller. [Mircemk] has an example that bends both worlds, with a single transistor oscillator and an Arduino.

This type of metal detector has a large search coil which forms part of the tuned circuit in an oscillator. As a piece of metal enters its range the frequency of oscillation changes. In the old days, this would have been detected as an audible beat frequency with another oscillator. This design would require a calibration step at the start of detecting, to tune the two oscillators to the same frequency.

This detector keeps the first oscillator but eschews the second one in favor of an Arduino. The microcontroller acts as a frequency counter, monitoring the frequency and issuing an alarm when it detects a change likely to be caused by a piece of metal. It may not have some of the finess a human ear could apply to a beat frequency in the all-analogue days, but it’s simple enough to build and it avoids the need for calibration. Seeing it in the video below the break we’re sure that just like those transistor models old, there will be plenty of fun to be had with it.

An Arduino may be one of the current go-to parts, but will it ever displace the 555? Perhaps not in the world of metal detectors!

Continue reading “A No-Calibration Metal Detector”

It’s Linux. On An ESP32

By today’s standards, the necessities for running a Linux-based operating system are surprisingly meagre in terms of RAM and processor power. Back in the day we ran earlier Linux versions on Intel 386 and 486 machines with tiny quantities of memory compared to the multi-gigabyte many-core powerhouses we do today.

So it stands to reason that many of the more powerful microcontrollers should also run Linux, but of course they are often unable because the lack a memory management unit. The original ESP32 is just such a candidate, plenty of power but unable to run Linux. Not so fast, because [Dror Gluska] has managed to boot a Linux kernel on Espressif’s dual-core chip. How on earth? By emulating a RISC-V processor on it and booting a RISC-V version of the kernel.

The emulator in question is [Fabrice Belard]’s TinyEMU, a piece of software that brings both RISC-V and x86 to limited-spec platforms, and the write-up describes the extensive optimization and tracing of ESP32 bottlenecks which was finally able to get a Linux kernel booting in 1 minute and 35 seconds. Of course it’s simply an exercise to prove it can be done and we won’t be seeing Linux-based ESP projects any time soon, but it’s still an impressive piece of work.

This isn’t the lowest-spec microcontroller we’ve seen run Linux, back in 2012 we saw it on emulated ARM running on an 8-bit AVR.

CP/M Is Now Freer Than It Was

It’s easy to think of the earlier history of desktop computing operating systems in terms of DOS, Windows, and Mac OS with maybe a bit of AmigaOS, TOS, or RiscOS thrown in. But the daddy of desktop computing, the OS that put word-processors and spreadsheets in 1970s offices and had a huge influence on what followed, isn’t among that list. Digital Research’s CP/M ran initially on Intel 8080-based machines before losing out to MS-DOS as IBM’s choice for their PC, and then gradually faded away over the 1980s. Its source has been available in some form with a few strings for a long time now, but now we have confirmation from Digital Research’s successor company that it’s now available without restrictions on where it can be distributed.

For years it was something an operating system that had been bypassed by the hardware and hacker communities, as the allure of GNU/Linux was stronger and most available CP/M capable machines were also 1980s 8-bit gaming platforms. But with the more recent increased popularity of dedicated retrocomputing platforms such as the RC2014 it’s become a more common sight in our community. Brush up your command line skills, and give it a go!

Header: Michael Specht, CC BY-SA 3.0.

A Guitar From Scratch

You can pursue your dreams of rock superstardom with any guitar, be it from an expensive luthier, a pawn shop, or a mail order catalog. But to join the ranks of rock greats there’s one way to have a truly special instrument, which is to build it yourself. [Bensoncraft] may not be [Bryan May]’s dad or indeed [Eddie van Halen], but he has at least joined the exclusive ranks of home made guitar builders with his video “Guitar from scratch: hard mode“.

It’s a fairly long video and we’ve placed it below the break, but a compelling one as we learn just how many operations go into making an electric guitar. When he says hard mode he’s not joking, there are no pre-made parts save for the strings and he’s not following a set of plans. Everything including the tuners and pickups are made from scratch, but for a non-guitar-player it’s she sheer number of different pieces of wood that go into making the solid body and neck of the instrument that’s so interesting. Even if you’ll never make a guitar you should watch it.

We’ve never seen a guitar build quite like this one before, but we have brought you a 3D printed guitar body, and neck.

Continue reading “A Guitar From Scratch”