It’s An LED Cube, But Maybe Not Quite What You Were Expecting

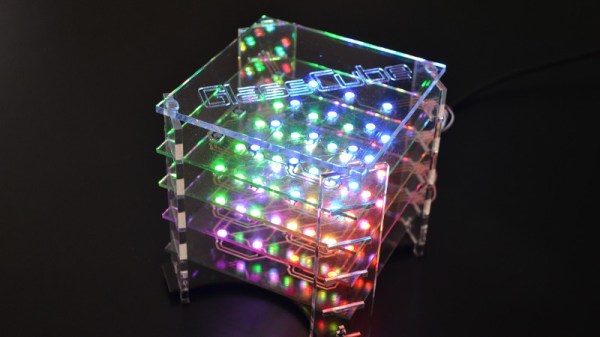
LED cubes are a pleasing ornament and still something of a talking point, but now they have reached the point of being available as inexpensive kits from China. The simpler ones don’t have quite the cachet they used to. It’s still a project that can deliver a few surprises though, as [Moritz v. Sivers] shows us very well with his glass LED cube. Instead of the usual wire frame construction he’s employed a novel technique of applying each layer of WS2812 LEDs to its own glass PCB.

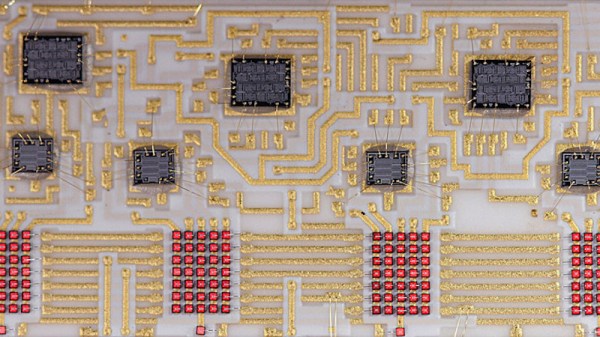
The PCBs are created with self-adhesive copper foil, cut out with a CNC cutter and painstakingly transferred to the glass substrate with the help of a piece of transfer paper. The LEDs are soldered on, and once each board has been tested they are mounted in the manner of a toast rack to laser cut acrylic corner pieces. There are four layers of 16 LEDs each, which might not make for the largest cube, but still makes for a respectable show. The addressable LEDs take it a level above the 3D matrix type of cube with which you might already be familiar, and the extra time required to load each value into them doesn’t seem to slow the display down.

There are a couple of videos we’ve placed below the break, one showing it in action and the other taking us through the build process. This last one should provide plenty of inspiration for anyone with an interest in creating this type of PCB on glass or any other unusual substrate. Continue reading “It’s An LED Cube, But Maybe Not Quite What You Were Expecting”

Teardown And Analysis Of A Cheap Solar Lamp

If you walk the aisles of a dollar store one constant that you will see worldwide is the Chinese solar lamp. Your dollar gets you a white LED behind plastic, mounted on a spike to stick into the ground, and with a solar cell on top. It charges in the sunlight during the day and then lights the LED for a few hours at nightfall. They are in gardens everywhere, and no doubt landfill sites are full of them because they do not last very long. [Giovanni Bernardo] had one that stopped working, so he subjected it to a teardown to find out what was up, and what made it tick (Italian, Google Translate link).

As expected, the culprit proved to be a leaking and corroded 1.2 volt NiMh cell, and its replacement with an AA cell brought the lamp back to life. But the interesting part of this tale comes from his teardown and analysis of the lamp’s components. It’s centered around a YX8016 battery charger and power management chip. The device has an amazing economy of design with only four components including the solar cell and the LED. The final component is a small inductor that forms part of the boost converter to keep the LED lit as the battery voltage falls. The chip switches at 580kHz, and produces a 3.2 volt supply.

If this is a subject that interests you, don’t forget to take a look at the power harvesting challenge we ran a while back.

Light The Way To Every Component

How do you organize your stock of components and modules? If an unruly pile of anti-static bags and envelopes from China stuffed into a cardboard box sounds familiar, then you need help from [Dimitris Tassopoulos]. He’s organized his parts into drawers and created a database, then linked it via an ESP8266 and a string of addressable LEDs to light up the individual drawer in which any given component resides. It’s a genius idea, as you can see in action in the video below the break.

Behind the scenes is a web server sitting atop an SQL database, with a PHP front end. It’s running on a Banana Pi board, but it could just as easily be running on any other similar SBC. The ESP8266 has a REST API to which the webserver connects when a component is sought, and from that it knows which LED to light.

The LED strip is not the tape with which most readers will be familiar, but a string of the type we might be more used to as Christmas lights. These have a 100mm spacing between LEDs, allowing them to be easily positioned behind each drawer. The result is a very effective parts inventory system. We’re not entirely sure that it would entirely banish the tide of anti-static bags here, but we’re impressed nevertheless.

Continue reading “Light The Way To Every Component”

Tracking Cancer Treatment With An ESP8266-Based Radiation Sensor

Those of us who have not been in that position can only imagine the anguish of learning that your teenager has cancer. This happened to [Rob], whose child was diagnosed with papillary thyroid cancer. It’s a condition that can be treated with surgery followed by a course of radioactive iodine to kill any remaining cancer cells. During iodine treatment, the patient is radioactive enough that other people must maintain a distance of 3m from them, and as a learning exercise for both father and teen he created and refined the design of a portable wireless radioactivity monitor.

There are a variety of sensors for radiation monitoring including the well-known Geiger–Müller tube, but he settled on a PIN photodiode based sensor supplied by radiation-watch.org. This sensor is not at its most sensitive at the energy levels emitted by the iodine isotope used in the treatment, but the relatively high intensity of the radiation meant that enough would register for a useful reading to be taken. The sensor board he was mated to an ESP8266 module. [Rob] went through three iterations of the balance of the hardware before settling on a lithium-ion battery and a plastic case.

On the software side, the ESP connects to an MQTT server, from which a CSV file of data is derived. On a computer, the CSV data is collected and plotted to a graph. The data take during treatment clearly shows the reduction in radiation following the isotope’s half-life. The graph isn’t perfect though, there is a gap due to the second prototype’s batteries running flat

From his epilogue it appears that his son has recovered, and we wish them further good health. The details have been published in the hope that other young people facing the same trial might benefit from building their own radiation monitor.

Review: Testdriving LibrePCB Shows That It’s Growing Up Fast

There are a host of PCB CAD tools at the disposal of the electronic designer from entry-level to multi-thousand-dollar workstation software. It’s a field in which most of the players are commercial, and for the open-source devotee there have traditionally been only two choices. Both KiCad and gEDA are venerable packages with legions of devoted fans, but it is fair to say that they both present a steep learning curve for newcomers. There is however another contender in the world of open-source PCB CAD, in the form of the up-and-coming LibrePCB.

This GPL-licensed package has only been in development for a few years. LibrePCB brought out its first official release a little over a year ago, and now stands at version 0.1.3 with builds for GNU/Linux, Windows, MacOS, and FreeBSD. It’s time to download it and run it through its paces, to see whether it’s ready to serve its purpose.

Continue reading “Review: Testdriving LibrePCB Shows That It’s Growing Up Fast”

A Kill Cord To End Laptop Skulduggery

In our community it is common for ancient laptops to be used way beyond their usual service life, held together by stickers and lovingly upgraded to their maximum capabilities. We hope it’s unusual for such a venerable machine to be stolen, but it seems that grab-and-run thefts are very much a thing for owners of much shinier hardware. [Michael Altfield] has a solution to this problem, in the form of a kill cord that when broken by the crook making off with the loot, triggers a set of scripts that can wipe the device or otherwise make it useless.

Hardware-wise it’s simple enough, a USB magnetic breakaway adapter and a USB extension cable to a drive clipped to the laptop owner’s belt. On the software side it’s as straightforward as a udev rule to launch the disaster script of your choice. Perhaps you could link it to something like a glitter bomb and fart spray. But we can’t help worrying that it might be too easy to get up and accidentally detach yourself from the laptop, making it deploy whatever anti-theft measure you’d installed in error. If this goes some way to reducing theft though, it has to be worth a second look.

Thanks [bluewraith] for the tip.

A Strange Display Gives Up Its Secrets

Providing a display for a project in 2020 is something of a done deal. Standard interfaces and off-the-shelf libraries for easily available and cheap modules mean that the hardest choice you’ll have to make about a display will probably relate to its colour. Three decades ago though this was not such a straightforward matter though, and having a display that was in any way complex would in varying proportion take a significant proportion of your processing time , and cost a fortune. [AnubisTTP] has an unusual display from that era, a four-digit LED dot matrix module, and the take of its reverse engineering makes for a fascinating read.

The LITEF 104267 was made in 1986, and is a hybrid circuit in a metal can with four clear windows , one positioned over each LED matrix. Inside are seven un-encapsulated chips alongside the LED matrices on a golf plated hybrid substrate. The chips themselves are not of a particularly high-density process, so some high-resolution photography was able to provide a good guess at their purpose. A set of shift registers drive the columns through buffers, while the rows are brought out to a set of parallel lines. Thus each column can be illuminated sequentially with data presented on the rows. It’s something that would have saved a designer of the day a few extra 74-series chips, though we are guessing at some significant cost.

This display may seem antiquated to us today, but it wasn’t the only option for 1980s designers. There’s one display driver from back then that’s very much still with us today.