Bicycle Seismograph Measures The Streets

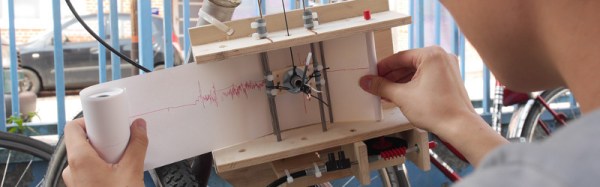
Riding the streets of the Netherlands on a bicycle is a silky-smooth experience compared to doing the same on those of Germany. So says [Kati Hyyppä], who made the move with her trusty Dutch bike. The experience led her to record the uneven cobblestones and broken asphalt of the German roads on a home-made seismograph, a paper chart recorder driven by the bike’s motion and recorded upon by a pen free to vibrate as it passed over any bumps.

The resulting instrument is a wooden frame with a ballpoint pen mounted in a sliding holder weighted with some washers and kept under some tension with elastic bands. The paper roll is driven from the motion of the bike by the drive from a mechanical speedometer feeding a set of FischerTechnik gears, and the whole unit is suspended from the crossbar.

You can see it in action in the video below the break, and if you would like to build one yourself she has put the project up on Instructables as well as posting the description linked above.

Continue reading “Bicycle Seismograph Measures The Streets”

Altitude Controlled LED Jacket Changes Color As You Climb

When your climbing gym throws a “glow in the dark” party, how can you stand out? For [Martijn], the answer was obvious. He made a jacket adorned with 32 WS2812 addressable LEDs whose color is addressable depending on the altitude to which he has climbed.

The build is centered on an Arduino Pro Mini with a barometric sensor and an NRF24L01 for radio communications. A pair of pockets contain AA batteries for power, and he’s all set to climb. A base station Arduino with the same set-up transmits an up-to-the-minute reading for ground level temperature, which is compared to the local reading from the barometric sensor and used to calculate a new color for the LEDs. A Kalman filter deals with noise on the pressure reading to assure a stable result. Arduino sketches for both ends are provided on the project’s Hackaday.io page.

The LEDs are mounted on the jacket’s stretch fabric with an excess of  wire behind the scenes to cater for the stretch. You can see the resulting garment in the short YouTube video below the break.
Continue reading “Altitude Controlled LED Jacket Changes Color As You Climb”

Make Your Own Simple VHF Tuning Capacitor

If you enjoy building radio projects you may have noticed something slightly worrying over the last few years in your component supply. Variable capacitors are no longer as plentiful as they used to be. There was a time when all radio receivers contained at least one, now with the advent of the varicap diode and the frequency synthesiser the traditional tuning capacitor is a rare breed. They are still made, but they’re not cheap and they won’t appear so readily in your junk box any more.

Fortunately a variable capacitor is a surprisingly simple device, and one you can make yourself if you are of a mind to do so. [Patrick] did just that with his home-made capacitor, in this case of a few tens of pF and suitable as a low-power trimmer capacitor or in a single-chip FM radio.

Rather than make a set of interlocking vanes as you’d find in a commercial design, he has gone for a screw in a tube. The capacitance is set by the length by which the screw is inserted into the tube. And his tube is not a tube in the traditional sense, instead he has used a coil of enamelled copper wire wound on the screw thread, whose insulation forms the dielectric. It looks wrong to use a coil in this way as you’d expect a similar coil to form the inductive part of a tuned circuit, but this coil is shorted out to prevent its inductance becoming a factor at the frequency in question.

It’s evidently not the answer to all variable capacitor problems, but it’s a neat piece of lateral thinking and it will make a simple working capacitor from readily available parts.

We’ve featured a couple of more traditional style home-made variable capacitors in the past on these pages, one made from thin aluminium sheet cut with scissors, and another one designed for use in higher power transmitters.

Thanks [PeterF] for the tip.

From Project To Kit: After The Sale

However you sell your kits online, you’ll have to find a means of shipping them to the customer. For an online operation this unseen part of the offering is more important than any other when it comes to customer satisfaction, yet so many large players get it so wrong.

This is the final article in a series looking on the process of creating and selling a commercial kit from a personal electronic project (read all the posts in this series). We’ve looked at the market, assembling the kit and its instructions, and how to set up an online sales channel. In this part we’ll look at what happens when you’ve made the sale, how to get it safely to the customer and how to keep the customer happy after the sale by offering support for your products. We’ll also give a nod to marketing your site, ensuring a fresh supply of customers.

Continue reading “From Project To Kit: After The Sale”

How I²C EEPROM Talks To The Bus

You will probably be familiar with I²C, a serial bus typically used for not-very-fast communication with microcontroller peripherals. It’s likely though that unless you are an I²C wizard you won’t be intimately familiar with the intricacies of its operation, and each new device will bring a lengthy spell of studying data sheets and head-scratching.

If the previous paragraph describes you, read on. [Clint Stevenson] wrote a library for interfacing I²C EEPROMs to Arduino platforms, and when a user found a bug when using it on an ATtiny85, he wrote up his solution. The resulting piece is a clear explanation of how I²C EEPROMs talk to the bus, the various operations you can perform on them, and the overhead each places on the bus. He then goes on to explain EEPROM timing, and how since it takes the device a while to perform each task, the microcontroller must be sure it has completed before moving to the next one.

In the case of [Clint]’s library, the problem turned out to be a minor incompatibility with the Arduino Wire library over handling I²C start conditions. I²C has a clock and a data line, both of which are high when no tasks are being performed. A start condition indicates to the devices on the bus that something is about to happen, and is indicated by the data line going low while the clock line stays high for a while before the clock line starts up and the data line carries the I²C command. He’s posted samples of code on the page linked above, and you can find his library in his GitHub repository.

If you want to know more about I²C, take a look at Hackaday Editor [Elliot Williams’] masterclasses on the subject: What could go wrong, I²C edition, and Embed With Elliot, I²C bus scanning.

Serial EEPROM die picture, By Epop (Own work) [CC0], via Wikimedia Commons.

Tricking Duck Hunt To See A Modern LCD TV As CRT

A must-have peripheral for games consoles of the 1980s and 1990s was the light gun. A lens and photo cell mounted in a gun-like plastic case, the console could calculate where on the screen it was pointing when its trigger was pressed by flashing the screen white and sensing the timing at which the on-screen flying spot triggered the photo cell.

Unfortunately light gun games hail from the era of CRT TVs, they do not work with modern LCDs as my colleague [Will Sweatman] eloquently illustrated late last year. Whereas a CRT displayed the dot on its screen in perfect synchronization with the console output, an LCD captures a whole frame, processes it and displays it in one go. All timing is lost, and the console can no longer sense position.

[Charlie] has attacked this problem with some more recent technology and a bit of lateral thinking, and has successfully brought light gun games back to life. He senses where the gun is pointing using a Wiimote with its sensor bar on top of the TV through a Raspberry Pi, and feeds the positional information to an Arduino. He then takes the video signal from the console and strips out its sync pulses which also go to the Arduino. Knowing both position and timing, the Arduino can then flash a white LED stuck to the end of the light gun barrel at the exact moment that part of the CRT would have been lit up, and as far as the game is concerned it has received the input it is expecting.

He explains the timing problem and his solution in the video below the break. He then shows us gameplay on a wide variety of consoles from the era using the device. More information and his code can be found on his GitHub repository.

Continue reading “Tricking Duck Hunt To See A Modern LCD TV As CRT”

Characterizing A Death Ray… Er, Solar Oven

Many of you will probably at some point have looked at a satellite dish antenna and idly wondered whether it would collect useful amounts of heat if you silvered it and pointed it at the sun. Perhaps you imagine a handy source of  solar-cooked hotdogs, or maybe you’re a bit of a pyromaniac.

[Charlie Soeder] didn’t just think about it, he did it. Finding a discarded offset-focus DirecTV dish, he glued a grid of 230 inch-square mirror tiles to it and set to investigating  the concentrated solar energy at its focus. 

Cotton waste, newspaper, and scraps of fabric char and burn with ease. A cigarette is lit almost from end to end, and it burns a hole right through a piece of bamboo. Most of the energy is in the form of light, so transparent or reflective items need a little help to absorb it from something dark. He demonstrated this by caramelizing some sugar through adding a few bits of charcoal to it, once the charcoal becomes hot enough to caramelize the sugar around it the spreading dark colour causes the rest of the sugar to caramelize without further help.

Solar furnace calculations

To gain some idea of the power of his solar furnace, he recorded a time series of temperature readings as it heated up some water darkened with a bit of charcoal to absorb heat. The resulting graph had a flat spot as a cloud had passed over the sun, but from it he was able to calculate instantaneous power figures from just below 30W to just below 50W depending on the sun.

He records his progress in the video you’ll find below the break. Will we be the only ones casting around for a surplus dish after watching it?

Continue reading “Characterizing A Death Ray… Er, Solar Oven”