Casting Machine Bases In Composite Epoxy

When you’re building a machine that needs to be accurate, you need to give it a nice solid base. A good base can lend strength to the machine to ensure its motions are accurate, as well as aid in damping vibrations that would impede performance. The problem is, it can be difficult to find a material that is both stiff and strong, and also a good damper of vibrations. Steel? Very stiff, very strong, terrible damper. Rubber? Great damper, strength leaves something to be desired. [Adam Bender] wanted to something strong that also damped vibrations, so developed a composite epoxy machine base.

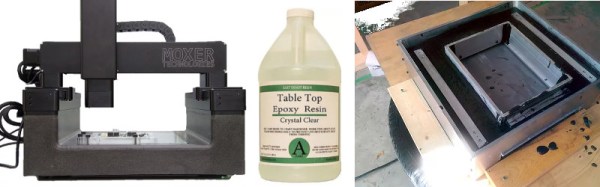
[Adam] first takes us through the theory, referring to a graph of common materials showing loss coefficient plotted against stiffness. Once the theory is understood, [Adam] sets out to create a composite material with the best of both worlds – combining an aluminium base for stiffness and strength, with epoxy composite as a damper. It’s here where [Adam] begins experimenting, mixing the epoxy with sand, gravel, iron oxide and dyes, trying to find a mixture that casts easily with a good surface finish and minimum porosity.

With a mixture chosen, it’s then a matter of assembling the final mould, coating with release agent, and pouring in the mixture. The final result is impressive and a testament to [Adam]’s experimental process.

We’ve seen similar builds before — like this precision CNC built with epoxy granite — but detail in the documentation here is phenomenal.

Printing Nintendo Portables With SLA

Downing] is no stranger to building portable consoles, employing all manner of techniques in the process. However, when it came time to start on this commission, [Downing] decided to take a different tack – employing a Form 2 SLA printer in this Nintendo 64 portable build.

Modifying home consoles to become portables often involves tricks like Frankencasing – hacking together original factory parts such as controllers, cases, and accessories, and using body filler and a lot of sanding to create a template for vacuum moulding, which then results in a seamless final product. It’s possible to get some really impressive results, but it does limit the builder to relying on existing parts.

By using the Form 2, [Downing] was able to take advantage of the SLA printer’s ability to create parts with good surface finish that would normally require a lot of post-print finishing when 3D printed with more common FDM technology. This was particularly useful as it allowed the creation of custom buttons and small parts that “just fit” – normally such parts are made from stock pieces that are then modified.

The build also features a few other cool features – there’s a breakout box which allows the connection of extra controllers, as well as hosting AV out for hooking up to a television. The breakout box connects to the portable over an HDMI cable. It’s a tidy choice – it’s a standard cable that has an abundance of conductors available so you don’t have to be particularly tricky to get 3 controllers and a few analog signals talking over it.

In the end, [Downing] wouldn’t use SLA printing again for the case itself – the process was too slow and expensive. In this respect, FDM may require more work after printing but it still comes out ahead in terms of time and money. But for small custom parts like buttons and structural brackets, the Form 2 is the machine for the job.

Video after the break.

Continue reading “Printing Nintendo Portables With SLA”

How To Play The Bass With Marbles

Stringed instruments make noise from the vibrations of tuned strings, using acoustic or electronic means to amplify those vibrations to the point where they’re loud enough to hear. The strings are triggered in a variety of ways – piano strings are hit with hammers, guitar strings are plucked, while violin strings are bowed. Meanwhile, [Martin] from the band [Wintergatan] is using marbles to play a bass guitar.

[Martin] starts out with a basic setup. The bass guitar is placed on the workbench, while a piece of wood is taped to a tripod. The wood has a hole drilled through it, and marbles are dropped through the aperture in an attempt to get them to land on the string. Plastic containers are used to easily alter the angle the bass guitar sits at, relative to the bench, while an acrylic guide sits around the string to try to guide the marbles in the desired direction. These guides are important to make sure the marbles hit the top of the string, and bounce cleanly in the desired direction afterwards.

The initial setup is too inconsistent, so [Martin] places a notch in the wood and builds a lever system to hold the marbles and then release them in a controlled manner. [Martin] then checks that the system works by analysing footage of the marble drop with slow motion video.

The video covers the CAD design of an eight-slot guide so the four strings of the bass can be played more rapidly than in their previous build. Two guides per string allow each string to play two notes in quick succession without having to worry about marble collisions from playing too quickly.

It’s a great build, and we’ve seen [Wintergatan]’s work before – namely, the incredible build that was the original Marble Machine.

Thanks to [Tim Trzepacz] for the tip!

Replica Fallout Terminal

If you’ve played Fallout 4, you’re familiar with the wall-mounted terminals in the game. They’ve got a post-apocalyptic aesthetic and the glowing green screen that calls out to anyone that grew up with computers and hacker movies from the 80s and 90s. Remember the first time you set your command line text to green? Don’t be embarrassed, we were all young once.

[PowerUpProps] liked the Fallout terminal so much they developed a replica. It’s a build that leans heavily on maker standards, a Raspberry Pi and 3D printing form the basis of the terminal. With ready access to such powerful tools, it makes starting such a project much more approachable. The key to the success of this build is the fine attention to detail in the finishing – the paint job looks incredible, and when photographed appropriately, it could be mistaken for the real thing an in-game screenshot.

An interesting touch is the use of a dark green acrylic window in front of the LCD, which gives the display a tinted hue. We’d like to see this compared with a clear glass window with a classic fishbowl curve to it, combined with greening up in software. The creator readily admits that this looks great at the command line, but is somewhat of a letdown when using the GUI.

Perhaps the only thing the prop build could use is some sort of user interface — the keyboard is only 3D printed and there’s no mouse or other pointing device included. There are some creative solutions to this problem, which we often see in other Fallout projects, like the ever popular Pip-Boy replica builds.

[Thanks to Sjoerd for the tip!]

Magsafe 1 To Magsafe 2 The Cheap Way

[Klakinoumi] wanted to use their Magsafe 1 charger from 2007 with their newer Macbook Pro Retina from 2012 — but it had a Magsafe 2 port. There were a few options on the table (buy an adapter, buy a new charger, cry) but those wouldn’t do. [Klakinoumi] went with the brute force option of grinding a Magsafe 1 charger to fit Magsafe 2.

Based on the existence of passive adapters that allow Magsafe 1 chargers to work with newer laptops, we’d assume that the older chargers are probably electrically similar to the newer models. That said, it’s not our gear and we’d definitely be checking first.

With that out of the way, it’s a simple enough modification — grind away the Magsafe 1’s magnet until it fits into a Magsafe 2 port. It really is that easy. The spring-loaded pins all seem to line up with the newer port’s pads. [Klakinoumi] reports it worked successfully in their tests with 2012, 2014 and 2015 Macbooks but that it should be attempted at your own risk — good advice, as laptops ain’t cheap.

When doing this mod, consider taking care not to overheat the connector during grinding. You could both melt plastic parts of the connector, or ruin the magnet by heating it past its Curie point.

Interested in the protocol Magsafe speaks over those little golden pins? Find out here.

Adding Buttons To The ESP-12 – The Cheat Way

[sorki] had an ESP-12F and wanted to play with nodeMCU, but found they were lacking buttons for reset & flash. We’ve all been there – mucking about with a project on a breadboard, trying to save the time required to solder up a button by shorting pins with wire or bending component legs to touch. This either doesn’t work or ends up bricking the microcontroller when it inevitably goes wrong. [Buger] found a tidier solution to adding buttons to the ESP-12F with the minimum of effort.

It’s the spirit of deadbug applied to buttons. One side of a piece of wire is soldered to the pin needing to be pulled down. Component leg offcuts are ideal for this. The other end of the wire is bent up and left to float over the metal shield of the ESP-12, which is connected to ground. When you want the pin to go low, press the wire into the shield, grounding it. Let it go, and the pin returns high again, assuming your pullup resistors are all in order.

It’s a quick hack that’s much more robust than trying to hold two ends of a piece of hookup wire in place. It’s also still easier than trying to find a tactile switch solder leads to, and you don’t end up having it hanging off the board either.

For deadbug construction taken to an impressive conclusion, check out this clock built out of discrete components.

[Thanks to Richard Marko for the tip!]

The Hard Way Of Cassette Tape Auto-Reverse

The audio cassette is an audio format that presented a variety of engineering challenges during its tenure. One of the biggest at the time was that listeners had to physically remove the cassette and flip it over to listen to the full recording. Over the years, manufacturers developed a variety of “auto-reverse” systems that allowed a cassette deck to play a full tape without user intervention. This video covers how Akai did it – the hard way.

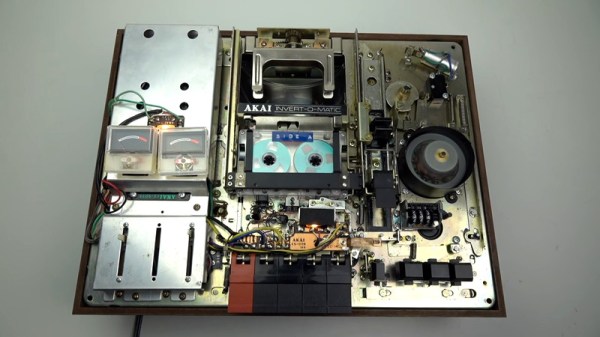
Towards the end of the cassette era, most manufacturers had decided on a relatively simple system of having the head assembly rotate while reversing the motor direction. Many years prior to this, however, Akai’s system involved a shuttle which carried the tape up to a rotating arm that flipped the cassette, before shuttling it back down and reinserting it into the deck.

Even a regular cassette player has an astounding level of complexity using simple electromechanical components — the humble cassette precedes the widespread introduction of integrated circuits, so things were done with motors, cams, levers, and switches instead. This device takes it to another level, and [Techmoan] does a great job of showing it in close-up detail. This is certainly a formidable design from an era that’s beginning to fade into history.

The video (found after the break) also does a great job of showing glimpses of other creative auto-reverse solutions — including one from Phillips that appears to rely on bouncing tapes through something vaguely resembling a playground slide. We’d love to see that one in action, too.

One thing you should never do with a cassette deck like this is use it with a cassette audio adapter like this one.

Continue reading “The Hard Way Of Cassette Tape Auto-Reverse”