Bees In TVs

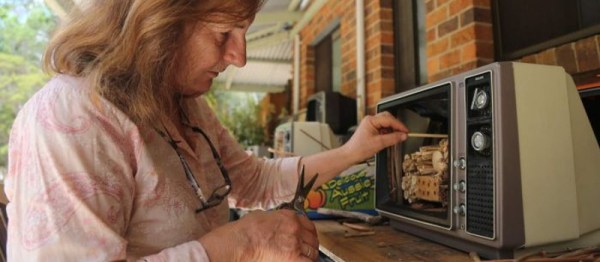
Bees are a crucial part of the ecosystem – without bees to act as pollinators, many plant species wouldn’t be able to reproduce at all! It’s unfortunate then that bees are struggling to survive in many parts of the world. However, [Louise Cosgrove] is doing her part – building homes for bees in old television sets.

The project started when Louise’s son-in-law left 100 (!) analog TVs at her home, having already recycled the picture tubes. That sounds kind of impolite to us, but we’ll give them the benefit of the doubt and assume they had some sort of agreement. [Louise] realised the empty television cases had plenty of ventilation and would make ideal homes for bees. By filling the empty boxes with natural materials like wood, bamboo and bark, it creates nesting places that the bees can use to lay their eggs.

We’ve seen bees on Hackaday beefore (tee-hee) – like this beehive wired for remote monitoring.

[Thanks to Stuart Longland for the tip!]

Bomb Defusal Fun With Friends!

Being a member of the bomb squad would be pretty high up when it comes to ranking stressful occupations. It also makes for great fun with friends. Keep Talking and Nobody Explodes is a two-player video game where one player attempts to defuse a bomb based on instructions from someone on the other end of a phone. [hephaisto] found the game great fun, but thought it could really benefit from some actual hardware. They set about building a real-life bomb defusal game named BUMM.

The “bomb” itself consists of a Raspberry Pi brain that communicates with a series of modules over a serial bus. The modules consist of a timer, a serial number display, and two “riddle” boxes covered in switches and LEDs. It’s the job of the bomb defuser to describe what they see on the various modules to the remote operator, who reads a manual and relays instructions based on this data back to the defuser. For example, the defuser may report seeing a yellow and green LED lit on the riddle module – the operator will then look this up and instruct the defuser on which switches to set in order to defuse that part of the bomb. It’s the challenge of quickly and accurately communicating in the face of a ticking clock that makes the game fun.

[hephaisto] took this build to Make Rhein-Main 2017, where they were very accepting of a “bomb” being brought onto the premises. The game was setup in a booth with an old analog S-video camera feed and a field telephone for communication – we love the detail touches that really add atmosphere to the gameplay experience.

Overall, it’s a great project that could easily be recreated by any hackerspace looking for something fun to share on community nights. The build files are all available on the project GitHub so it’s easy to see the nuts and bolts of how it works.

We’ve seen builds that bring video games into the real world before – like this coilgun Scorched Earth build. Fantastic.

Fix-a-Brick: Fighting The Nexus 5X Bootloop

Oh Nexus 5X, how could you? I found my beloved device was holding my files hostage having succumbed to the dreaded bootloop. But hey, we’re hackers, right? I’ve got this.

It was a long, quiet Friday afternoon when I noticed my Nexus 5X was asking to install yet another update. Usually I leave these things for a few days before eventually giving in, but at some point I must have accidentally clicked to accept the update. Later that day I found my phone mid-way through the update and figured I’d just wait it out. No dice — an hour later, my phone was off. Powering up led to it repeatedly falling back to the “Google” screen; the dreaded bootloop.

Stages of Grief

I kept my phone on me for the rest of the night’s jubilant activities, playing with it from time to time, but alas, nothing would make it budge. The problem was, my Nexus still had a full day’s video shoot locked away on its internal flash that I needed rather badly. I had to fix the phone, at least long enough to recover my files. This is the story of my attempt to debrick my Nexus 5X.

Continue reading “Fix-a-Brick: Fighting The Nexus 5X Bootloop”

Cheap Modules Upgrade Home Security System

[gw0udm] had an ancient monitored alarm system fitted to their home, and decided it was time to upgrade to something a little more modern. They chose a system from Texecom, but when it came time to hook it up to their computer, they were alarmed at the costs – £40 for what amounted to a USB-to-Serial cable! There were other overpriced modules too. But [gw0udm] wanted to upgrade, so it was time to hack the system.

The first step was grabbing a £4 USB-to-Serial board and wiring it up – a simple job for the skilled hacker.  As we always say – everything speaks serial. [gw0udm] then set their sights higher – they wanted the Ethernet interface but weren’t about to cough up the coin. After some research, it was determined that a Raspberry Pi could be used with a utility called ser2net with the existing serial interface to do pretty much the same job. It was a simple matter of figuring out the parity and messaging format to get things up and running.

From there, the project moves on to tackling the creation of a GSM module for monitoring in the absence of a local network, and on flashing the firmware of the system itself. It’s great to see a project continually grow and expand the functionality of a product over time.

We see a lot of security systems here at Hackaday – high prices and proprietary hardware tend to inspire the hacker spirit. Check out this reverse engineering of an obsolete 1980s system, resplendent with Eurostile font.

How To Use A Photo Tachometer

If you’re into anything even vaguely mechanical on the broad hacking spectrum, you’ve come into contact with things that spin. Sometimes, it’s important to know precisely how fast they are spinning! When you’ve got the need to know angular speed, you need a device to measure it. That device is a tachometer. And the most useful tachometer is the non-contact photo-tachometer.

Continue reading “How To Use A Photo Tachometer”

Hush Those Old-Fashioned Phones

Most people hate unsolicited calls, and it’s worse in the dead of night when we’re all trying to sleep. Smartphones are easy to configure to block nuisance calls, but what if you need a solution for your Plain Old Telephone System (POTS)? [Molecular Descriptor] has built a system to invisibly stop landline phones ringing after hours.

The basic principle relies on an analog circuit that detects the AC ringing signal from the phone network, and then switches in an impedance to make the phone company think the phone has been picked up. The circuit is able to operate solely on the voltage from the phone line itself, thanks to the use of the LM2936 – a regulator with an ultra-low quiescent current. It’s important if you’re going to place a load on the phone line that it be as miniscule as possible, otherwise you’ll have phone company technicians snooping around your house in short order wondering what’s going on.

The aforementioned circuitry is just to block the phone line. To enable the system to only work at night, more sophistication was needed. An Arduino Mega was used to program an advanced RTC with two alarm outputs, and then disconnected. The RTC is then connected to a flip-flop which connects the blocking circuit only during the requisite “quiet” hours programmed by the Arduino. The RTC / flip-flop combination is an elegant way of allowing the circuit to remain solely powered by the phone line in use, as they use far less power when properly configured than a full-blown microcontroller.

It’s a cool project, with perhaps the only pitfall being that telecommunications companies aren’t always cool with hackers attaching their latest homebrewed creations to the network. Your mileage may vary. For more old-school telephony goodness, check out this home PBX rig.

Build Your Own Animated Turn Signals

Automotive lighting used to be strictly controlled, particularly in the United States — anyone remember sealed beam headlamps? These days, pretty much anything goes. You can even have an animated turn signal, because a simple flash isn’t fancy enough these days. You can get a scanning-LED turn signal on your new model Audi, among others. [Shravan] wanted this on their Mazda and set about building an animated turn signal and daytime running lights setup for their car.

It’s not a complicated build by any means; an off-the-shelf WS2812B strip provides the blinkums, an Arduino Nano the smarts. Using a modified library to drive the LEDs allowed [Shravan] to get things running with a minimum of fuss. We’d love to see a little more of the gritty reality of this build — how the Nano is getting directional signals from the car, and how it’s all wired up and bolted on. When you’re installing custom hardware onto a vehicle, the devil really is in the details. It’s supremely difficult to create something that looks tidy and functions well.

It’s amazing to think about how far we’ve come. When high-brightness LEDs first came on to the market in the 1990s, you would have been on the hook for wiring your own loom to connect the 20+ LEDs, building your own driver circuitry, and likely etching a custom PCB — all the while you programmed a PIC in assembly as it dangled off a parallel-port programmer. But then again, our cave-dwelling ancestors didn’t even have matches. Time marches on. Use today’s technology to build the very best things you can.

We love seeing car mods, particularly those that are well executed. Check out [Dave]’s interior lighting mods to the Nissan Juke — a car this writer has weighty opinions about. Video after the break.

Continue reading “Build Your Own Animated Turn Signals”