An “ill” Logical PWM Control

illogicalPWMcontrol

[James] recently finished up a gigantic seven segment display for Nottingham Hackerspace, and although it looks great, the display isn’t the interesting part. The PWM dimmer control implemented in logic is the true head-turner. That’s right: this is done without a programmable controller.

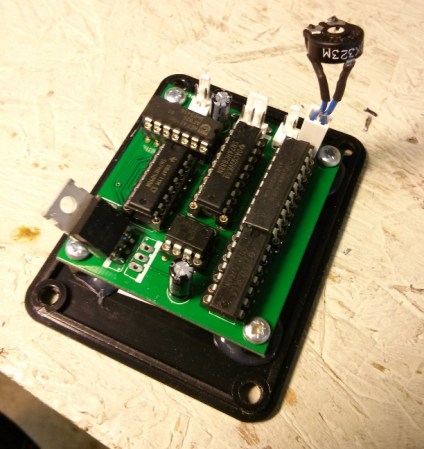
Unsatisfied with the lack of difficulty he faced when slapping together the rest of the electronics, [James] was determined to complicate the auto-dimmer by foregoing all sensible routes. He started by building an 8-bit timer made from a 555 timer fed into a 12-bit 4040 counter. He then used an 8-bit ADC IC to read a photoresistor. The outputs from both the ADC and from the scratch-built 8-bit timer plug into an 8-bit comparator; If the values match, the comparator outputs LOW for a single clock period.

Though this set the groundwork for PWM control, [James] had to add a couple of additional logic gates into the mix to nail everything down. You can find a diagram and the details behind flip-flopping out a duty cycle on his project blog. Clever builds like this one are a rarity when a few lines of code and a microcontroller can give you numerous shortcuts. [James] doesn’t recommend that you over-engineer your PWM controller, but we’re glad he did.  Meanwhile, Moore’s Law marches on; check out what people are doing with Low-Energy Bluetooth these days.

ContactKey: A Portable, Battery-powered Phonebook

contactKey

Although it’s still a prototype, [Russell] tipped us off to his battery-powered device for storing your contacts list: ContactKey. (Warning: Loud sound @ beginning). Sure, paper can back up your contact information, but paper isn’t nearly as cool to show off, nor can it receive updates directly from your Android. The ContactKey displays a contact’s information on an OLED screen, which you can pluck through by pressing a few buttons: either ‘Up,’ ‘Down,’ or ‘Reset’. Although the up/down button can advance one contact at a time, holding one down will fly through the list at lightning speed. A few seconds of inactivity causes a timeout and puts the ContactKey to sleep to conserve battery life.

This build uses an ATMega328 microcontroller and an external EEPROM to store the actual list. [Russell] wrote an Android app that will sync your contact list to the ContactKey over USB via an FTDI chip. The microcontroller uses I2C to talk to the EEPROM, while an OLED display interfaces to the ATMega through SPI. We’re looking forward to seeing how compact [Russell] can make the ContactKey once it’s off the breadboard; the battery life for most smartphones isn’t particularly stellar. Phones of the future will eventually live longer, but we bet it won’t be this one.

Continue reading “ContactKey: A Portable, Battery-powered Phonebook”

Talkbot: An Arduino-driven Robot For Beginners

talkbotguts

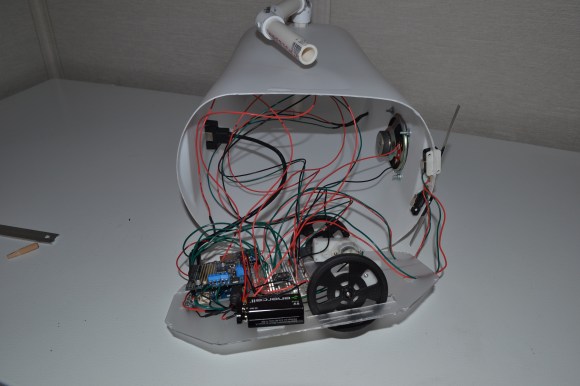
It isn’t exactly WALL-E, but [Bithead’s] affordable introduction to robots — Talkbot — is made out of a trash can. This little guy runs off an Arduino and comes packed with features, including a voice chip, a motor shield, and a pair of bump sensors. Talkbot will cruise around until a bump sensor slams into an obstacle. One of his prerecorded messages will then play through the speaker while he backs up, turns, and tries to find a clearer path.

According to [Bithead’s] build log, tracking down the right bargain voice chip was a bit of a hassle; he skipped over the text-to-speech options only to be stalled by vendor issues. He finally settled on a clone of Sparkfun’s WTV020SD chip sourced from eBay, which allows you to access pre-recorded WAV files stored on a Micro-SD card. The robot’s body comes straight off the hardware store shelf, with PVC pipe for arms and a polystyrene base to hold all the parts.  At the bargain price of $110, [Bithead’s] students will have a true hacker experience cobbling the Talkbot together rather than using a prefab kit.

Be sure to see Talkbot  in a video below, performing either his green-eyed “friendly mode” or red-eyed “grumpy mode,” which dictates how pleasantly he responds to obstacles. Need something more advanced? Check out the tentacle robot, just in time for Halloween.

Continue reading “Talkbot: An Arduino-driven Robot For Beginners”

VCR Centrifuge

VCR’s practically scream “tear me open!” with all those shiny, moving parts and a minimal risk that you’re going to damage a piece of equipment that someone actually cares about. Once you’ve broken in, why not hack it into a centrifuge like [Kymyst]? Separating water from the denser stuff doesn’t require lab-grade equipment. As [Kymyst] explains: you can get a force of 10 G just spinning something around your head. By harvesting some belt drives from a few VCR’s, however, he built this safer, arm-preserving motor-driven device.

[Kymst] dissected the video head rotor and cassette motor drive down to a bare minimum of parts which were reassembled in a stack. A bored-out old CD was attached beneath the rotor while a large plastic bowl was bolted onto the CD. The bowl–here a microwave cooking cover–acts as a protective barrier against the tubes spinning inside. The tube carriers consist of plastic irrigation tubing fitted with a homemade trunnion, which [Kymyst] fashioned from some self-tapping screws and a piece of PVC. At 250 rpm, this centrifuge reaches around 6 G and best of all, gives a VCR something to do again. Take a look at his guide and make your own, particularly if your hackerspace has a bio lab.

FLASH.IT: The RGB LED Climbing Wall

rockWallLEDs2

[Chris] and his friends were kicking around ideas for a Burning Man project, and this is the one that stuck: a rock climbing wall with RGB LEDs embedded in the holds. The holds themselves were custom made; the group started by making silicone molds of varying shapes and sizes, then added the electronics and poured in polyurethane resin to create the casting. The boards for these LEDs are equipped with a central hole that pairs up with a peg in the silicone mold. [Chris] also solved an annoying spinning problem by affixing a bolt to the far end of the LED board: once embedded in the polyurethane, the bolt provides resistance that the thin board cannot. The finished holds bolt onto the wall with all their wires neatly sticking out of the back to be hooked up to a central controller.

The Instrucables page suggests a few ways to get the lights working, including grabbing the nearest Arduino and relying on the Neopixel Library from Adafruit. [Chris] went the extra mile for Burning Man, however, designing Arduino-software-compatible controller boards capable of communicating via DMX, which expanded the system from a simple display to one capable of more complex lighting control. Stop by the Github for schematics and PCB layouts, and stick around for a video of the wall after the break. If the thrill-seeking outdoorsman inside you yearns for more, check out WALL-O-TRON from earlier this summer.

Continue reading “FLASH.IT: The RGB LED Climbing Wall”

Smart Brake Lights And More With OpenXC

smart-brake-light

At a recent hack-a-thon event, [Al Linke] tapped into a vehicle’s OBD port with an OpenXC vehicle interface and hacked an LED screen in the rear window to display data based on events. If you haven’t heard of OpenXC, you can expect to read more about it here at Hackaday in the near future. For now, all you need to know is that OpenXC is Ford’s open source API for real-time data from your vehicle: specifically 2010 and newer model Ford vehicles (for now).

[Al] connected the OpenXC interface to his Android phone over Bluetooth, transmitting data from the OBD port to the phone in real time. From here, the Android can do some really cool stuff. It can use text to speech to announce how much your lead foot cost you, add sound effects for different car events, and even interact with additional devices. Although he managed all of those features, [Al’s] primary goal was to add an LED screen that displayed messages on the vehicle’s back window.

When the phone detected a braking event from the car, it directed the LEDs to light up with a “braking” image, adding some flavor to the process of stopping. He could also change the image to a “Thank You” sign with a waving hand, or—for less courteous drivers—an “F U” image with a slightly different hand gesture. You’ll want to check your local and/or national laws before attempting to strap any additional lighting to your vehicle, but you can watch [Al’s] car light up in the video below. For a more detailed look under the hood, he’s also provided an Instructables page.  If OpenXC catches on, the number of vehicle hacks such as the Remote Controlled Car may skyrocket.

Continue reading “Smart Brake Lights And More With OpenXC”

A Bitcoin Vending Machine

bitcoinVendingMachine

Accessibility is one of the biggest hurdles facing the Bitcoin revolution, so [Mathias] found a way to give BTCs some market penetration by converting an old condom vending machine. The machine was 30 years old and required some clean up. [Mathias] also worked in a plywood adapter that attaches to the mount on the back so it can install on a wider variety of surfaces. This is an electricity-free alternative to selling coins: the machine is purely mechanical and it vends custom-made vouchers rather than the coins themselves, which you then redeem on the Kondocoin website.

The transaction isn’t as instant or snazzy as the Bitcoin briefcase converter from Defcon this year, but it still provides the advantage of an up-to-date exchange rate, as the vouchers themselves are valued at amount of Euros spent rather than a set amount of coins. The exchange rate is consulted later, when you punch in your voucher key. [Mathias] wants to share the wealth, too, and offers up the server software on github along with a detailed explanation of the process.