DIY Keyboard Backlighting Takes Forever, Worth It

LED Keyboard with Custom Lights

Want a back-lit keyboard? Make one yourself. Though you may not want to after seeing this build by [prodigydoo], who devoted 40 hours to upgrade his mechanical keyboard with a smattering of shiny.

No eye rolling just yet, though, because [prodigydoo’s] work is a monument to meticulous craftsmanship and dedication. So what if he accidentally dropped the keyboard’s PCB and cracked it? He patched that up with a few wires in true hacker-problem-solving fashion and no one will ever know.

With the electronics “safely” removed, [prodigydoo] set about desoldering every single key switch, then carefully detaching and disassembling the Cherry MX Blues. He then inserted an LED into each switch’s backplate, reassembled them, mounted the keys back on the board, then added some current-limiting resistors and heat shrink to the circuit. [prodigydoo] cut a few necessary holes for a power switch, state indicator LEDs (Caps Lock, etc.) and some under-the-board lighting, then rounded off the build by hooking up a power supply capable of running all the lights.

No microcontroller? No RGBLEDs? We like it anyway, and it seems [prodigydoo] is glad he kept it simple. Go check out the gallery for gritty details, an explanation of the circuit, and more pictures than your family vacation album.

Quick And Dirty RFID Door Locks Clean Up Nice

homemade RFID Door Locks

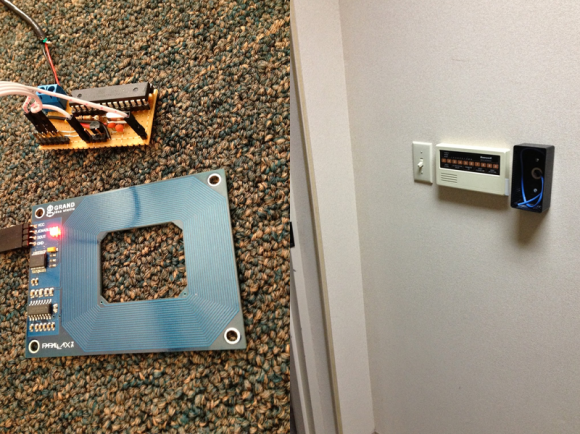
[Shawn] recently overhauled his access control by fitting the doors with some RFID readers. Though the building already had electronic switches in place, unlocking the doors required mashing an aging keypad or pestering someone in an adjacent office to press a button to unlock them for you. [Shawn] tapped into that system by running some wires up into the attic and connecting them to one of two control boxes, each with an ATMega328 inside. Everything functions as you would expect: presenting the right RFID card to the wall-mounted reader sends a signal to the microcontroller, which clicks an accompanying relay that drives the locks.

You may recall [Shawn’s] RFID phone tag hack from last month; the addition of the readers is the second act of the project. If you’re looking to recreate this build, you shouldn’t have any trouble sourcing the same Parallax readers or building out your own Arduino on a stick, either. Check out a quick walkthrough video after the jump.

Continue reading “Quick And Dirty RFID Door Locks Clean Up Nice”

Open Source Glucose Monitoring On The Front Lines Of Innovation

Cloud-based CGM

[John] is the parent of a diabetic child, and his efforts to expand the communication options for his son’s CGM (continuous glucose monitor) have grown into a larger movement: #wearenotwaiting.

After receiving a new monitor—a Dexcom G4—[John] set about decoding its communication protocols. The first steps were relatively simple, using a laptop to snag the data from the CGM and storing it on a Google doc which he could access as the day went along. The next step involved connecting the monitor and a cellphone for around-the-clock data gathering. [John] managed to develop an Android app to accomplish just that, and shortly after people began to take notice. Both [Howard Look], the CEO of Tidepool, and [Lane Desborough], engineer and father of a child with diabetes, have thrown in their support, leading to further developments such as Nightscout, an open source solution for storing CGM data in the cloud.

This project is a victory not only for those with diabetes, but also for the open source community. [John] admits his initial hesitation for developing for the medical device platform: litigation from a corporation could cause devastation for him and his family despite his intentions to merely improve his son’s and others’ quality of life. Those fears have mostly subsided, however, because the project now belongs to both no one and to everyone. It’s community-owned through an open source repository. Check out the overview of [John’s] work for more pictures and links to different parts of the #wearenotwaiting community.

Adventures In Hackerspacing: Hackyard Athens, Part I

Hackyard Athens

It’s funny how quickly it can all come together. If there’s a hackerspace or makerspace in your area, I hope you’ve gone by to see what it’s like. If there isn’t, you can always start your own…

That notion seems so simple, doesn’t it? Round up a few like-minded folks, find a space—any space—shove them and some equipment into it. Two years of attempted round-ups and shove-ins, however, is enough to discourage the most passionate of would-be hackerspacers. By all predictions, the effort to start a hackerspace in Athens, GA was a marathon, a gradual advance culminating in a hard-earned workspace. But that’s not what happened. Hackyard Athens erupted into being.

In only one week.

Continue reading “Adventures In Hackerspacing: Hackyard Athens, Part I”

Koch Lamp Is 3D Printed With A Twist

Koch Lamp

[repkid] didn’t set out to build a lamp, but that’s what he ended up with, and what a lamp he built. If the above-pictured shapes look familiar, it’s because you can’t visit Thingiverse without tripping over one of several designs, all based on a fractal better known as the Koch snowflake. Typically, however, these models are intended as vases, but [repkid] saw an opportunity to bring a couple of them together as a housing for his lighting fixture.

Tinkering with an old IKEA dioder wasn’t enough of a challenge, so [repkid] fired up his 3D printer and churned out three smaller Koch vases to serve as “bulbs” for the lamp. Inside, he affixed each LED strip to a laser-cut acrylic housing with clear tape. The three bulbs attach around a wooden base, which also holds a larger, central Koch print at its center. The base also contains a PICAXE 14M2 controller to run the dioder while collecting input from an attached wireless receiver. The final component is a custom control box—comprised of both 3D-printed and laser-cut parts—to provide a 3-dial remote. A simple spin communicates the red, green, and blue values through another PICAXE controller to the transmitter. Swing by his site for a detailed build log and an assortment of progress pictures.


Wiimote Controlled Extermination: Dalek-Style

Dalek Build

Convention-goers have likely strolled past a number of Daleks: the aliens drive around the event space, spouting threats of extermination and occasionally slapping folks with a rotating eyestalk. [James Bruton] has been hard at work building this Wii-remote-controlled Dalek with his fellow hackers at the SoMakeIt Hackerspace (you may remember our write-up from earlier this year).

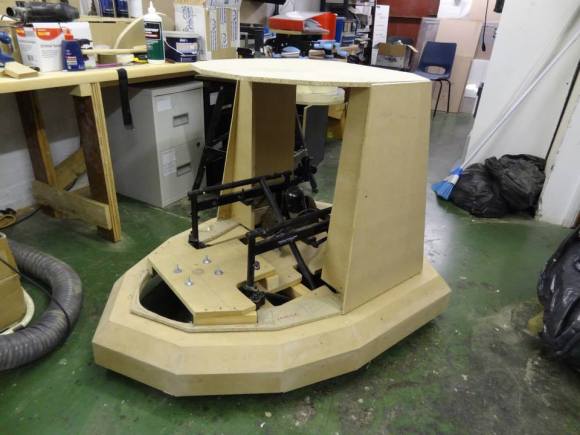
Most Dalek builds seat a driver inside the body at the helm of a salvaged electric wheelchair, where they plunk around using a joystick control and simmer in an increasingly potent aroma. This version started like most, with a wooden structure from plans sourced at Project Dalek. Inside, however, [James] and his crew have tapped into the wheelchair’s motor controller to feed it a PWM signal from an Arduino Shrimp, which is linked to a Raspi. The Pi receives a Bluetooth signal from a Wiimote, and, through their custom Python script, directs the Dalek with ease.

They’re still working on finishing the Dalek’s body, but they’re using some clever tactics to push onward: using a 3D-printer to solve some of the nuanced styling choices. They’ve uploaded a gallery with additional photos on Facebook, and you can watch them goofing around with their creation (losing their balance and nearly exterminating themselves) in a video after the break.

Continue reading “Wiimote Controlled Extermination: Dalek-Style”

Developing The Grillino In 24 Hours

grillino

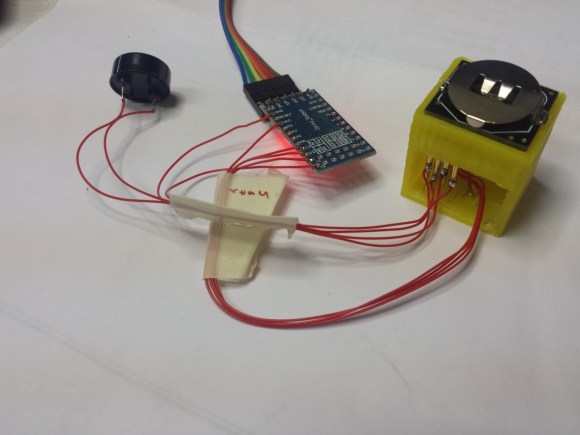
[Mastro Gippo] hit Shenzhen back in April and organized a challenge for himself: could he develop an electronic device from idea to product in only 24 hours? The result is the Grillino, a simple clone of the Annoy-a-Tron: a small, concealable device that makes chirping sounds at random intervals. It’s name was derived from a mix of the Italian word for a cricket—”grillo”—and, of course, “Arduino.”

Shenzhen was the perfect setting for his experiment, especially because [Mastro Gippo] was in town for the Hacker Camp we mentioned a few months ago. The build is pretty simple, requiring only a microcontroller, a battery, and a piezo speaker. What follows is a detailed journey of dizzying speed through the production process, from bags stuffed full of components, to 3D-printing a test jig, to searching for a PCB manufacturer that could fulfill his order overnight. Video and more below.

Continue reading “Developing The Grillino In 24 Hours”