Miata Sci-Fi Digital Dash

One of the hardest, but sometimes best, things you can do for a project is to walk away. [Jroobi] had spent hundreds of hours crafting the digital dash for his MX5 Miata (video, embedded below) and after spending far too long chasing down I2C bugs, he made the difficult decision to step away for a while. However, as of May 2021, [Jroobi] returned to the project and found a power supply was under-specified and was causing brownouts that resulted in crashes.

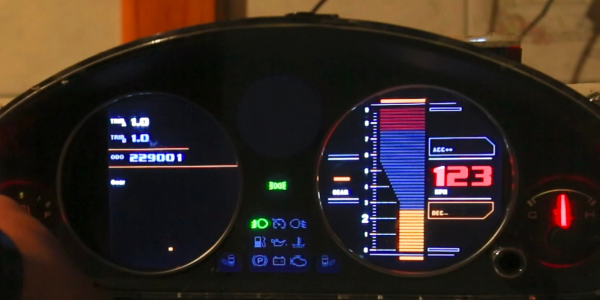
All in all, it’s an incredible work of engineering. Everything from the massive codebase that describes all the different states to the tasteful graphic design is masterfully done. The Star-Trek-inspired theme and attention to detail really show in the different modes on the tachometer. The dynamic soft RPM limit based on engine temperature is particularly ingenious.

Under the hood of this custom dash are two Ardunios running the show. The center media console offers more controls with a generous touch screen while the instrument cluster shows most of the data. They talk over I2C to each other and communicate with other parts in the car, such as the RGB cabin lighting and the TEIN electronic suspension dampeners. Fuel and temperature levels come in as voltage levels which can be read via an ADC. The gear position is calculated based on RPMs and speed given the wheel size and the transmission in the vehicle.

It is a phenomenal labor of love and if you’re inspired to further upgrade your Miata you might want to see how to put carbs on the engine or RGB light rings in the instruments. Continue reading “Miata Sci-Fi Digital Dash”

Modifying A SNES Rom To Be Widescreen

Turning a game like Super Mario World for SNES into a widescreen game is not a small task, but [Vitor Vilela] accomplished just that. [Vitor] has a long list of incredible patches such as optimizing code for better frame rates and adding code to take advantage of the SA-1 accelerator chip, so out of anyone he has the know-how to pull a widescreen mod off. This patch represents a true labor of love as many levels were designed with a specific screen width in mind. [Vitor] went through each of these single-screen width levels and expanded them by writing the extra assembly needed.

On a technical level, this hack was achieved by using the panning feature built into the game. The left and right shoulder buttons allowed a player to pan the camera to the left and right. The viewport is considered to be two times the screen resolution and so items will be rendered within the widescreen resolution. By taking away the panning feature and render a larger section of the viewport to the screen, you get a widescreen view. However, to save cycles, enemies and items don’t start moving until they get close to the screen edge. So how do you make a game widescreen without ruining the timing of every enemy that spawns? Suddenly the hours of muscle memory that fans have drilled in over the years is a disadvantage rather than a strength. The answer is a significant time investment and an eye for detail.

All the code is available on GitHub. A video of a playthrough of the mod is after the break.

Continue reading “Modifying A SNES Rom To Be Widescreen”

An Emulator That Only Plays One Game

[Ben Smith] had previously implemented a GameBoy Color emulator but decided to make a new emulator that to play just one game called pokegb. The game is, of course, the popular blue edition of Pokemon. While this emulator could play other GameBoy games, the way it was implemented was to support only the opcodes and features that Pokemon Blue used. What’s perhaps even more amazing is that this full emulator is just 582 lines of C++ (using SDL for graphics and input). There is also an obfuscated version that comes in at just 68 lines and in the shape of three Pokeballs. All the code for pokegb can be found on GitHub.

[Ben] goes through a detailed listing of each opcode of the processor, memory, the graphics unit (PPU), and how it interacts with a modern operating system. We love the idea of implementing each opcode one by one and gradually seeing the emulator make it farther and farther through the ROM. The only feature that’s noticeably absent is sound, which would require a significant amount of code to emulate properly.

If you’re interested in a deep dive into the audio chips inside a Gameboy Color, [Ken Shirriff] has already done the research for you.

The Keyboard You Really Don’t Need Or Want

Most people think of a keyboard as a flat, vaguely rectangular thing with around 100ish different keys. A mechanical keyboard enthusiast would heartily disagree and point out various tenkeyless, 75%, 60%, or 40% keyboards that strip down the idea of what a keyboard is by taking keys out. [Stavros Korokithakis] takes that notion and turns it on its side by creating the five-button vertical keyboard known as Keyyyyyyyys.

This keyboard, or keystick, is designed to be onehanded and to be eye-contact-free. With just five keys, it makes heavy use of chording to output all the characters needed. It has a maximum of 32 possible states and taking out pressing nothing as a no-op leaves 31 possible key combinations. So [Stavros] had to get creative and laid out the letters according to their frequency in the English language. The brains of Keyyyyyyyys is the ubiquitous ESP32, emulating a Bluetooth keyboard while being wrapped in a simple 3d printed box. The code is hosted on GitLab.

If you don’t know how hard it is to learn a five-key chording keyboard from scratch, definitely check out [Stavros]’ video embedded below. “C’mon h.” We have heard reports that you can learn these things, though.

While this five-button keyboard may seem small, this two-button keyboard still has it beat by three keys. A one-button keyboard is just a morse code keyboard, and we are looking forward to a wireless Bluetooth version. Continue reading “The Keyboard You Really Don’t Need Or Want”

Guitar Hero Robot Actually Shreds

Once a popular craze, most of the public has sold or stashed away their plastic video game instruments and forgotten the likes of Guitar Hero and Rockband. Having never been quite satisfied with his scores, [Nick O’Hara] set out to create a robot that could play a Guitar Hero controller. It would be easy enough to use transistors to actuate the buttons or even just a Teensy to emulate a controller and have it play the perfect game, but [Nick] wanted to replicate what it was really like to play. So after burning out a fair number of solenoids (driving them over spec) and learning on his feet, [Nick] slowly began to dial in his robot, Jon Bot Jovi.

The brains of the bot are a Raspberry Pi running some OpenCV-based code that identifies blobs of different colors. The video feed comes from a PS2 via an HDMI capture card. Solenoids are driven via an 8 channel driver board, controlled by the Pi. While it missed a few notes here and there, we loved seeing the strumming solenoid whammy rapidly on the strummer. All in all, it’s a great project, and we love the design of the robot. Whether played by a robot, turned into a synthesizer, or recreated from toy pianos and mechanical keyboards, Guitar Hero controllers offer many hacking opportunities.

Continue reading “Guitar Hero Robot Actually Shreds”

[Ken Shirriff] Picks Apart Mystery Chip From Twitter Photo

It’s no secret that the work of [Ken Shirriff] graces the front pages of Hackaday quite frequently. He’s back again, this time reverse engineering a comparator chip from a photo on Twitter. The mysterious chip was decapped, photographed under a microscope, and subsequently posted on the internet with an open call to figure out what it did.

[Ken] stepped up, and at first glance, it was obvious that most of the chip is unused, and there appeared to be four copies of the same circuit. After identifying resistors and the different transistor types, [Ken] found differential pairs.

Differential pairs form the heart of most op-amps, and by chaining them together, you can get a strong enough signal to treat it as a logic signal. Based on the design and materials, [Ken] estimates the chip is from the 1970s. Given that it appears to be ECL (Emitter-Coupled Logic), it could just be four comparators. But there are still a few things that don’t add up as two comparators have additional inverted outputs. Searching the part number offered few if any clues, so this will remain somewhat a mystery.

We’ve covered [Ken’s] incredible chip sleuthing before here, such as the Sharp EL-8 from 1969.

Pedaling Away Under The Cover Of Your Desk

[Wayne Venables], like many of us, found himself sitting more than usual the past few months.  Armed with a Bluetooth-enabled under desk exercise bike, he quickly found the app to be rather sub-optimal and set about reverse-engineering the protocol of his bike.

Custom GUI for the exercise bike

The first step was to use some apps on his Android phone to reveal the profiles on the bike, which showed his particular machine used a Nordic Bluetooth UART. This meant the only work would be decoding the stream of bytes coming off the wireless serial port. Using Wireshark and Bluetooth logs on his phone, [Wayne] was able to correspond the various commands to points in the video. There were still a few bytes that he wasn’t able to identify, but [Wayne] had enough to whip up a quick .NET app that can start a workout and log it all to a database. The code for his app is on his GitHub.

While [Wayne] doesn’t specifically name the bike he uses in this project, we tracked down the image he shows on his writeup to the Exerpeutic 900e. It appears to be discontinued but the reverse engineering approach should be usable on a range of Bluetooth-connected machines. This isn’t the first bike we’ve seen liberated by reverse engineering here at Hackaday. And we have a feeling it won’t be the last.