Adapting Modern Cameras To Use Old Flash Units

using-old-time-flash-modules-with-modern-cameras

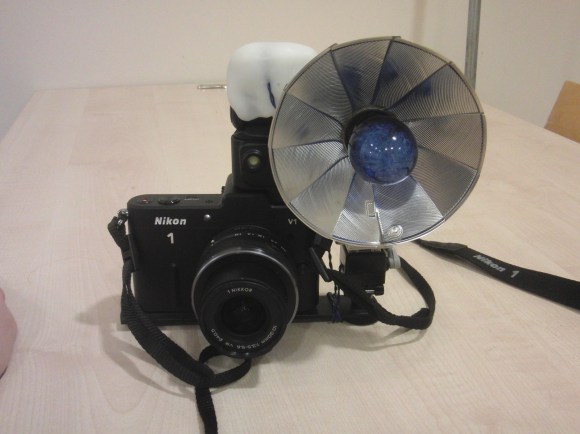
We don’t think this one is going to bring back the days of one-time-use flash bulbs. But for camera enthusiasts who do have old flash units lying around this will be quite interesting. [Sven] worked out a method of interfacing this vintage flash with a modern camera.

The trick is to map the trigger signal from the camera to the flash module. Instead of patching into an electrical signal from the camera he’s using the light from the stock flash. He cut an optocoupler in half, keeping the receiving side of the part. This is molded in plastic that was shaped to surround the original flash unit. When that flash goes off the triac in the remaining half of the IC is activated. This is connected to a hot shoe mounted on an extension arm that is attached to the camera’s tripod mount. The shoe can be used to interface a few different styles of flash modules.

We don’t have an alternative use in mind right now. But chopping an optocoupler in half could come in handy for other applications that use a bright light as a trigger event.

Continue reading “Adapting Modern Cameras To Use Old Flash Units”

One Method Of Fabricating Translucent Faceplates

laser-cut-translucent-panel-covers

Enclosures are the bane of electronics engineers (or so says [Dave Jones] of the EEVblog and The Amp Hour). But fabricating a case that looks great has been getting easier lately. [Eric Forkosh] produced this professional-looking translucent face plate with a minimum of effort. He found a way to use a laser cutter to etch icons in acrylic.

Admittedly, this is not very involved. But just look at the quality he achieved. The secret to his success (aside from having a quality laser cutter on hand) is to use high-temperature spray paint. The acrylic is coated in paint and allowed to dry before heading to the laser cutter. By using the rasterize setting under low power he kills two birds with one stone; the paint is etched away while the acrylic is left a little bit rough to act as a diffuser for LEDs behind the panel. [Eric] cautions against using regular spray paint. In his write up he shows off the unsightly results of doing so.

This makes a great addition to some of the case options out there. One that we have been keeping our eye on is the Sick of Beige initiative being spearheaded by [Ian Lesnet].

No Sleep Till Brooklyn Aquaponics Installation Is Complete

brooklyn-aquaponics-build

This is some extreme gardening. [I Am Become Derpth] didn’t let lack of space or tillable soil stop him from growing a bountiful harvest. Instead of cutting though prairie sod to begin the farming he had to contend with the concrete expanses found in the NYC area. Here he’s nearing the end of an impressive aquaponics installation in Brooklyn, New York.

For a good overview of what aquaponics is all about we suggest you take a look at this Oakland, CA setup. The heart of the system is a closed loop that uses both plants and fish for balance. The byproduct is edible greens. The image above shows the growing beds through which water is circulated. They’re filled with clean gravel which keeps the roots happy. Once the water has made it through this system it is piped into the basement of the apartment where water tanks filled with fish reside. The system uses the fish waste (broken down by bacteria) to feed the plants.

It’s an efficient system but one thing’s for sure, you don’t just go out and buy a rig this complicated. We think you’ll really enjoy going through the build log linked at the top.

[via Reddit]

LTC3105 And LTC3109 Energy Harvesting Chips

a-look-at-energy-harvester-chips

[Shahriar] devoted the lastest episode of The Signal Path to looking at energy harvesting chips. These parts are designed to gather energy from non-traditional sources as efficiently as possible. The full episode, which is embedded after the break, is about one hour long. It starts with a bit of background about the nature of these parts, and a brief overview of the wide-range of chips available. Each is suited for a different type of energy source.

He moves on to test and explain the LTC3105 and the LTC3109. The former is shown above on a development board. [Shahriar] hooks it up to his bench equipment to compare its performance to the published specs. This culminates in a circuit that uses a solar cell as the source with a super capacitor used as storage. The latter is connected to a Peltier cooler and used to convert the potential energy of ice cubes to electrical energy which charges his iPhone for about thirty seconds. This might be useful in that Peltier generator we saw last week.

Continue reading “LTC3105 And LTC3109 Energy Harvesting Chips”

Retrotechtacular: The Differential

Any video that starts off with two minutes of motorcycle formation riding has got to be good. If the grainy black and white video didn’t tip you off that this was made in a different time the helmetless riders standing on the seats of moving motorcycles certainly would have. But there is a purpose to this exposition. A single line of motorcycles riding shoulder to shoulder as they go around a curve illustrates why a differential is necessary and soon after you’ll find out how one works.

Two wheels mounted on one axle need to turn at different speeds as a vehicle goes around a corner or one of the wheels must slip to accommodate the speed difference. The differential is necessary to allow for these different turning rates while still letting both wheels connect to the power train. We were surprised to learn from the video after the break that early automobiles got around this issues by powering only one of the four wheels.

This instructional video is a prefect compliment to the fluid coupling video we saw in the last installment of Retrotechtacular.

Continue reading “Retrotechtacular: The Differential”

Converting A Weather Station Kit For Wireless Data Harvesting

converting-weather-station-for-wireless-data-collection

Everyone loves getting something you can play with as a Christmas gift. [Thomas] was the lucky recipient of an Elektor USB weather station kit. But the fun didn’t end once he had assembled everything. He went on to hack the device for wireless data collection.

Shown above is the weather station board connected to the transmitter. The red board with a tiny antenna to the right is a Rovio RN-VX module. It is capable of transmitting serial data to its twin on the receiving end of the setup. The weather station is pretty easy to connect to the transmitter since it feeds serial data to an FTDI USB chip. [Thomas] simply connected power and ground, then added a jumper from the board’s TX pin to the Rovio’s RX pin. The receiving end uses a serial-to-USB converter — getting a signal for its RX pin from the TX pin on the Rovio receiver board.

We know from other projects that these radio modules can connect to a WiFi AP. Perhaps a future revision of [Thomas’] hack will allow the weather station to communicate with his server over the network, doing away with the need for a standalone receiver.

Coffee Table Arcade Cabinet

ikea-arcade-gaming

Get some Pac-Man fever while sitting on this couch thanks to the arcade rig built inside of the coffee table. The controls are a bit more sparse than more dedicated MAME rigs, but you should still be able to play most of the classics with four buttons and a joystick. After all, you need to reserve some room to put your feet up when you’re not gaming.

[Manny Flores] started the project with a Lack table from Ikea. The top is anything but solid. After tracing the outline of his LCD screen and cutting through the surface he discovered this is more of a beefed of cardboard than it is wood. The honeycomb of paperboard inside the surface of the table makes it really easy to clear out some space. In fact, when it came time to add the arcade buttons he just used a utility knife to cut the openings. Inside you’ll find a Raspberry Pi which interfaces with the buttons and joystick via an iPac USB controller board. A set of powered speakers mounted on the underside complete the design.

[via Adafruit]