Another Take On The Rear-window LED Marquee

re-window-led-display

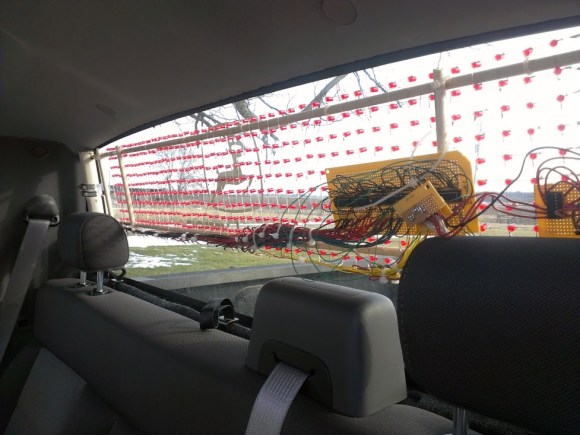
This rear-window LED marquee will help let the driver behind you know when you’re planing to change lanes or make a turn. But it also includes the ability to send a message like “Back Off!”. [Robert Dunn] was inspired to undertake the project after seeing the one we featured back in October. We’d say his has a better chance of being street legal since it uses all red LEDs.

The marquee is a matrix of 480 LEDs, all hand soldered to form the nearly transparent 48×10 grid shown above. This is important to preserve visibility out the back window of his truck. It makes us wonder about the feasibility of using SMD instead of through hole components. That would certainly make it even less visible when not illuminated, but the assembly process would be much more difficult. That’s because the 5mm LED packages fit nicely in the grid of holes he drilled in some plywood which served as the jig during soldering. The presence of leads also made the soldering process manageable.

Power to an Arduino board is provided from the cigarette lighter adapter. A set of six shift registers drive the columns while the rows are controlled by a 4017 decade counter and some transistors. Check out the blinker test video after the break to get a look at what this can do while on the road.

Continue reading “Another Take On The Rear-window LED Marquee”

Garage Parking Monitor Guides You In Every Time

THEPARKINGSPOTTER2

The live Adafruit Show and Tell stream from last weekend featured this project put together by [Silent Jeff]. He’s called “Silent” because when it came time to present his project on the show his microphone wasn’t working. As you can see in the video after the break, [PT] and [Ladyada] worked together to explain the project (of which they had no prior knowledge) using a game of charades. This is one of the follow-up images he sent them which details his parking spotter project.

[Ladyada] compliments [Jeff] on the finished look of the device and we agree. Not only does this do a great job of letting a driver know if they have pulled far enough into the garage, but it’s finished appearance ensures it won’t ever look out-of-place. The two silver discs near the lower end of the box are the sensors of an ultrasonic rangefinder. You mount this box so that the sensor is measuring distance between itself and the bumper of your vehicle. As the distance decreases the LEDs change to let you know when to stop. Inside the case you’ll find a voltage regulator and single-chip running the Arduino bootloader. [Jeff] says this is just his second Arduino project and we hope that at this rate we’ll be looking for big things from him in the not too distant future!

This is basically the same idea as cars that use parking assist sensors in the bumper. It’s just attached to the building instead of to the vehicle itself.

Continue reading “Garage Parking Monitor Guides You In Every Time”

New Year’s Eve Countdown Clock Included SMS Interactivity

We remember several years back, when text messaging was first becoming popular, we went to a bar which had a huge television that would display text messages sent to a particular number. This sounds like a novelty, but in a large group of folks who know one another it’s the sandbox of social games. Wanting to tap in on that fun for his New Year’s Eve party, [James] built this countdown timer that includes an element of SMS interactivity (link dead, try the Internet Archive version).

The rig is projector based. A computer using Processing does the majority of the work but [James] needed a way to accepts text messages (the locale of the party had no Internet connection so this was the best bet). He grabbed a GSM shield and his Arduino Leonardo. The bulk of the evening the display showed the last few messages received, with a small countdown timer in the lower corner. As the countdown approached zero the time was given prominence as in the image above. We guess he was lucky to find a prepaid SIM card that allowed free incoming text messages. Our cell provider charges us 20¢ for each.

You might give this one a whirl next year. If it’s not quite your thing take a look around. We’ve seen a lot of fun setups like this mini ball drop.

Glass Delay Line Slide Used In An RGB Lamp

glass-delay-lines-lamp

The spire used in this lamp is a part from an old television. It’s a glass delay line slide which pipes the light up from the Bluetooth controlled RGB lamp (translated) in the base.

We have looked at delay lines previously when [Dave Jones] tore down a camcorder to get at one. But we must have missed the EEVblog follow-up episode which explains how the glass slides work. The device uses physical distance to form a delay. Waves directed into the edge of the glass slide bounce around at an angle before being sensed at the collection point. [Lukas] liked the visual appearance of the part and decided to use it to add visual interest to his lamp project. The nature of the glass makes it perfect for directing the light up and away from the PCB.

The lamp consists of one RGB LED module controlled by an ATtiny2313 microcontroller. Also on board is a HC-05 Bluetooth module. This along with an app he wrote lets the user change lamp color and behavior wirelessly. You can see the lamp in action in the video after the break, but we think the camera shot probably doesn’t do it the justice it deserves.

Continue reading “Glass Delay Line Slide Used In An RGB Lamp”

Robot Has Rhythm; Carries Drum Sticks

This little robot needs to go on the road with the Blue Man Group. The treaded rover carries its own drum sticks and uses random objects as its drum set.

We admit that this is not a fresh hack. It harkens from 2008 but this is the first time we can remember seeing the little guy. After viewing the video embedded after the jump we think you’ll agree the project deserves to be seen by as many aspiring hardware hackers as possible.

Perched atop the pile is a speaker, with a second hidden between the yellow treads. The lower unit lets the PICAX 28 microcontroller produce beeps and pops, while the upper unit provides a background track for the drumming. The two rods extending above the ultrasonic rangefinder are connected to a couple of motors and drum along with a third stick that looks like a tail. Even the servo that sweeps the rangefinder from side to side keeps the beat. The synchronized magic is all in the code, which you can get your hands on in step 11 of this longer build tutorial.

Continue reading “Robot Has Rhythm; Carries Drum Sticks”

Adding AirPlay To A Shelf System

adding-airplay-to-a-shelf-system

AirPlay is a great system. It allows you to send whatever media is playing from one device to another. Sure, we wish it were a bit more open (Apple is certainly not known for that) but there are several option for creating your own AirPlay receivers. After coming across a project that does just that, [Matt Shirley] decided to turn his shelf system into an AirPlay receiver.

The path to his goal depends on the Raspberry Pi’s ability to receive AirPlay audio using the Shairport package (we just looked in on another player that does this last week). He uses an Edirol UA-5 USB audio interface as an amplifier for his record player. He wasn’t using the USB port for it and knew that it would be simple to connect the RPi USB as a host for the device.

Wanting to keep the look of the system as clean as possible he popped the lid off of the amp. There is just enough room to fit the small RPi board inside. He hacked (literally, look at the pictures) an opening for the USB ports into the side of the metal enclosure. A short patch cable connects from one port to the USB jack on the back of the amplifier. The white cable leaving the side of the case provides power to the Rasperry Pi. The surgery was a success and now he can listen to his tunes with a tap of his finger.

Picture Frame That Scrapes Train Times From The Web

rpi-train-times-fixture

Whenever [Gareth James] needs to catch a train he has only to push a button on this frame and the next three departure times will be displayed. As you can see from the post-processing in the photo, this is accomplished by a Raspberry Pi board using a few familiar tools.

Let’s take a look at the hardware first. He acquired a 7″ LCD display which he removed from its plastic case. The bare screen will easily fit inside of the rather deep wood frame and its composite video input makes it quite simple to interface with the RPi board. There was a little work to be done for power. The LCD needs 12V so he’s using a 12V wall wart to feed the frame, and including a USB car charger to power the RPi. The last thing he added is a button connected to the GPIO header to tell the system to fetch a new set of times.

A Python script monitors the button and uses Beautiful Soup to scrape the train info off of a website. To get the look he wanted [Gareth] wrote a GUI using tkinter. Don’t miss the demo after the jump.

If you need a bit of a primer on scraping web data take a look at this guide.

Continue reading “Picture Frame That Scrapes Train Times From The Web”