Reclaiming Waste Heat From Appliances

Here we see [Christopher Suprock] hanging out in his basement laundry area in order to show off his intelligent heat exchanger. The reason for the device is simple, when you use your clothes dryer , hot water heater, other other utilities that generate heat, energy is often wasted in the form of hot exhaust gases. Why not get the most for you clothes drying dollar by sourcing that hot air to warm your house.

The block you see on top of the dryer is a heat exchanger. The exhaust from the dryer passes through a radiator assembly before being vented outside the house. Some control hardware monitors the temperature of the input side and switches on the fan when it detects a higher temperature than the ambient air. Air then flows through the radiator, picking up heat energy from the exhaust gas. See [Christopher’s] explaination, and some thermal readings while the dryer is running, in the video after the break.

This makes us wonder, if the heat exchanger drops the exhaust gas fifty degrees before being vented, will this cause any issues with condensation?


Continue reading “Reclaiming Waste Heat From Appliances”

Hardware-based Keyboard Remapping

[Nav] wanted to change his keyboard mapping for one particular keyboard, rather than on each operating system. He used an AT90USBKey as a replacement PCB by soldering to all of the contacts on the key matrix. This allows him to remap the keys by following onscreen prompts.

The board enumerates as an HID device, and has a special mode which is accesses by plugging the keyboard in while holding down any key. If a text editor window is active you’ll see prompts from the microcontroller to press a series of keys. This is a routine used to learn how the key matrix is organized, and it’s your opportunity to change how each key is mapped. Since the mapping is saved to EEPROM, you can use any computer to map the keys, then plug the device into a systems that don’t offer software remapping. It could also be useful as a gaming keyboard, assuming there aren’t latency issues

As with the AVR-based arcade controller, this project uses the LUFA package to handle the USB stack.

Open Source Makes This USB Arcade Controller Build A Breeze

[Jamie] built his own USB connected arcade controller. We’ve been seeing a lot of these lately, and they usually involve soldering buttons to a keyboard PCB. But [Jamie] decided to go a different route and use his own microcontroller. This method always gets a bit hairy when it comes to deciding how to connect it to a computer. Dealing with the USB stack used to be quite tricky, but the LUFA project is slowly taking the pain out of the process.

The Lightweight USB Framework for AVRs is an open source project that handles the hard work associated with USB capable AVR microcontrollers. [Jamie] knew that they already had a sample implementation of a hardware joystick. He’s not using one of the supported boards and so wasn’t able to just compile and go. But porting the code to work with his minimus board was simple enough. With the code in place, the physical build was quite simple. The buttons and joystick were mounted on the surface of an overturned drawer. Each is connected to one pin of the controller board and to ground. LUFA makes sure that the device enumerates as a joystick, and [Jamie] was gaming in no time.

Student Built Robot Chassis Has Something You Can Learn From

This is a four-wheeled robot chassis built by high school students over the summer. They were participating in workshops put on by xbot robotics in Seattle, Washington. The goal is to get them participating in events like FIRST Robotics and LEGO league, and eventually into science related careers.

At first glance we thought: oh, that’s a nice chassis build… on to the next tip. But then the difference in front and rear wheel types caught our eye. The problem with four-wheeled designs is that you need differential steering to overcome the skidding issue when turning. This usually means two independently powered rear wheels and one unpowered front wheel that can swivel. One way to overcome this is to use three omniwheels, each with their own motor. And more recently we have seen four-wheelers that use mechanum wheels to get around the issue… but that takes four motors.

The design seen above uses just two motors, each with a chain to drive both wheels on one side. The rear wheels have rubber grippers which give them great traction. The front wheels are omni-wheels which allow them to move side to side easily during turns while aiding in forward progress when not turning. This gives the robot enough grip to push object around, like you can see in the video after the break.

Continue reading “Student Built Robot Chassis Has Something You Can Learn From”

Portable Light Box For Photographers On-the-go

Looking to make a quality light box more portable, [Hharry] designed a collapsible version complete with adjustable side lighting.

Light tents are used by photographers as a stage for photographing small items. The use of multiple light sources, and a fabric that will diffuse them, means a reduction in shadows that might otherwise ruin a picture. This design starts with an MDF base in the form of a shallow box with a few baffles running left to right. Drawer slides connect the lamp poles to these baffles, making it easy to pull each of the four light sources out when setting up the tent.

The white fabric that makes up the stage has pockets sewn into the edges to accept dowel rods. These are not anchored permanently. They pull against the fabric when wedged in place to keep the tent taut, but easily fold down for storage in the cavities of the base. Finally, the top of the carrying case folds down and a drawer pull serves as the carrying handle.

A light tent isn’t the only way to battle shadows in your pictures. Check out this method that uses mirrors to adjust lighting conditions.

[Thanks David]

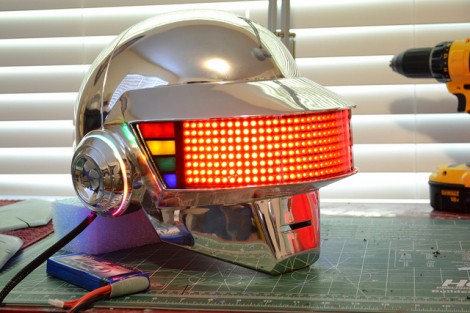
IPhone Controlled Daft Punk Helmet Replica A Dazzling Build

This Daft Punk helmet replica is beautiful to look at, but the deeper we delve into the build process, the more we begin to think that the entire project is a piece of artwork. [Harrison Krix] has been working on it for months, and just posted his three-part build log in September. Check out the video and the links to all three parts after the break.

Now [Harrison] isn’t new to prop replica scene. He’s the guy responsible for the other fantastic Daft Punk helmet we saw last year. He’s tapped the same fabrication skills to churn out an equally impressive chromed helmet, complete with addressable flashing LEDs. He built his own mold to create the body of the helmet, reminding us of the Storm Trooper helmet replicas we saw in July. While this was off being coated in chrome, he got down to business with the electronics.

The visor of the helmet has a red LED marquee. This, along with the multicolored visor sides and ear pucks, is controlled by an Arduino yellow jacket. The lights can be controlled by an iPhone app that connects to the helmet via WiFi, letting a user push custom messages to the display, and alter the light patterns. The build shines on the inside as well as the outside with an incredibly clean LED matrix build, and clever control placement for switching each part on or off.

Continue reading “IPhone Controlled Daft Punk Helmet Replica A Dazzling Build”

Sustainability Hacks: Auto-feeding Wood-fired Generator

Here’s a project that’s hard to categorize. It generates electricity by burning wood. The diamond-plate wrapped column to the right is a magazine that stores the wood, which is gravity fed as pieces below are consumed. The heat is used to drive a power turbine which is responsible for generating the electricity.

This begs the question, is this a sustainability hack? From one perspective it’s burning renewable biomass. Right now that’s wood, but it could be compressed blocks of grasses or wood manufacturing byproducts. So in this sense it is sustainable. Unfortunately it still doesn’t solve the problem of carbon emissions.

The build log for the project is both image and video heavy. You can see the initial prototypes which are not self-feeding, but burn so hot that there’s a nice pink glow to the entire assembly. But by the time they get to the final prototype it’s running much more efficiently, and can put out a peak of over 100 amps!

[Thanks DerAxman]