RC Override For Autonomous Hardware

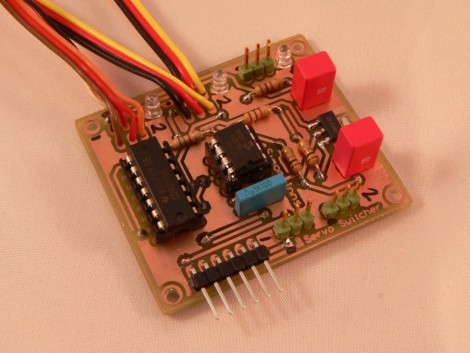
[Simon Inns] developed this board to act as a radio controlled override for autonomous hardware. It sits between some servo motors and two different sets of controllers for those motors. One set of hardware that can control the motors is a microcontroller programmed for autonomous tasks. In [Simon’s] case this enables a sailboat to navigate open water with out human intervention. But if that board fails, or if you just need to call the boat back to port, this module allows for a traditional RF vehicle controller to take command.

The board seen above, dubbed the Servo Switcher, uses a PIC 12F683 to monitor the incoming signal from the RF receiver. If that signal is not present it switches control of the motors over to a separate microcontroller board. This means that the override control is established simply by turning the handheld controller on. This will save you a swim to retrieve your boat, which is a nice convenience. But if you modify this for a plane or helicopter, it can save your aircraft from certain destruction. Check out the video walk through after the break.

Continue reading “RC Override For Autonomous Hardware”

PC Case Using CNC Router And Home Building Products

[Reinventing Science] needed a project that he could use to test out his skills on a new CNC routing machine he recently acquire. He settled on building a PC case using easily obtained materials. What he ended up with is the clean-looking case seen above that was machined from materials you can pick up at the home store.

The bulk of the case is made from extruded PVC which is designed to perform like solid wood trim. He picked up one piece of the ‘lumber’ and cut out the front, back, top, bottom, and drive bay bezel. We expected the joints between the horizontal and vertical pieces to either be butt joints, or rabbits. But [Reinventing Science] wanted a cleaner look and managed to mill mortise and tenon joints. These are strong joints that leave a very nice finished look. Since the material is designed as a lumber replacement it shouldn’t be too surprising to see drywall screws used as the fasteners.

In addition to joinery, some other CNC tricks were used. The sides of the case were cut from clear acrylic, with a decorative bead milled in the surface. There’s also fan ports cut in the top and vents on the bottom, as well as some engraving with the name of the project just above the optical drive. The wood-grain embossing makes for an interesting final look; we’d like to see how this takes a few careful coats of paint.

If you’re interested in the CNC hardware used, take a look at the unboxing post that shares a few details.

Converting A Scanner Into A Touchscreen

[Sprite_TM] was cleaning up his hacking workbench when he came across an all-in-one device that had seen better days. After a bit of consideration he decided to tear down the scanner portion of the device and ended up turning it into a multi-touch display.

The scanner relies on a long PCB with a line CCD sensor. This sensor is read in a similar way that information is passed along a shift register. Tell it to take a reading, and then start a clock signal to pulse out each analog value from the pixels of the sensor. In order to scan color images it uses multicolored LEDs to take different readings under different illumination.

[Sprite_TM] takes advantage of this functionality to turn it into a multitouch sensor. The sensor board itself is mounted below an LCD display along with a shield with a slit in it to help filter out ambient light. Above the screen a series of LEDs shine down on the sensor. When you break the beams with your finger it casts a series of shadows which are picked up by the sensor and processed in software. Watch the clip after the break to see it for yourself. It has no problem detecting and tracking multiple contact points.

Continue reading “Converting A Scanner Into A Touchscreen”

Don’t Buy An Amp, Build One To Suit

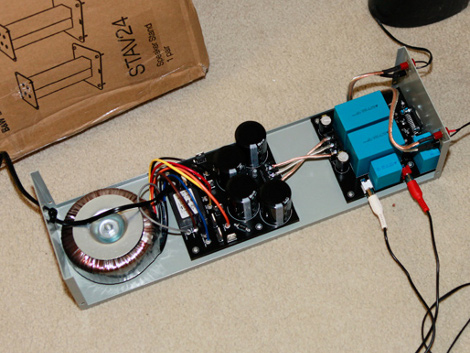
In need of an amplifier for his home entertainment system [Afroman] decided to build an amp rather than buying one. If nothing else, doing it himself allowed for a form factor that can’t just go out and buy.

He designed the project on two separate boards, one for the power supply and the other for the amplifier circuit. Both are of his own design, and although he doesn’t share the schematic, we know he’s based his work on a National Semiconductor reference design for the LM4780 audio amplifier chip. There’s a few other clues, like his mention of the toroidal transformer seen at the left in the image above and hi-res photos of the unpopulated board that has component values printed in the silk screen.

The final design allows him to get great performance out of his speakers with a very clean look. You’ll need to be logged to the forum linked above to view all of the images, but we’ve embedded three more of them after the break to whet your appetite.

Oh, and cost? This gets up there, just sneaking past the $500 mark.

Continue reading “Don’t Buy An Amp, Build One To Suit”

Tricycle Robot Using Omni-wheels

[Markus Gritsch] built this six-wheeled robot using omni-wheels. Two wheels are used on each axis in order to ensure perpendicular rotation is possible no matter where the axis rotation stops. The wheels have also been improved by dipping the elliptical components to give them a rubbery coating.

The robot gets its commands wirelessly from a separate controller unit. That controller, as well as the bot seen above, uses a Teensy microcontroller board. Two analog sticks take input from the operator and transmit commands using an inexpensive RF pair. The wheel movement is facilitated by three servo motors which may seem like an odd choice. But we think that it simplifies the electronic side of the build because you do not need an H-bridge to control a servo motors. It’s a bit loud, as you can hear in the video after the break, but it certainly works quite well.

One of the commenters on the thread above asks why [Markus] didn’t use mechanum wheels. These would have allowed him to use just one wheel on each axis but the omni-wheels were so inexpensive that he went this route instead.

Continue reading “Tricycle Robot Using Omni-wheels”

Kinect, Mouse, And Nerf Gun Combine For House Of The Dead

[Tony Blanch] built his own motion controller for playing House of the Dead. It should work with any shooter that follows the ‘rail’ type of game play (your character is not free walking, but moves along a set path beyond your control).

Two parts come together to make this happen. The first is the Nerf dart gun that you see above. The circuit board fitted into the top portion of the plastic housing is from a five-button wireless mouse. The buttons are used to sense trigger pulls from the player. The second portion of the controller is a Kinect. It has been set up to work with a Windows 7 machine. [Tony] used the Flexible Action and Articulated Skeleton Toolkit (FAAST) to bind and track the gun controller, moving the mouse cursor on the screen to match the movements of the weapon. Check out the video after the break to see how responsive this system is.

This is a very interesting departure from the gun controllers we’ve seen before.

Continue reading “Kinect, Mouse, And Nerf Gun Combine For House Of The Dead”

Smartphone Operated Garage Door Is Beginning Of Arduino Home Automation System

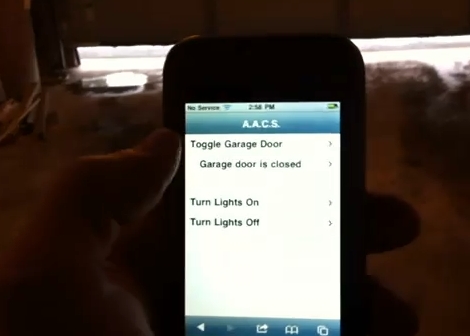
[Tim] is showing off the first step in his home automation projected with this smart-phone garage door interface. In the video after the break you can see him open and close the garage door with the touch of a button. There’s also an open or closed indicator that he can check when away from home.

An Arduino takes care of a portion of the control for this project. Like the post we saw yesterday, he’s using PHP code on a webpage to manipulate the Arduino via its USB connection in order to open and close the door using a relay. The door status is also monitored by the Arduino and sent to the PC over the serial connection. The computer uses a Python script to monitor the incoming data and update a text file which is merged into the web interface using a PHP include. Future plans for the system include adding control for heating and air conditioning systems.

If you’re looking to do something like this but wirelessly here’s some advice on ditching the Arduino and using an XBee module instead.

Continue reading “Smartphone Operated Garage Door Is Beginning Of Arduino Home Automation System”