RC Plane Built Using Pieces Of An RC Car

This hack’s old as dirt to be sure, but new to us and a great accomplishment. The plane above, which is meant to fly without an operator, has been given RC control thanks to parts from that little car. The transmitter and receiver pair are the obvious transplant, but how do you add steering to a $7 plane that wasn’t manufactured to have that feature? The tail was cut and reconnected with mylar hinges to turn it into a rudder. A rare earth magnet and a coil are also thrown into the mix to provide movement. Basically this is a simple solenoid where the coil pushes against the magnet when energized, actuating the rudder. This in combination with an upgraded motor allows for both speed control and yaw. It doesn’t look like you can control roll and pitch but what more can you really expect?

This would be a nice first step on that path to building an epic flying camera rig.

[Thanks Rob]

Using Analog Voltage References With Arduino

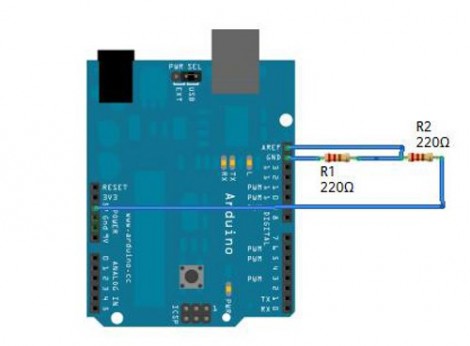
Little Bird Electronics posted an article about using an analog voltage reference with Arduino. This is a tool available when using an analog-to-digital converter. By setting up either an internal or external AREF, you can better use the ADC considering its resolution limitations. For instance, if you are measuring a signal that you know will always be below 2V, an external circuit, such as a voltage divider or an adjustable regulator, can give you a reference voltage just above that upper limit; say 2.5V. This way the 1024 divisions of resolution will be spread across your signal’s range, rather than just the lower half of the ADC readings.

Analog references are common to microcontrollers that have ADCs. Even if you’re not working with an Arduino, read through the article and use what you learn with your uC of choice.

Kindle Terminal With Secret Key-press Activation

[Luigi Rizzo] has been working on some hacks for his 3rd generation Kindle. There is already a Python based terminal emulator called AjaxTerm but he wanted a lightweight standalone so he reimplemented the program in C. The 100k binary monitors the keyboard, launching the terminal emulator when it detects a Shift-T sequence. It also uses alternative key mapping to fill in for some of the keys the Kindle’s keyboard is missing.

We haven’t seen a whole lot of Kindle hacking since it was hacked to run Ubuntu. Seems like this terminal emulator is a useful and unobtrusive hack to try out on the beloved reader.

Bluetooth Temperature Module

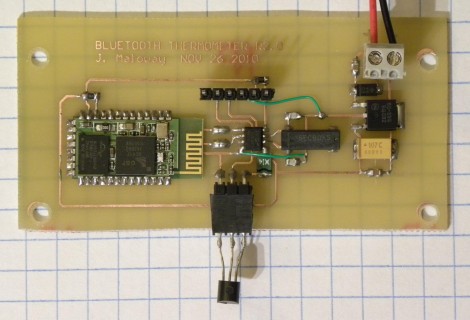
Wanting to know the outside temperature, [Jamie Maloway] built his own temperature sensor that can be read with a Bluetooth device. Let’s take a tour of the hardware above from right to left. There’s a linear voltage regulator with two filtering caps and a terminal block to attach a 9V battery or other power source. Next there’s an 8 MHz crystal and it’s capacitors, followed by a programming header on top and a 1-wire temperature IC, the DS18B20 we’re all familiar with hanging off the bottom. These both connect to the 8-pin PIC 12F675 that drives the system, and transmits using a Bluetooth module from Sure Electronics. Since this is using a serial protocol and transmitting ASCII data, it can be read using an automated script, or simply by using a terminal program.

Now, who’s going to be the first to get rid of the battery and leech off of the mains through inductance?

Segfault: Balancing Transport Using A Dozen Op-amps

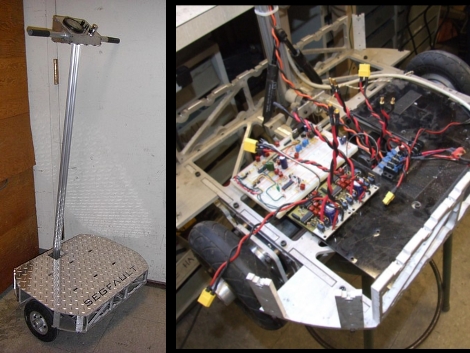
The Segfault is a balancing transport similar to a Segway, but it uses analog comparators instead of digital circuitry. On board you’ll find no less than twelve LMC6484 op amps. They take signals from the gyroscope and the accelerometer, balance and filter them, then drive the motor h-bridges accordingly.

[Charles], the guy behind the Segfault, is also the one responsible for DeathBlades. As with that project he does just as well at documenting as he does at fabrication. Take some time to enjoy his posts associated with this two-wheeled-wonder (especially the build process) and then watch in the video after the break.

Continue reading “Segfault: Balancing Transport Using A Dozen Op-amps”

Lego Machine Predicts Future Eclipses

Hidden behind the white face plates of this machine are racks of gears that make up a replica of one of the oldest known mechanical computers. This is a working model of the Antikythera mechanism made from Lego pieces. In the video, which you absolutely can’t miss after the break, The machine is disassembled into its various components. Each mechanical unit takes advantage of gear ratio combinations to perform numerous levels of mathematical functions in order to display the date and time that future celestial events will occur.

The background information on the original device reads like the script for a sequel to The Goonies. Believed to date back to 100-150 BC, the stone bronze mechanism was recovered from a shipwreck around the turn of the twentieth century. The use of x-ray analysis helped to unlock the functions and confirm the theories of its operation.

Part of what makes this so interesting is the historical connection. But the production quality of the video (which to be fair, seems to be an advertisement) really brings home how complicated this process is. Now it’s time for us to watch the video a few more times, sketching out the gearing to see that this works as they say it does.

Want more of the Antikythera mechanism? Check out the model built by [Tatyana van Vark].

Continue reading “Lego Machine Predicts Future Eclipses”

Skillet Reflow Controller

Using an electric skillet to reflow surface mount circuit boards is a popular alternate use for those kitchen appliances. The real trick is monitoring and controlling the temperature. [Mechatronics Guy] built his own skillet temperature controller using a thermistor, a solid state relay, and an Arduino.

He was inspired by [Ladyada’s] work which used a servo to adjust the temperature dial on the skillet’s power supply. This started by attaching the thermistor to the bottom of the skillet using JB weld. since this area will be heating up he also attached a terminal block for connecting the feed wires as the heat would melt any solder joints. Those wires travel back to a control box housing the Arduino and solid state relay. To gain finer control over the heating element the relay is switched on and off, resulting in low-frequency Pulse Width Modulation, which should help maintain a consistent temperature better than just turning the temperature dial on the cord.

Pair this up with the vacuum tweezers hack and you’re on your way to a surface mount assembly line. If you want to see this process in action check out this post. It goes from stenciling, to populating, to reflowing in a toaster oven.

[Thanks Rob]