Gyro Controlled RGB Blinky Ball Will Light Up Your Life

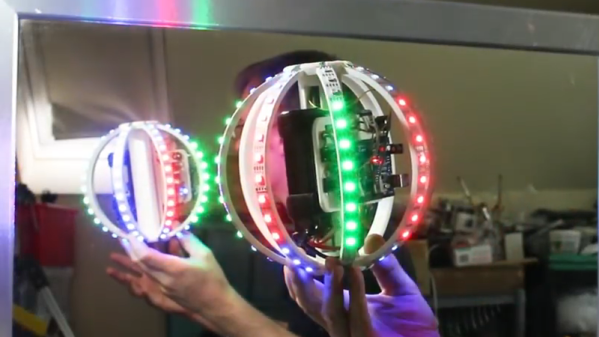
[James Bruton], from the XRobots YouTube channel is known for his multipart robot and cosplay builds. Occasionally, though, he creates a one-off build. Recently, he created a video showing how to build a LED ball that changes color depending on its movement.

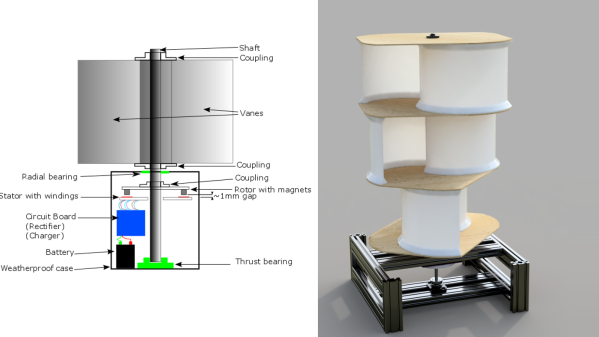
The project is built around a series of 3D printed “arms” around a hollow core, each loaded with a strip of APA102 RGB LEDs. An Arduino Mega reads orientation data from an MPU6050 and changes the color of the LEDs based on that input. Two buttons attached to the Mega modify the way that the LEDs change color. The Mega, MPU6050, battery and power circuitry are mounted in the middle of the ball. The DotStar strips are stuck to the outside of the curved arms and the wiring goes from one end of the DotStar strip, up through the middle column of the ball to the top of the next arm. This means more complicated wiring but allows for easier programming of the LEDs.

Unlike [James’] other projects, this one is a quickie, but it works as a great introduction to programming DotStar LEDs with an Arduino, as well as using an accelerometer and gyro chip. The code and the CAD is up on Github if you want to create your own. [James] has had a few of his projects on the site before; check out his Open Dog project, but there’s also another blinky ball project as well.

Continue reading “Gyro Controlled RGB Blinky Ball Will Light Up Your Life”

The Polyphonic Analog/Digital Synth Project

[Matt Bradshaw]’s entry in the Hackaday Prize is Polymod, a modular digital synthesizer which combines the modularity of an analog synth with the power of a digital synth. Each module (LFO, Envelope Generator, Amplifier, etc.) are connected with audio cables to others and the result is processed digitally to create music.

The synth is built with a toy keyboard with each key having a tactile switch underneath it, contained inside a wooden case upcycled from a bookshelf found on the street. Each module is a series of potentiometers and I/O jacks with a wooden faceplate. The modules are connected to sockets on the main board and are held in place with thumbscrews so that the modules can be easily switched out. Each module can be connected to others using audio cables, the same way modular analog synths are connected.

The main board contains a Teensy 3.6 and a Teensy Audio Adapter creates the audio for the synth. Software that [Matt] wrote runs on the Teensy and allows the digital synthesizer to run in either monophonic or polyphonic modes. In polyphonic mode, the software creates digital copies of each module to allow the playing of chords. The Teensy scans up to eight module sockets and for each module that it finds, it reads the potentiometer value as well as the status of the I/O jacks. The keyboard buttons are converted to a control voltage which can be sent to any of the modules to create a melody.

[Matt] has created a great synth that combines benefits of both analog and digital synths together and the result is an inexpensive modular synth that can create some really cool sounds. Check out the videos after the break. In the meantime, take a look at this mess of wires and this article on a slew of open-source synthesizers.

Continue reading “The Polyphonic Analog/Digital Synth Project”

The Redox Keyboard

Alternative keyboard layouts like Colemak and Dvorak are nothing new; they allow easier access to more often used keys to reduce the strain placed on the hands during typing. Building on the popularity of the ergonomic Ergodox keyboard, [Mattia Dal Ben] has developed the Redox keyboard, the Reduced Ergodox, to make an even smaller, more ergonomic keyboard.

Like the Ergodox, the Redox uses a columnar layout, where the keys are laid out in columns, each column offset based on the corresponding finger. Where the Redox breaks away from the design of the Ergodox is the thumb keys. [Mattia] started having pain in his pinkies, so he wanted the thumb layouts to take away some of the extra work from the pinkies. The thumb cluster is smaller than its ancestor and includes an additional rotated thumb key.

The Redox has some great improvements over the Ergodox in order to help with the types of strain injuries most associated with typing, hopefully leading to a much nicer interaction with the peripheral that gets the most use.

The mechanical keyboard community is constantly coming up with great new designs and different DIY keyboards and we’ve featured many of them on the site. After you’ve checked out the pictures and schematics [Mattia] has created, take a look at this 3D printed mechanical keyboard, and details of a keyboard design and build were presented at the Hackaday Superconference in 2017.

This TARDIS Is Bigger On The Inside

A few months ago, YouTube user [Maladroit Modeller] uploaded a video of his model TARDIS from Doctor Who which shows an inside that’s bigger than the outside. Recently, [Maladroit Modeller] posted some pictures and has now uploaded a video showing how it’s done.

The TARDIS model itself is a 3:75 scale “Spin & Fly” model. The case to show everything off is built from foam core and the interior is built from foam core, silver paper, cardboard, styrene and other bits and pieces. There looks like there’s some EL wire being used, too, along with a lot of LEDs.

The build looks great and the illusion works very nicely in the video. Check out the video after the break, and then check out the “how it’s done” video for an explanation. Continue reading “This TARDIS Is Bigger On The Inside”

A 3D Printed Marble Clock

There are clocks with pendulums, gears, and circuits. How about one with marbles? Initially designed in the ’70s, rolling ball clocks came in many designs and materials, but this is the future, so [gocivici] has created an Instructable to show you how you can 3D print and build your own.

Three rows of marbles keep track of the time, one for one hour intervals, one for five-minute intervals and a third for one minute intervals. It makes reading the time a bit more difficult than a pair of hands, but more fun. The clock uses the weight of the marbles to know when a row needs resetting. When the fifth marble drops onto the minute row, its weight causes the row to tilt, sending all but one marble down to the bottom of the machine. The marble that caused the tilting is sent down to the row underneath, perhaps causing a cascade of marbles down to the bottom.

There is something quite satisfying about seeing the marbles moving around in [gocivici]’s mechanical marble clock. Sure, it’s probably too loud for the nightstand, but it keeps time and looks great. In this build a stepper motor drives the main wheel which acts as an elevator, grabbing a marble from the bottom and raising it to the top to tumble down and find its position among the rows.

Of course, at Hackaday we love clocks so there have been many clock builds showcased here; all you need do is a quick search for “clock” to find some incredible designs and builds. We’ve also featured similar marble clocks.

via BoingBoing

Continue reading “A 3D Printed Marble Clock”

LED-ifying A Guitar

Say you have a guitar, an expensive guitar – one of only three like it. And say this guitar sounds great, but it’s missing something. It needs something, but something that won’t ruin the finish. Over at Sparkfun, [Englandsaurus] was asked to come up with a really cool looking mod to a three-of-a-kind guitar – covering the body with LED strips to create light patterns on the guitar.

In order not to damage or modify the guitar [Englandsaurus] sandwiched the body between two plexiglass sheets, connected together by 3D printed clips. The clips have a dual purpose – they hold the plexiglass pieces to the guitar and also act as conduits for a pair of fiber optic tubes that run around the edge of the body. In order that the color goes all the way around the guitar’s edge without a break in the light, the fiber optic cables are offset. At each clip light is fed into them. One cable runs between two clips, skipping one in between, and the second cable runs between the skipped clips. This allows light to flow around the guitar’s body.

At nearly 500W at full-white, these LEDs draw a lot of power, however, at full brightness they’re overpoweringly bright, so [Englandsaurus] used some WonderFlex, a moldable, diffuse plastic sheet, to cover them. Even with this, the LEDs aren’t run at full brightness. The fiber optic cables, though, need full brightness due to their covering.

Around 1600 LEDs went in to this mod and the guitar itself hasn’t been modified.  Everything is removable, and the guitar would go back to its original self if the strips were taken off. Take a look at Strumbot, another project where the original guitar wasn’t modified, or a really cool scrap metal guitar.

Continue reading “LED-ifying A Guitar”

DIY Wind Turbine For Where The Sun Doesn’t Shine

There are plenty of places outside where you may like to have a project requiring electricity that may not get enough sun for solar power to be viable. Perhaps wind power could be used instead? [Greg] has a project to create a platform for using a small wind turbine to generate the power for your projects.

The wind turbine that [Greg] designing is a Savonius-style wind turbine that would put out between 5 and 12 volts. In a Savonius turbine, blades are mounted on a vertical axis allowing for a smaller, less complicated build than traditional horizontal axis wind turbines. The design is named for its inventor, Finnish engineer Sigurd Johannes Savonius.

After doing some research, the design will have a 2:1 height to blade ratio and use three pairs of overlapping curved blades stacked on top of each other, each pair offset by 120 degrees. This design, [Greg] figures, will come within a few percentage points of the efficiency of more exotic blade shapes while making the windmill easy to design and implement. Being half cylinders, the blades can easily be made from existing objects cut in half – pop cans, for example, but there has been some designing the blades in Fusion 360 for 3D printing. The stator board has been designed and the initial prototypes of it and the rotor have arrived, so the testing can now commence.

Once the design is finalized and the prototype working, it’d be interesting to see some projects start showing up using wind power instead of solar power. Take a look at this design for a vertical wind turbine, and this design for a simple, straightforward turbine.