Custom Monitor For Pi-Powered Commodore 64

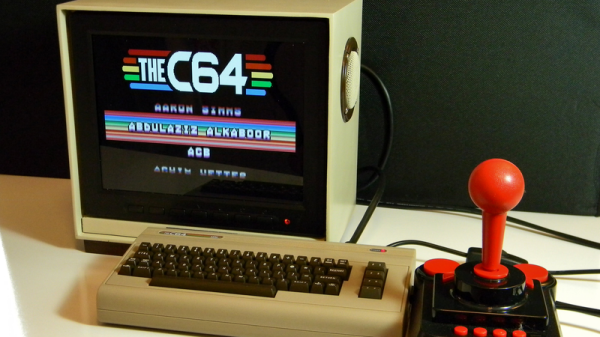
Classic games never seem to have gone out of style and with the emulation powers of the Raspberry Pi, there seems to be no end of projects folks have been coming up with. [Chris Mills] project is a great looking monitor to get his Commodore 64 fix by combining the retro looks of a home-made 64-style monitor with the Raspberry Pi.

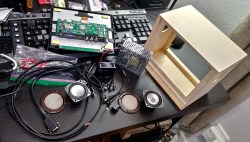
[Chris] is only interested in Commodore 64 emulation, at least with this project, and wanted something that would fit on a desk without taking up too much room. An eight inch LCD security monitor fit the bill perfectly. [Chris] ended up building a wooden enclosure for the monitor to give it that Commodore look. The monitor, power supply and cable connections fit inside along with speakers; each of these having their inputs on the back. A fan vents in the back as well and the Pi sits outside running the Combian 64 emulation software.

[Chris] has put up some galleries of build pics. The logo from the old Commodore logo is a nice touch. Read over the Hackaday site and you could build your own Commodore 64, or use the Commodore 64 itself to house the Raspberry Pi if you wanted.


Yet Another DIY Handheld Pi Gaming Console

The Raspberry Pi is a great platform for running retro video games, and with the addition of some buttons, a TFT screen and some speakers it’s relatively inexpensive and easy to get a working console up and running. If you have access to even a cheap 3D printer, a good-looking DIY console is well within reach for not a lot of money. YouTube user [DIY Engineering] has a bunch of consumer-grade fabrication tools and has designed and built a high-end but still DIY RetroPi gaming console, the RKDR II.

Among the tools that [DIY Engineering] has are both a FDM and DLP 3D printer, a reflow oven, a couple of different CNC machines and a laser cutter. They are all consumer grade, but not necessarily cheap – especially combined! [DIY Engineering] uses Fusion3D to model the case, bezel and circuit board, the latter of which is a 4 layer board designed in Eagle and sent off to be fabbed. The buttons, D-pad, screen and battery are bought off the shelf, but everything else is DIY. Check out the video for the details – the tools used, and the design files, are linked in the information section under the video on YouTube.

Continue reading “Yet Another DIY Handheld Pi Gaming Console”

The Bakery That Runs On Emacs

When it comes to managing ingredients and baking at a professional bakery, we know that most people would turn to an SQL database and emacs.  Really, what else do you need? Okay, so maybe there are a few who would think that emacs couldn’t help you with this, so, here’s how [Piers] uses emacs and PostgresSQL to manage the day to day needs at his bakery.

[Piers] had tried a spreadsheet to keep track of things, but didn’t really like it when he had to create a new recipe:  “lots of tedious copying, pasting and repetition of formulae” is how he put it. As a ex-professional programmer, [Piers] was familiar with emacs and so set up a daily worksheet in emacs using org-mode. Each morning he runs org-capture to create the template for the day’s work. Some code in the org file (run with org-babel) can run a query on the database. He’s created some code to set up each day’s journal entry and to run the complicated database queries that he needs.

There is a list of things that [Piers] is working on next, including ingredient order management and accounting, but it works for him. And to stop any potential flame wars that might break out, it’s good to mention that the system does just that: It works for him. There are other possibilities. Take a look at Al’s Editor Wars article, or Elliot’s rebuttal, or, ignore the wars and read this article on baking with steam.

This Creepy Skull Shows Time With Its Eyes

Sometimes you have an idea, and despite it not being the “right” time of year you put a creepy skull whose eyes tell the time and whose jaw clacks on the hour into a nice wooden box for your wife as a Christmas present. At least, if you’re reddit user [flyingalbatross1], you do!

The eyes are rotated using 360 degree servos, which makes rotating the eyes based on the time pretty easy. The servos are connected to rods that are epoxied to the spheres used as eyes. Some water slide iris decals are put on the eyes offset from center in order to point in the direction of the minutes/hours. An arduino with a real time clock module keeps track of the time and powers the servos.

Check out the video after the break:

Continue reading “This Creepy Skull Shows Time With Its Eyes”

Add A Trackpoint To A Mechanical Keyboard

People love their tech, and feel like something’s missing when it’s not there. This is the story of one person’s desire to have the venerable trackpoint in their new keyboard.

[Klapse] loves a Lenovo old-style non-chicklet keyboard, so, despite the cost, five were ordered. They very quickly ended up with keys that didn’t work, although the trackpoints still did. After buying a sixth which ended up the same, [Klapse] decided that maybe giving up on the Lenovo keyboards was the best idea. A quick stop at a local store scored a fill-in mechanical keyboard, but in the back of [klapse]’s mind the need for a trackpoint remained. Maybe one could be frankensteined in to the keyboard that was just purchased?

Underside of the trackpoint, fitted to the keyboard PCB

The keyboard’s circuit board had traces everywhere, with nowhere to drill through between the correct keys, typically between the G, H and Y keys. But there was a hole used for mounting the PCB nearby. between the H, J, U and Y keys. The trackpoint needed to be extended to reach all the way through the key caps, so [klapse] searched the house looking for something that might do. Turns out that a knitting needle fits perfectly.

At this point a side-hack emerged. [Klapse] found a drill bit small enough to make the necessary hole in the trackpoint shaft to fit the needle. But the bit was too small for the drill chuck. In true hacking style, the bit was wrapped with duct tape and held in the drill. Sure, it wobbled a lot and it was really difficult to get it to drill in the center of the shaft, but it worked, eventually. The needle was cut off and glued into the hole, the key caps were modified a bit to allow the trackpoint through and the rubber tip put back on.

They say, “desire to cram old tech into new is the mother of invention.” Or something similar, anyway. Check out how a Teensy liberated a Lenovo laptop keyboard trackpoint and all. Also, check out this custom keyboard with integrated trackpoint, of course.

A Candle Powered Guitar Pedal

When it comes to guitar effects pedals, the industry looks both back and forward in time. Back to the 50’s and 60’s when vacuum tubes and germanium transistors started to define the sound of the modern guitar, and forward as the expense and rarity of parts from decades ago becomes too expensive, to digital reproductions and effects. Rarely does an effects company look back to the turn of the 19th century for its technological innovations, but Zvex Effects’ “Mad Scientist,” [Zachary Vex], did just that when he created the Candela Vibrophase.

At the heart of the Candela is the lowly tea light. Available for next to nothing in bags of a hundred at your local Scandinavian furniture store, the tea light powers the Zvex pedal in three ways: First, the light from the candle powers the circuit by way of solar cells, second, the heat from the candle powers a Stirling engine, a heat engine which powers a rotating disk. This disc has a pattern on it which, when rotated, modifies the amount of light that reaches the third part of the engine – photoelectric cells. These modulate the input signal to create the effects that give the pedal its name, vibrato and phase.

Controls on the engine adjust the amount of the each effect. At one end, the effect is full phasor, at the other, full vibrato. In between a blend of the two. A ball magnet on a pivot is used to control the speed of the rotating disk by slowing the Stirling engine’s flywheel as it is moved closer.

While more of a work of art than a practical guitar effect, if you happen to be part of a steam punk inspired band, this might be right up your alley. For more information on Stirling engines, take a look at this post. Also take a look at this horizontal Stirling engine.

Continue reading “A Candle Powered Guitar Pedal”

Lego Tardis Spins Through The Void

Using LEGO Technic gears and rods seems like a great way of bringing animation to your regular LEGO creation. Using gears and crank shafts you can animate models from your favorite TV show or movie like LEGO kinetic sculpture maker, [Josh DaVid] has done when he created a spinning TARDIS.  Crank the handle and the sculpture spins through space and time.

The large gear stays in place. The hidden gears, turned by the crank, rotate a shaft from below that goes through the large gear making the TARDIS rotate around the main axis. Connected to the TARDIS model is a smaller gear, at an angle, that meshes with the larger, stationary, gear. This smaller gear is what causes the TARDIS to rotate around its own axis while the whole thing rotates around the main axis. If your hand gets too tired, you can substitute a LEGO motor.

It’s a neat effect, and you can get the plans [Josh]’s Etsy page. The best part, however, is that you can get a set with all the parts as well! The TARDIS is a popular item here and we’ve had plenty of projects with it as the focus: Everything from a tree topper to sub-woofers. The only question we have, of course, is, ‘Is it bigger on the inside?’

Continue reading “Lego Tardis Spins Through The Void”