Save A Few Steps On Your Next Build With These Easy Linear Actuators

A lot of projects require linear motion, but not all of them require high-accuracy linear slides and expensive ball screws. When just a little shove for a door or the ability to pop something up out of an enclosure is all you need, finding just the right actuator can be a chore.

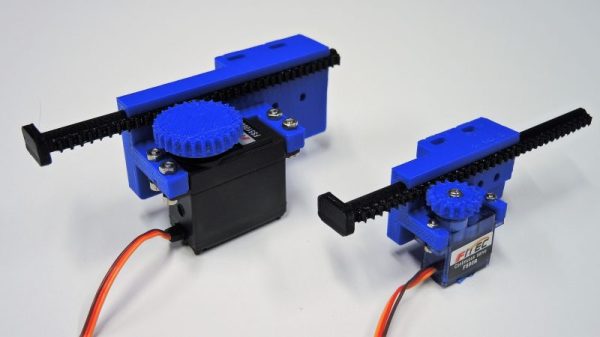
Unless someone has done the work for you, of course. That’s what [Ali] from PotentPrintables did with these 3D-printed linear actuators. It’s a simple rack-and-pinion design that’s suitable for light loads and comes in two sizes, supporting both the 9-g micro servos and the larger, more powerful version. Each design has a pinion that has to be glued to a servo horn, and a selection of rack lengths to suit your needs. The printed parts are nothing fancy, but seem to have material in the right places to bear the loads these actuators will encounter. [Ali] has included parts lists and build instructions in with the STL files, as well as sample Arduino code to get you started. The video below shows the actuators in action.

We’re heartened to learn that [Ali] was at least partly inspired to undertake this design by a previous Hackaday post. And we’re glad he decided to share his version; it might save us a few steps on our next build.

Continue reading “Save A Few Steps On Your Next Build With These Easy Linear Actuators”

Gyro Controlled RGB Blinky Ball Will Light Up Your Life

[James Bruton], from the XRobots YouTube channel is known for his multipart robot and cosplay builds. Occasionally, though, he creates a one-off build. Recently, he created a video showing how to build a LED ball that changes color depending on its movement.

The project is built around a series of 3D printed “arms” around a hollow core, each loaded with a strip of APA102 RGB LEDs. An Arduino Mega reads orientation data from an MPU6050 and changes the color of the LEDs based on that input. Two buttons attached to the Mega modify the way that the LEDs change color. The Mega, MPU6050, battery and power circuitry are mounted in the middle of the ball. The DotStar strips are stuck to the outside of the curved arms and the wiring goes from one end of the DotStar strip, up through the middle column of the ball to the top of the next arm. This means more complicated wiring but allows for easier programming of the LEDs.

Unlike [James’] other projects, this one is a quickie, but it works as a great introduction to programming DotStar LEDs with an Arduino, as well as using an accelerometer and gyro chip. The code and the CAD is up on Github if you want to create your own. [James] has had a few of his projects on the site before; check out his Open Dog project, but there’s also another blinky ball project as well.

Continue reading “Gyro Controlled RGB Blinky Ball Will Light Up Your Life”

Teardown And Repair Of A Police Recorder

You should probably hope you haven’t seen [Techmoan’s] cassette recorder before. That’s because it is a Neal interview recorder that was mainly used by police to tape interrogations. This one was apparently used by the Royal Navy and was sold for parts. Turns out, the repair was simple, but the teardown and the analysis of the machine — you can see it in the video below — is pretty interesting if you’ve never seen one of these before.

The unit looks like a heavy-duty piece of industrial electronics from the 1980s. Unlike a commercial tape deck, this one is made to do one thing: record. You can’t even rewind a tape in it. Also unlike a consumer recorder, the Neal has a few special features aimed at making sure you didn’t miss some important confession on tape. First, it beeps if there’s no microphone plugged in. When [Techmoan] showed the recording head, we noticed it looked like it was split in half. Towards the end of the video, we found out why. In addition, the unit records two tracks: one audio track and another with a voice reading the elapsed time every 10 seconds — pretty high tech for its day.

Continue reading “Teardown And Repair Of A Police Recorder”

Eight Player GameCube Adapter Is Ready For Smash

With the release of Smash Ultimate fast approaching for the Nintendo Switch, [Patrick Hess] wanted to get ahead of the game and make sure his squad had the equipment they’d need. Namely, support for the GameCube controllers that serious Smash Bros players demand. But it wasn’t enough to have one or two of them hooked up, or even four. Not even six GameCube controllers could satiate his desire. No, he needed to have support for eight simultaneous GameCube controllers, and he wanted to look good doing it too.

Enter his meticulously designed eight player GameCube to USB adapter. Made out of dual official Nintendo GameCube to USB adapters (intended for the Wii U) merged together in a 3D printed case, the final result looks like something that could earn the coveted Nintendo Seal of Approval. Or at least, something that might pop up on the import sites in the next month or two for a few bucks.

[Patrick] started the project by recreating the official adapter PCBs and their housings in 3D using a pair of calipers. After a couple of test prints to make sure he had all the dimensions right, he could then move on to designing his final enclosure knowing he had accurate data to model around.

In addition to the two adapter boards, there’s also a four port USB hub inside the device’s case. Each adapter has two USB leads, here shortened to fit inside the case, which connect up to the hub. The integrated hub allows connecting all eight GameCube controllers through only a single USB connection. All controllers worked as expected during intense testing on the Wii U’s version of Smash Bros, though at this point [Patrick] can only assume it will work when the Switch version is released.

If there’s a downside to this project, it’s that the design for the 3D printed case is so intricate that [Patrick] was only able to print it on a machine that supported water-soluble PVA supports. A somewhat tall order for the average hacker; it would be interesting to see if somebody could make a second pass on the enclosure that is geared more towards printability than aesthetics.

While the design of the GameCube controller remains somewhat controversial after all these years, there’s no denying it retains an impressive following. Whether turning them into USB devices, shrinking them to preposterously small dimensions, or just finding increasingly creative ways to use them on Nintendo’s latest console, hackers are definitely in love with the gonzo little controller that’s now pushing 20 years old.

These Are The 100 Finalists In The Hackaday Prize

The Hackaday Prize is the greatest hardware competition on the planet. It’s the Academy Awards of Open Hardware, and over the last few years we’ve been doing it, we’ve seen literally tens of projects that have gone from an idea to a prototype to a finished project to a saleable product. It’s the greatest success story the Open Hardware community has.

Over the last eight months, we’ve been deep in the weeds with this year’s Hackaday Prize. It’s five challenges, with twenty winners per challenge. That’s one hundred projects that will make it to the semifinals in the hopes of becoming the greatest project this year. Only one will make it, but truthfully they all deserve it. These are the one hundred finalists in the Hackaday Prize, all truly awesome projects but only one will walk home with the Grand Prize. Continue reading “These Are The 100 Finalists In The Hackaday Prize”

FT8: Saving Ham Radio Or Killing It?

It is popular to blame new technology for killing things. The Internet killed newspapers. Video killed the radio star. Is FT8, a new digital technology, poised to kill off ham radio? The community seems evenly divided. In an online poll, 52% of people responding says FT8 is damaging ham radio.  But ham operator [K5SDR] has an excellent blog post about how he thinks FT8 is going to save ham radio instead.

If you already have an opinion, you have probably already raced down to the comments to share your thoughts. I’ll be honest, I think what we are seeing is a transformation of ham radio and like most transformations, it is probably both killing parts of ham radio and saving others. But if you are still here, let’s talk a little bit about what’s going on in ham radio right now and how it relates to the FT8 question. Oddly enough, our story starts with the strange lack of sunspots that we’ve been experiencing lately. Continue reading “FT8: Saving Ham Radio Or Killing It?”

Flexible Battery Meter Bends Over Backward To Work

A lithium-ion battery tester seems like a simple project, at least electrically. But when you start thinking about the physical problem of dealing with a huge range of battery sizes, things get a little more complicated. Sure, you can 3D-print adapters and jigs to accommodate the different batteries, or you can cheat a bit and put the charger and tester circuit on a flexible PCB.

Maybe it’s the Kapton talking, but we really like the look of [Androkavo]’s project. The idea is simple – rather than use a rigid FR4 printed circuit board, a flexible polyimide film PCB a little longer than the biggest battery to be tested was fabricated. With large contacts on each end, the board can just be looped across the battery to take a reading. For charging, neodymium magnets on the other side of the board keep the charger in contact with the battery. The circuit itself is built around an STM8S003 8-bit microcontroller and a handful of discrete components. There’s a bar graph display for battery voltage that covers 2.0 to 4.9 volts, and a USB port for charging. The charger works with everything from the big 21700 cells down to the short 14500s. With the help of another magnet to keep the board from bending too sharply, even the diminutive 10180 can be charged. Check out the video below, which has some of the most relaxing music and best microscope shots of SMD soldering we’ve seen.

Flexible PCBs are versatile things. Not only can they make projects like this successful, but they can also wriggle around, swim, or even play music.

Continue reading “Flexible Battery Meter Bends Over Backward To Work”