heartbeat sensor

Simple And Inexpensive Heartbeat Detector

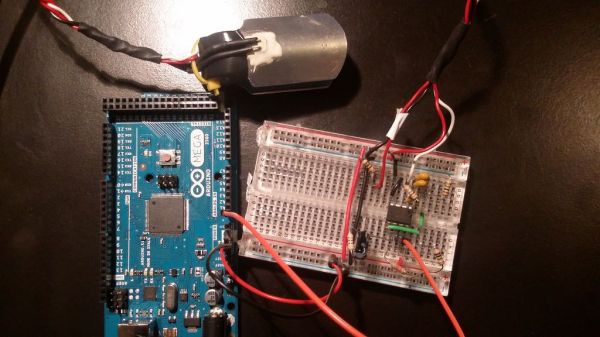
There are many ways to detect a heartbeat electronically. One of the simpler ways is to take [Orlando’s] approach. He’s built a finger-mounted pulse detector using a few simple components and an Arduino.

This circuit uses a method known as photoplethysmography. As blood is pumped through your body, the volume of blood in your extremities increases and decreases with each heartbeat. This method uses a light source and a detector to determine changes in the amount of blood in your extremities. In this case, [Orlando] is using the finger.

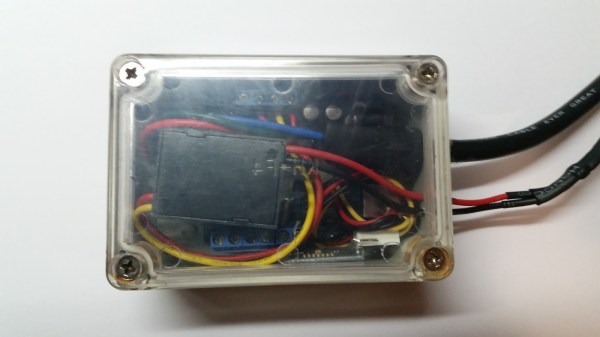
[Orlando] built a finger cuff containing an infrared LED and a photodiode. These components reside on opposite sides of the finger. The IR LED shines light through the finger while the photodiode detects it on the other side. The photodiode detects changes in the amount of light as blood pumps in and out of the finger.

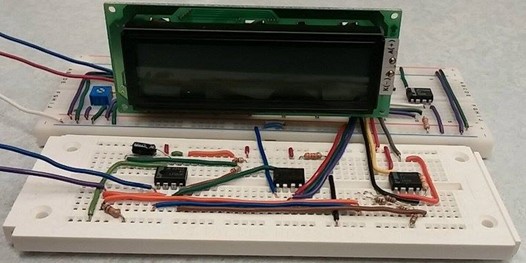
The sensor is hooked up to an op amp circuit in order to convert the varying current into a varying voltage. The signal is then filtered and amplified. An Arduino detects the voltage changes and transmits the information to a computer via serial. [Orlando] has written both a LabVIEW program as well as a Processing program to plot the data as a waveform. If you’d rather ditch the PC altogether, you might want to check out this standalone heartbeat sensor instead.

switchboard

Bypassing Broken SIP ALG Implementations

The SIP protocol is commonly used for IP telephone communications. Unfortunately it’s notorious for having issues with NAT traversal. Even some major vendors can’t seem to get it right. [Stephen] had this problem with his Cisco WRVS4400N router. After a bit of troubleshooting, he was able to come up with a workaround that others may find useful.

The router had built in SIP ALG functionality, but it just didn’t work. [Stephen] was trying to route SIP traffic from a phone to an Asterisk PBX system behind the router. The router just couldn’t properly handle these packets regardless of whether SIP ALG was enabled or disabled.

[Stephen] first tried to change the SIP port on the external VOIP phone from the default of 5060 to something else. Then he setup port forwarding on the router to the Asterisk box to forward the traffic to the Asterisk system on the original port. This sort of worked. The calls would go through but they would eventually drop after about 20 seconds.

The only thing that [Stephen] could get to work completely was to change the SIP port in Asterisk’s sip.conf file using the “bindport” directive. He changed it to some random unused high port number. Then he setup port forwarding on the router to forward incoming UDP packets on that port to the Asterisk system. This worked fine, but now all of the original phones behind the router stopped working because they were configured to use the default port of 5060.

Rather than re-configure all of the phones in the organization, [Stephen] made one change on the Asterisk system. He setup an iptables rule to forward all incoming traffic on UDP port 5060 to the new SIP port. Now all of the phones are working with minimal changes across the organization. It’s a lot of hassle to go through just because the router couldn’t handle SIP correctly, but it gets the job done.

e-cigarette

How Many Puffs Does It Take To Kill An E-Cigarette?

Most of us have probably heard the old Tootsie Pop slogan, “How many licks does it take to get to the center of a Tootsie Pop?” [E-Smoker2014] had a similar question about his e-cigarettes. These devices are sometimes advertised with the number of puffs they are good for. [E-Smoker2014] had purchased an e-cigarette on a trip to Belgium that advertised 500 puffs. After a bit of use, he started to suspect that he wasn’t getting the advertised number of puffs in before the battery would die. Rather than just accept that the world may never know for sure, he decided to test it out himself.

There aren’t many details on this build, but you can tell what’s going on from the video below. [E-Smoke2014r] built a machine to artificially puff on an e-cigarette. The e-cigarette is hooked up to what appears to be vinyl tubing. This tubing then attaches to a T-splitter. One end of the splitter is hooked up to a DIY actuator valve that can open or close the port. The other end of the splitter is hooked up to more tubing, which in turn is attached to a plastic cylinder placed in a container of water.

To simulate breathing, the computer first opens the relief valve in the splitter. It then mechanically lowers the plastic container into the bowl of water, pushing out a bunch of air in the process. The valve closes, and the computer then raises the plastic container out of the water. This action creates suction that draws air in through the e-cigarette like a normal user would do with their lungs. The computer increases the puff count and then repeats the process, expelling any vapor out of the relief valve.

The results of the test indicated that [E-Smoker] could only get 59 puffs out of this particular e-cigarette before draining the battery. Not even close to the advertised 500 puffs. Maybe he should consider building his own e-cigarette vaporizer? Continue reading “How Many Puffs Does It Take To Kill An E-Cigarette?”

Body Fat Measurement

DIY Electrical Body Fat Analyzer

Whether you are trying to drop some fat or build some muscle, it’s important to track progress. It’s easy enough to track your weight, but weight doesn’t tell the whole story. You might be burning fat but also building muscle, which can make it appear as though you aren’t losing weight at all. A more useful number is body fat percentage. Students from Cornell have developed their own version of an electrical body fat analyzer to help track body fat percentage.

Fat free body mass contains mostly water, whereas fat contains very little water. This means that if you were to pass an electrical current through a body, the overall bioelectrical impedance will vary depending on how much fat or water there is. This isn’t a perfect system, but it can give a rough approximation in a relatively easy way.

The students’ system places an electrode on one hand and another on the opposite foot. This provides the longest electrical path possible in the human body to allow for the most accurate measurement possible. An ATMega1284P is used to generate a 50kHz square wave signal. This signal is opto-isolated for user safety. Another stage of the circuit then uses this source signal to generate a 10ua current source at 50kHz. This is passed through a human body and fed back to the microcontroller for analysis.

The voltage reading is sent to a MATLAB script via serial. The user must also enter in their weight and age. The MATLAB script uses these numbers combined with the voltage reading to estimate the body fat percentage. In order to calibrate the system, the students measured the body fat of 12 of their peers using body fat calipers. They admit that their sample size is too small. All of the sample subjects are about 21 years old and have a similar body fat percentage. This means that their system is currently very accurate for people in this range, but likely less accurate for anyone else. Continue reading “DIY Electrical Body Fat Analyzer”

Naenara

Messing Around With Naenara, North Korea’s Web Browser

[Robert] has been snooping around Naenara in order to learn more about how North Korea’s intranet might work. Naenara is the web browser that comes bundled with North Korea’s official Linux-based operating system known as Red Star OS. [Robert] once saw a screenshot of the browser and found it interesting that the browser seemed to automatically load a non-routable IP address immediately upon start-up. This made him curious about what other oddities one might uncover from the software.

Upon start-up, the browser tries to load a page located at IP address 10.76.1.11, which is a reserved IP address for private use. This indicated that North Korea’s “Internet” is actually more of in intranet. [Robert] suspects that the entire country may be running in private address space, similar to how your home or business likely runs.

[Robert’s] next thoughts were that the browser looks like a very old version of Mozilla Firefox, but with some default configuration changes. For one, all crashes are automatically transmitted to “the mothership”, as [Robert] calls it. He suspects this is to fix not only bugs, but also to find and repair any security vulnerabilities that may allow users more control.

There are some other interesting changes as well, such as the supported security certificates. The Naenara browser only accepts certificates issued by the DPRK, which would make it very easy for them to snoop on encrypted HTTPS traffic. there is also evidence suggesting that all traffic for the entire country is routed through a single government controlled proxy server.

None of these findings are all that surprising, but it’s still interesting to see what kind of information can be gleamed from poking around the browser and operating system. [Robert] has found more than just these few findings. You can check out the rest of his findings on his blog.

[via Reddit]

Bluetooth Fuel Monitor

Bluetooth Enabled Fuel Consumption Monitor

[Malebuffy] bought himself a used boat last year. Fuel isn’t exactly cheap where he lives, so he wanted a way to monitor his fuel consumption. He originally looked into purchasing a Flowscan off the shelf, but they were just too expensive. In the interest of saving money, [Malebuffy] decided to build his own version of the product instead.

To begin, [Malebuffy] knew he would need a way to display the fuel data once it was collected. His boat’s console didn’t have much room though, and cutting holes into his recently purchased boat didn’t sound like the best idea. He decided he could just use his smart phone to display the data instead. With that in mind, [Malebuffy] decided to use Bluetooth to transmit the data from the fuel sensors to his smart phone.

The system uses an older Arduino for the brain. The Arduino gets the fuel consumption readings from a Microstream OF05ZAT fuel flow sensor. The Arduino processes the data and then transmits it to a smart phone via a Bluetooth module. The whole circuit is powered from the boat battery using a DC adapter. The electronics are protected inside of a waterproof case.

[Malebuffy’s] custom Android apps are available for download from his website. He’s also made the Arduino code available in case any one wants to copy his design.

Binary Clock

Binary Clock Would Make Doc Brown Proud

[Brett] was looking for a way to improve on an old binary clock project from 1996. His original clock used green LEDs to denote between a one or a zero. If the LED was lit up, that indicated a one. The problem was that the LEDs were too dim to be able to read them accurately from afar. He’s been wanting to improve on his project using seven segment displays, but until recently it has been cost prohibitive.

[Brett] wanted his new project to use 24 seven segment displays. Three rows of eight displays. To build something like this from basic components would require the ability to switch many different LEDs for each of the seven segment displays. [Brett] instead decided to make things easier by using seven segment display modules available from Tindie. These modules each contain eight displays and are controllable via a single serial line.

The clock’s brain is an ATmega328 running Arduino. The controller keeps accurate time using a DCF77 receiver module and a DCF77 Arduino library. The clock comes with three display modes. [Brett] didn’t want and physical buttons on his beautiful new clock, so he opted to use remote control instead. The Arduino is connected to a 433MHz receiver, which came paired with a small remote. Now [Brett] can change display modes using a remote control.

A secondary monochrome LCD display is used to display debugging information. It displays the time and date in a more easily readable format, as well as time sync information, signal quality, and other useful information. The whole thing is housed in a sleek black case, giving it a professional look.