No Need To Watch Your Tea, This Robot Does It For You

For anyone who’s ever had to make their own tea, steeping it for the right amount of time can be a pain. That’s precisely the problem that the automatic tea brewing robot solves with its painless approach to brewing tea, built by Slovenian electrical engineering student [Kristjan Berce].

You can use the robot by setting a timer on the knob, at which point the robot raises it arm for the tea bag then dips in the water every 30 seconds until the time has passed. At the end of the timer, the bag is raised clear of the cup to end the brewing. It’s a remarkably simple design that almost evokes chindogu (the Japanese art of useless inventions) if not for the fact that the robot actually serves a useful purpose.

The components for 3D printing the robot are available online, consisting of a case, a container for the Arduino-powered electronics, the lever for holding the tea, and the gear that raises the lever up and down. The device also uses an integrated Li-Ion battery with an accessible charging port and integrated BMS. A 35BYJ46 stepper motor and ULN2003 driver are used to move the 3D printed mechanism. The device uses a potentiometer for setting the steeping time between 1 and 9 minutes, and there’s even a buzzer for indicating once the tea is done brewing.

The Gerber and Arduino code files are open-source for any hackers looking to make their own tea brewers; just take care they operate with “deadly punctuality”.

Continue reading “No Need To Watch Your Tea, This Robot Does It For You”

Solve Your Precision Woes With A Sliding Angle Grinder

Angle grinders are among the most useful tools for anyone who’s ever had to cut metal. They’re ergonomic, compact, and get the job done. Unfortunately, one of the tradeoffs you usually make when using them is precision.

But thankfully, there’s a DIY solution. YouTuber [workshop from scratch] demonstrated the build process for a sliding angle grinder in a recent video, welding steel beams into a flat frame and attaching fitted beams on top to slide across the rows. Where necessary, spacers are used to ensure that the slider is perfectly fitted to the beam. The contraption holding the angle grinder – a welded piece of steel bolted to the sliding mechanism – has a grip for the user to seamlessly slide the tool across the table.

The operation is like a more versatile and robust chop saw, not to mention the customized angle references you can make to cut virtually anything you like. The build video shows the entire process, from drill pressing and turning holes to welding pieces of the frame together to artfully spray painting the surface a classy black, with familiarity enough to make the project look like a piece of cake.

As the name implies, [workshop from scratch] is all about building your own shop tools, and we’ve previously taken a look at their impressive hydraulic vise and mobile crane builds. These tools, largely hacked together from scraps, prove that setting up your own shop doesn’t necessarily mean you need to break the bank.

Continue reading “Solve Your Precision Woes With A Sliding Angle Grinder”

A Retro Gaming Console For The New Generation

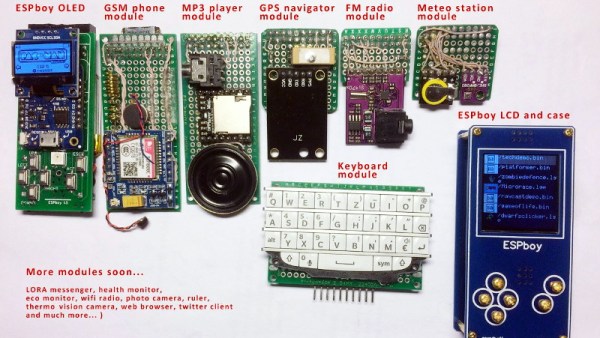
Ostensibly the ESPboy is an open-source hackable game engine built as an IoT platform for STEM education and play, but there’s no way [RomanS] could have been inspired by anything other than retro gaming consoles from the near past. For anyone who grew up playing with Tamagotchi pets or Palm Pilots, this project is going to be a major throwback.

The Saint Petersburg-based microcontroller hobbyist utilizes a ESP8266 microcontroller to build a series of modules for different game play modes, including a TFT display, GSM phone, MP3 player, GPS navigator, FM radio, and keyboard module. He has plans to build even more modules, including a LoRa messenger and thermal camera, to really expand the system’s capabilities.

Since the board has built-in WiFi, firmware can be uploaded to the device without a wired connection and compiler. The nature of the project makes the board compatible with the Arduino IDE and Micropython, which makes hacking the software even easier.

A TP4056 battery charging module charges the LiPo, although depending on the battery capacity, the charging current (set by the R3 resistor on the controller) does require some change. A MCP4725 I2C DAC is used for smooth driving the LCD’s backlight. In order to extend the battery life, the battery controller uses sleep mode to periodically wake up to measure and send data, which allows it to extend its battery life without external power. There’s also transistor driven buzzers that provide a little extra feedback to the user when playing games, complete with a variable resistor to adjust the sound volume.

A number of free pins run along the periphery for connecting to other modules, including pins for GPIO extension, sensor adapters, connectors to addressable LEDs, and an extension slot for actuators. For anyone interested in making their own version of the ESPboy, the PCB schematics are accessible online.

Projects like the Arduboy have shown that a small microcontroller-based game system can be equal parts fun and educational, so we’ve been excited to see more of these types of projects popping up during the course of the 2019 Hackaday Prize.

Continue reading “A Retro Gaming Console For The New Generation”

Keeping Kids In School The Smart Way

For institutions with high traffic, such as schools and movie theaters, it can be difficult to keep track of individuals moving in and out, especially without a critical mass of security. For schools especially, keeping track of student attendance and preventing kids from leaving campus in the middle of the day can be a costly problem.

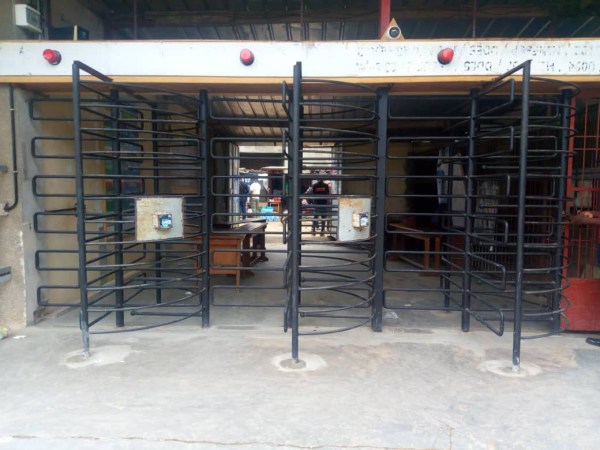
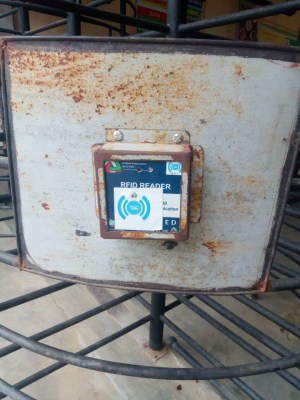
The solution that Tunisian engineers [Michael Djimeli], [Darius Koliou], and [Jinette Tankoua] came up with was to create a smart gate that only turns when checks are carried out by designated security officers. The design is retrofitted to existing school turnstiles in his hometown of Monastir, Tunisia, and uses an RFID card, biometric devices, and a host of access controls to ensure that the student attempting to turn the turnstile is validated first.

The smart gate uses a few methods for identification – either by RFID, fingerprint, facial recognition, or by reading a QR code. An external database stores each user’s data and their transaction history, effectively storing their attendance data. In addition to relaying the information to an administrator, the smart gate also checks the credit of the user — whether they’ve paid the entrance fee for a movie theater, or whether they’re permitted to exit school grounds as a student.

A Raspberry Pi is used as the card collector, relaying information on transaction data over WiFi. Meanwhile local identification information via biometric devices and key fobs are relayed to the processor over Bluetooth. There are also plans to develop a mobile app to track the status of the smart gate remotely.

While the full systems integration isn’t published yet, there are several photos of the control box, which shows the components used for the first smart gate. The mechanical design was successfully tested on the IUC Douala Cameroon university campus (with 35-45 students identified per minute), and the project will hopefully be repeated within more schools in the coming year.

Lighting The Way For The Visually Impaired

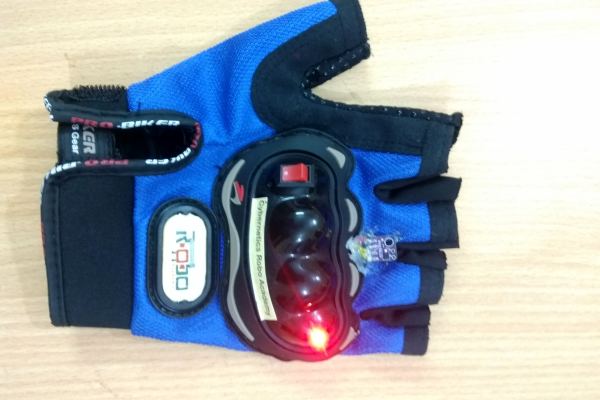
The latest creation from Bengali roboticist [nabilphysics] might sound familiar. His laser-augmented glove gives users the ability to detect objects horizontally in front of them, much like a cane or pole is used by the visually impaired to navigate through a physical space.

As a stand in for the physical cane, he uses the VL53L0X time-of-flight (TOF) sensor which detects the time taken for a laser source to bounce back to the sensor. Theses are much more accurate than IR distance sensors and have a much finer focus than ultrasonic sensors for excellent directionality.

While the sensors can succumb to interferences from background light or other time-of-flight sensors, the main advantages are speed of calculation (it relies on a single shot to compute the distances within a scene) and an efficient distance algorithm that simplifies the measurement of distance data. In contrast to stereo vision, which requires complex correlation algorithms, the process for extracting information for a time-of-flight sensor is entirely direct, requiring a small amount of processing power.

The glove delivers haptic feedback to the user to determine if an object is in their way. The feedback is controlled through an Arduino Pro Mini, powered remotely by a LiPo battery. The code is uploaded to the Arduino from an FTDI adapter, and works by taking continuous readings from the time-of-flight sensor and determining if the object in front is within 450 millimeters of the glove, at which point it triggers the vibration motor to alert the user of the object’s presence.

Since the glove used for the project is a bicycle glove, the form factor is straightforward — the Arduino, motor, battery, and switch are all located inside a plastic box on the top of the glove, while the time-of-flight sensor sticks out to make continuous measurements when the glove is switched on.

In general, the setup is fairly simple, but the idea of using a time-of-flight sensor rather than an IR or sonar sensor is interesting. In the broader usage of sensors, LIDARs are already the de facto sensor used for autonomous vehicles and robotic components that rely on distance sensing. This three-dimensional data wouldn’t be much use here and this sensor works without mechanical moving parts since it doesn’t rely on the point-by-point scan from a laser beam that LIDAR systems use.

Hypnotic Visuals Synthesizer

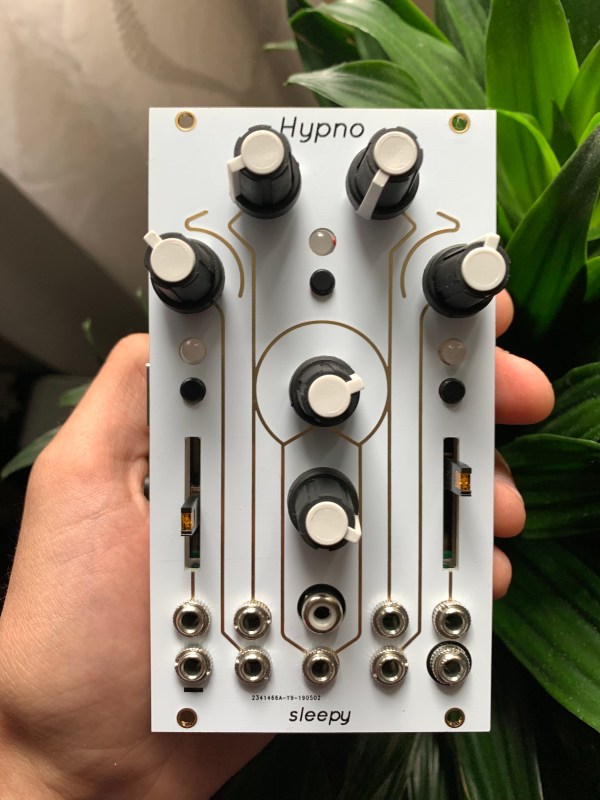
Ever wanted to make some seriously trippy retro graphics to go along with your lo-fi hip hop beats? Now you can, with [teafella]’s aptly named Hypno Video Synthesizer, a Raspberry Pi-based video synthesizer that digitally emulates and extends analog video workflows through colorization, shape generation, and feedback, patching the modifications into a compact interface. The device allows music creators to perform with live visuals, or alternatively to create a unique visual source for a video setup. Once the CV input is plugged in, all it requires is a composite display and power to start working.

Hypno takes input through a control voltage (CV) jack using a MCP3008 ADC via SPI, with voltages scaled from -5-5V to 0-5V. The device attaches on top of a Raspberry Pi, using Raspbian for the operating system and the Pi Zero GPIO to interface with an OpenGL Engine. The input parameters are taken from knobs through a multiplexer into a single channel of the ADC, with values offset in software based on the CV inputs.

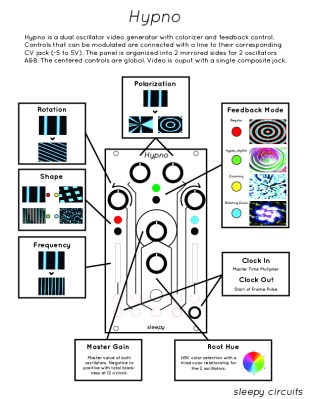
Using the Hypno ends up being fairly straight forward, as the controls are organized onto two mirrored sides for the two oscillators A & B, with global controls in the center. There are knobs that control polarization, rotation, shape, feedback modes (regular, hyper digital, zooming, rotating zoom), clock in/clock out, frequency, root hue, and master gain, as well as RGB LEDs that provide visual feedback.

A single jack outputs the composite result, although a micro-HDMI plug can also be used on the back. For advanced functionality, Hypno allows for patching, which mixes effects on top of one another and allows for shapes such as oscillator cross modulation. There are also alt-controls that open up self modulation and other shapes. Examples include bipolar drift (smoothly scrolls the oscillator) and mirroring (mirrors the oscillator’s shape in different patterns for a kaleidoscope-eque tiled madness).

The software is written in C++ and GLSL, with the main engine running with one plane in OpenGL, drawing the output of a GLSL shader. The CV and knob inputs are fed into shader uniforms that are used to change the visuals in the engine.

[teafella], a self-professed Arduino user, uses WiringPi for the GPIO interactions. The Shader system is inspired by analog video synthesis, with every shape having a simulated “scan” over the screen and function mapped to it that can be transformed into polar coordinates.

The setup for Hypno is fully compatible with analog CV equipment such as Eurorack synthesizers, which makes it easy for music creators to plug and play. Here’s a couple of sample outputs from some soundtracks inputted into Hypno:

Too many combinations to even imagine? Check out a demo of Hypno in action!

Continue reading “Hypnotic Visuals Synthesizer”

Return Of The MITERS Journal

After a long hiatus, the MIT Electronic Research Society, better known as MITERS, has released their summer 2019 edition of the MITERS Journal, officially known as Volume 43 Issue 1.

The latest edition features a throwback to the first journal published in 1976, showing that some things just never change:

“What is MITERS? MITERS is the MIT Electronic Research Society, a non-profit, student-run laboratory for MIT’s EE hackers. The Society provides work space, tools, low-cost parts and information to any number of the MIT community. We have a few good ‘scopes, various and sundry pieces of test equipment, a b’zillion power supplies, and Bertha, our beloved PDP-7 computer. (No snickers from the peanut gallery, please. Bertha is very sensitive.) We also have the most incredible plunder-trove on campus.”

– 1976 Journal 1 Number 1

The space remains a member-run project space and maker shop, providing the MIT community with access to tools, knowledge, and room to build projects. Continue reading “Return Of The MITERS Journal”