When Virgin Orbit filed for bankruptcy in April, it was clear the commercial launch provider was in serious trouble. Despite successfully putting four payloads into low Earth orbit, the spin-off of Richard Branson’s Virgin Galactic space tourism company had struggled to achieve a high enough launch cadence to become profitable, and had recently suffered a highly-publicized failure when their first launch from the UK from the newly-completed Spaceport Cornwall ended in a complete loss of the vehicle.
There was some hope that a buyer would swoop in and save them at the last minute, but now that the bankruptcy auction has spread out the company’s assets among several other players in the commercial launch industry, Virgin Orbital is officially no more. With future launches now off the table, the company’s remaining employees are set to be let go as operations wind down over the coming weeks.
Many Hackaday readers will be familiar with the term “core memory”, likely thanks to its close association with the Apollo Guidance Computer. But knowing that the technology existed at one point and actually understanding how it worked is another thing entirely. It’s a bit like electronic equivalent to the butter churn — you’ve heard of it, you could probably even identify an image of one — but should somebody hand you one and ask you to operate it, the result probably won’t be too appetizing.
That’s where Andy Geppert comes in. He’s turned his own personal interest into magnetic core memory into a quest to introduce this fascinating technology to a whole new generation thanks to some modern enhancements through his Core64 project. By mating the antiquated storage technology with a modern microcontroller and LEDs, it’s transformed into an interactive visual experience. Against all odds, he’s managed to turned a technology that helped put boots on the Moon half a century ago into a gadget that fascinates both young and old.
In this talk at the 2022 Hackaday Supercon, Andy first talks the audience through the basics of magnetic core memory as it was originally implemented. From there, he explains the chain of events that lead to the development of the Core64 project, and talks a bit about where he hopes it can go in the future.
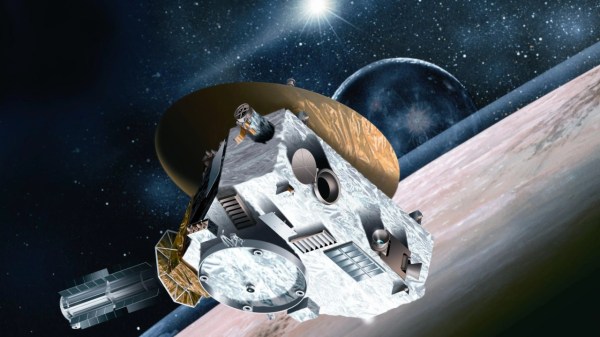
In 2015 NASA’s New Horizons spacecraft provided humanity with the first up-close views of Pluto, passing just 12,472 km (7,750 mi) from the surface. What had always been little more than a fuzzy blip at the edge of the solar system could finally be seen in stunning high resolution. Unfortunately, the deep space probe could only provide us with a relatively fleeting glimpse at the mysterious dwarf planet — the physics of such a distant interplanetary flight meant the energy required to slow down and enter orbit around Pluto was beyond the tiny spacecraft’s abilities.
The craft, often described as being roughly the size and shape of a grand piano, raced past Pluto and its moons at a relative velocity of approximately 49,600 km/h (30,800 mph) and headed out in the direction of Sagittarius. The incredible rate at which New Horizons traveled officially put it on track to be just the fifth spacecraft to leave the solar system, after the Pioneer and Voyager probes. Even so, its onboard systems were still in good health, and if given a sufficiently distant target, the $700 million craft was ready and able to collect more data.
Pluto, as seen by New Horizons
Accordingly, almost exactly a year after it flew over Pluto, New Horizons officially received a mission extension from NASA. As it blasted through deep space, the craft would seek out and study as many objects as it could in the region of space known as the Kuiper belt. Given that there are no current plans to send other spacecraft through this distant area of the outer solar system, New Horizons was uniquely positioned to make what could be once-in-a-lifetime observations.
Or at least, that was the plan. Recently, notes from a May 4th meeting of the Outer Planets Assessment Group (OPAG) were released that revealed NASA’s plans to redirect New Horizons from its work in the Kuiper belt to focus on heliospheric science in 2025. Those in attendance said the meeting became “heated” as New Horizons principal investigator Alan Stern questioned the logic of potentially changing the craft’s mission this late in the game.
While computers have become ever faster and more capable over the years, it’s hard to say they’ve become any more exciting. In fact, they’ve become downright boring. Desktop, laptop, or mobile, they’re all more or less featureless slabs of various dimensions. There’s not even much in the way of color variation — the classic beige box is now available with white, black, or metallic finishes.
Believing that such a pedestrian appearance isn’t befitting a device that puts the world’s collected knowledge at our fingertips, [Keegan McNamara] started exploring a more luxurious approach to computing. Gone is the mass produced injection molded plastic, in its place is hand-carved maple and Tuscan leather. Common computing form factors are eschewed entirely for a swooping console inspired by fine furniture and classic sports cars. The final result, called the Mythic I, is equal parts art and science. Not just a bold reimaging of what a computer can be, but an object to be displayed and discussed. Continue reading “Mythic I: An Exploration Of Artisanal Computing”→
While we tend to think of Amazon’s e-paper Kindles as more or less single-purpose devices (which to be fair, is how they’re advertised), there’s actually a full-featured Linux computer running behind that simple interface, just waiting to be put to work. Given how cheap you can get old Kindles on the second hand market, this has always struck us as something of a wasted opportunity.
This is why we love to see projects like Kindlefusion from [Diggedypomme]. It turns the Kindle into a picture frame to show off the latest in machine learning art thanks to Stable Diffusion. Just connect your browser to the web-based control interface running on the Kindle, give it a prompt, and away it goes. There are also functions to recall previously generated images, and if you’re connecting from a mobile device, support for creating images from voice prompts.
You can find cheap older Kindles on eBay.
All you need is a Kindle that can be jailbroken, though technically the software has only been tested against older third and fourth-generation hardware. From there you install a few required packages as listed in the project documentation, including Python 3. Then you just move the Kindlefusion package over either via USB or SSH, and do a little final housekeeping before starting it up and letting it take over the Kindle’s normal UI.
Given the somewhat niche nature of Kindle hacking, we’re particularly glad to see that [Diggedypomme] went through the trouble of explaining the nuances of getting the e-reader ready to run your own code. While it’s not difficult to do, there are plenty of pitfalls if you’ve never done it before, so a concise guide is a nice thing to have. Unfortunately, it seems like Amazon has recently gone on the offensive, with firmware updates blocking the exploits the community was using for jailbreaking on all but the older models that are no longer officially supported.
While it’s a shame you can’t just pick up a new Kindle and start hacking (at least, for now), there are still millions of older devices floating around that could be put to good use. Hopefully, projects like this can help inspire others to pick one up and start experimenting with what’s possible.
We’re sorry, the politically correct term these days is “unidentified anomalous phenomena” (UAP), as it’s less likely to excite those with a predilection for tinfoil hats. But whether you call them flying objects or anomalous phenomena, it’s that unidentified part that has us interested.
Before you get too excited, the meeting is about how NASA can “evaluate and study UAP by using data, technology, and the tools of science”, and the press release explains that they won’t be reviewing or assessing any unidentifiable observations. So if you’re hoping for the US government’s tacit acknowledgment that we’re not alone in the universe, you’ll probably be disappointed. That said, they wouldn’t have to assemble a team to study these reports if they were all so easily dismissed. As always, interstellar visitors are dead last on the list of possible explanations, but some cases have too much hard evidence to be dismissed out of hand. They might not be little green men, but they are something.
If you were reading this post a month ago, you could have been forgiven for thinking it was an April Fools post. But we assure you, this is no joke. A company called HeatBit has recently opened preorders for their second generation of Bitcoin miner that doubles as a space heater.
The logic goes something like this: if you’re going to be using an electric space heater anyway, which essentially generates heat by wasting a bunch of energy with a resistive element, why not replace that element with a Bitcoin miner instead? Or at least, some of the element. The specs listed for the HeatBit Mini note that the miner itself only consumes 300 watts, which is only responsible for a fraction of the device’s total heat output. Most of the thermal work is actually done by a traditional 1000 watt heater built inside the 46 cm (18 inch) tall cylindrical device.