This Open Hardware Li-Ion Charger Skips The TP4056

There’s a good chance that if you build something which includes the ability to top up a lithium-ion battery, it’s going to involve the incredibly common TP4056 charger IC. Now, there’s certainly nothing wrong with that. It’s a decent enough chip, and there are countless pre-made modules out there that make it extremely easy to implement. But if the chip shortage has taught us anything, it’s that alternatives are always good.

So we’d suggest bookmarking this opensource hardware Li-Ion battery charger design from [Shahar Sery]. The circuit uses the BQ24060 from Texas Instruments, which other than the support for LiFePO4 batteries, doesn’t seem to offer anything too new or exciting compared to the standard TP4056. But that’s not the point — this design is simply offered as a potential alternative to the TP4056, not necessarily an upgrade.

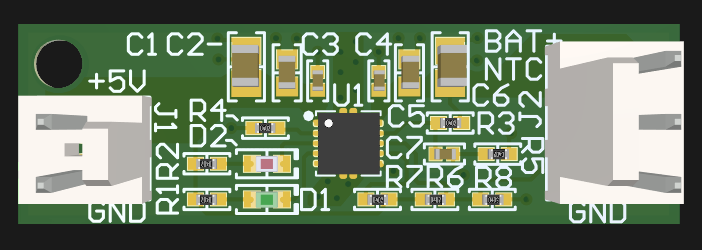
[Shahar] has implemented the design as a 33 mm X 10 mm two-layer PCB, with everything but the input and output connectors mounted to the topside. That would make this board ideal for attaching to your latest project with a dab of hot glue or double-sided tape, as there are no components on the bottom to get pulled off when you inevitably have to do some rework.

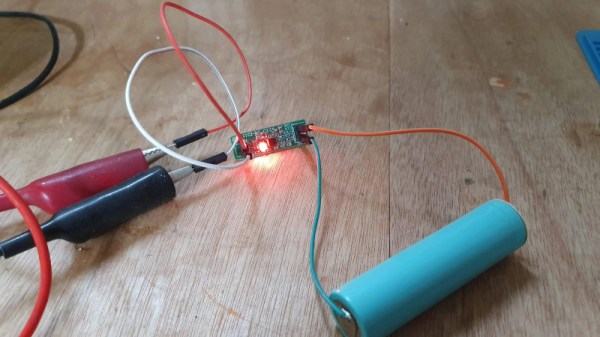
The board takes 5 VDC as the input, and charges a single 3.7 V cell (such as an 18650) at up to 1 Amp. Or at least, it can if you add a heatsink or fan — otherwise, the notes seem to indicate that ~0.7 A is about as high as you can go before tripping the thermal protection mode.

Like the boilerplate TP4056 we covered recently, this might seem like little more than a physical manifestation of the typical application circuit from the chip’s datasheet. But we still think there’s value in showing how the information from the datasheet translates into the real-world, especially when it’s released under an open license like this.

A closeup of a ring and "flower" electrode attached to a translucent piece of material with fainter wires. The flower and ring electrodes are made of molybdenum that has a somewhat accordion fold back-and-forth cross-section.

Electronic Bandage Speeds Wound Healing

We’re a long way from the dermal regenerators in Star Trek, but researchers at Northwestern University have made a leap forward in the convenient use of electrotherapy for wound healing.

Using a ring and center “flower” electrode, this bioresorbable molybdenum device restores the natural bioelectric field across a wound to stimulate healing in diabetic ulcers. Only 30 minutes of electrical stimulation per day was able to show a 30% improvement in healing speed when used with diabetic mice. Power is delivered wirelessly and data is transmitted back via NFC, meaning the device can remain on a patient without leaving them tethered when not being treated.

Healing can be tracked by the change in electrical resistance across the wound since the wound will dry out as it heals. Over a period of six months, the central flower electrode will dissolve into the patient’s body and the rest of the device can be removed. Next steps include testing in a larger animal model and then clinical trials on human diabetic patients.

This isn’t the first time we’ve covered using electricity in medicine.

Continue reading “Electronic Bandage Speeds Wound Healing”

Quick And Dirty Microscope Motion Control For Focus Stacking

If you’ve spent much time looking through a microscope, you know that their narrow depth of field can be a bit challenging to deal with. Most microscopes are designed to only have a very thin slice of the specimen in focus, so looking at anything above or below that plane requires a focus adjustment. It’s tedious and fussy, and that makes it a perfect target for automation.

The goal behind [ItMightBeWorse]’s microscope mods is “focus stacking,” a technique where multiple images of the same sample taken at different focal planes can be stitched together so that everything appears to be in focus. Rather than twist knobs and take pictures manually, he built a simpler Arduino-based rig to do the job for him. Focus control is through a small stepper motor connected to the fine focus knob of the scope, while the DSLR camera shutter is triggered through a simple relay board. There’s also lighting control, with an RGB LED ring light that can change both the light level on the sample as well as the tint.

The code is very simple, and the setup is quite temporary looking, but the results are pretty impressive. We could do without the extreme closeup of that tick — nasty little arachnids — but the ant at the end of the video below has some interesting details. [ItMightBeWorse] doesn’t mention how the actual stacking is being done, but this CNC-based focus stacking project mentions a few utilities that take help with the post-processing.

Continue reading “Quick And Dirty Microscope Motion Control For Focus Stacking”

A Retro-Style Trainer For Motorola’s 1-Bit Chip

If you want to program a microcontroller today, you pop open your editor of choice, bang out some code, and flash it over USB. But back in ancient times, when your editor was a piece of paper and you didn’t even have a computer of your own, things were a bit different. In that case, you might have reached for a “trainer”: a PCB that included the chip you wanted to program along with an array of switches, LEDs, and maybe even a hex keypad for good measure. Grab yourself the programming manual (printed on paper, naturally), and you’re good to go.

So when [Nicola Cimmino] became curious about the Motorola MC14500, a 1-bit ICU (Industrial Control Unit) from the 1970s, he could think of no more appropriate way to get up close and personal with the chip than to design an era-appropriate trainer for it. The resulting board, which he’s calling the PLC14500 Nano, is festooned with LEDs that show the status of the system buses and registers. Thanks to the chip’s single-step mode, this gives you valuable insight into what’s happening inside this piece of classic silicon.

An early breadboard version of the trainer.

But just because the board looks like it could have come from the 1970s doesn’t mean you have to live in the past. There’s an Arduino Nano on the backside of the trainer that handles communicating with a modern computer. [Nicola] even provided an assembler that lets you write your code in ASM before shuttling the binary off to the board for execution.

Interested in getting your hands on one? Not a problem. The design is completely open source for anyone who wants to build one at home. In fact, [Nicola] even got his trainer OSHW Certified. He’s also selling kits on Tindie, though at the time of this writing, they’re sold out.

This project has actually been a long time coming. We covered an early breadboard prototype of the concept back in 2015. We’re glad to see that [Nicola] was finally able to bring this one across the finish line. It’s a beautiful piece of hardware, and thanks to its open-source nature, something that the whole community can enjoy and learn from.

Enzymes Make Electricity From Thin Air

There’s an old magic trick known as the miser’s dream, where the magician appears to pull coins from thin air. Australian scientists say they can now generate electricity out of thin air with the help of some enzymes. The enzyme reacts to hydrogen in the atmosphere to generate a current.

They learned the trick from bacteria which are known to use hydrogen for fuel in inhospitable environments like Antarctica or in volcanic craters. Scientists knew hydrogen was involved but didn’t know how it worked until now.

The enzyme is very efficient and can even work on trace amounts of hydrogen. The enzyme can survive freezing and temperature up to 80 °C (176 °F). The paper seems more intent on the physical mechanisms involved, but you can tell the current generated is minuscule. We don’t expect to see air-powered cell phones anytime soon. Then again, you have to start somewhere, and who knows where this could lead?

Microbial fuel cells aren’t new, of course. If you just want lights, you can skip the electricity altogether.

Computers For Fun

The last couple years have seen an incredible flourishing of the cyberdeck scene, and probably for about as many reasons as there are individual ’deck designs. Some people get really into the prop-making, some into scrapping old tech or reusing a particularly appealing case, and others simply into the customization possibilities. That’s awesome, and they’re all different motivations for making a computer that’s truly your own.

But I really like the motivation and sentiment behind [Andreas Eriksen]’s PotatoP. (Assuming that his real motivation isn’t all the bad potato puns.) This is a small microcomputer that’s built on a commonly available microcontroller, so it’s not a particularly powerful beast – hence the “potato”. But what makes up for that in my mind is that it’s running a rudimentary bare-metal OS of his own writing. It’s like he’s taken the cyberdeck’s DIY aesthetic into the software as well.

What I like most about the spirit of the project is the idea of a long-term project that’s also a constant companion. Once you get past a terminal and an interpreter – [Andreas] is using LISP for both – everything else consists of small projects that you can check off one by one, that maybe don’t take forever, and that are limited in complexity by the hardware you’re working on. A simple text editor, some graphics primitives, maybe a sound subsystem. A way to read and write files in flash. I don’t love LISP personally, but I love that it brings interactivity and independence from an external compiler, making the it possible to develop the system on the system, pulling itself up by its own bootstraps.

Pretty soon, you could have something capable, and completely DIY. But it doesn’t need to be done all at once either. With a light enough computer, and a good basic foundation, you could keep it in your backpack and play “OS development” whenever you’ve got the free time. A DIY play OS for a sandbox computing platform: what more could a nerd want?

A Fancy Connected Caliper For Not A Lot

An essential for the engineer is a decent caliper, to measure dimensions with reasonable accuracy. Some of us have old-fashioned Vernier scales, while many up-to-date versions are electronic. When entering large numbers of dimensions into a CAD package matters can become a little tedious, so the fancier versions have connectivity for automatic reading transfer. [Mew463] didn’t want to shell out the cash for one of those, so modified a cheaper caliper with an ESP32-C3 microcontroller to provide a Bluetooth interface.

Many cheaper calipers have a handy hidden serial port, and it’s to this interface the mod is connected via a simple level shifter. The ESP and associated circuitry is mounted on a custom PCB on the back of the caliper body, with a very neatly designed case also holding a small Li-Po cell. It adds a little bulk to the instrument, but not enough to render it unusable. Whether the work required to design and build it is worth the cost saving over an off-the-shelf connected caliper is left to the reader to decide.

We’ve covered similar hacks in the past, but this one’s to a very high standard. Meanwhile if calipers are of interest to you then they’re a subject we’ve examined in some significant detail.