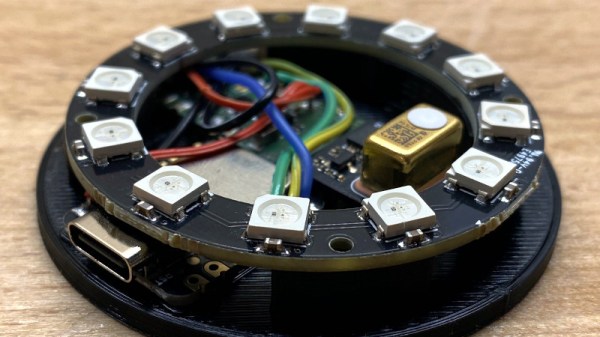
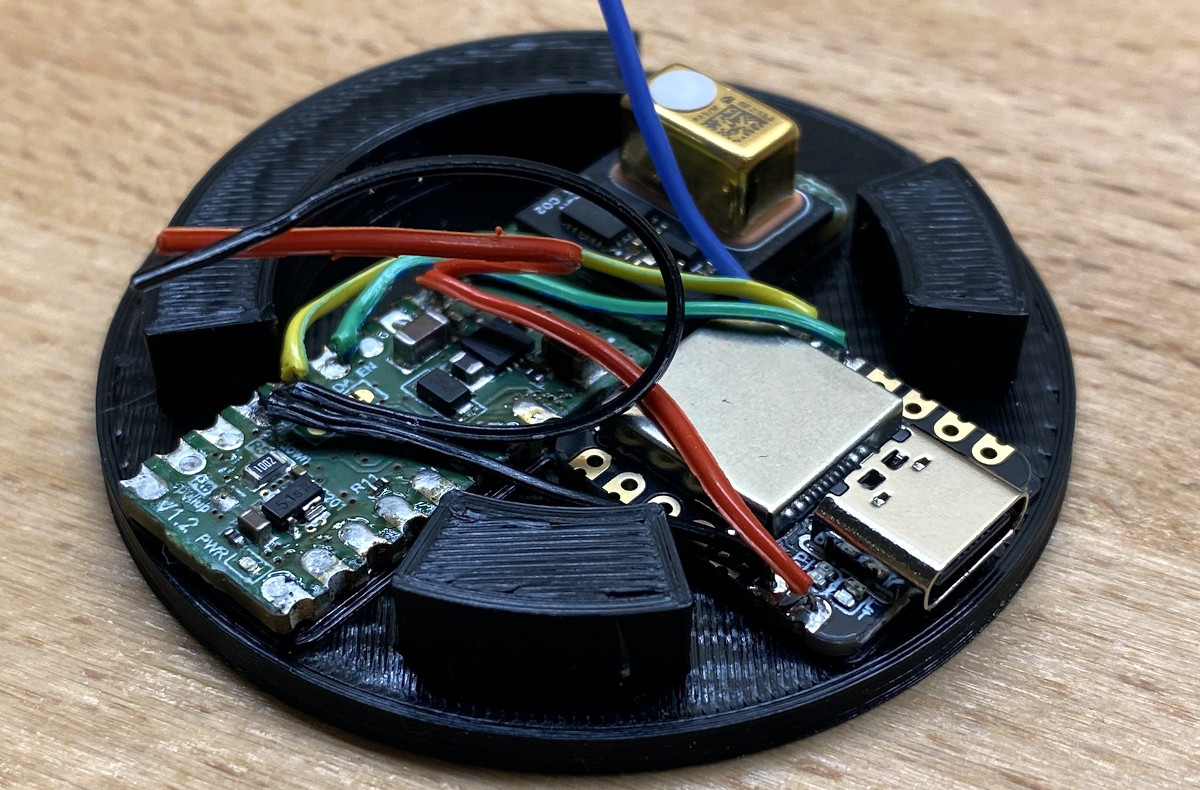
Outwardly, this sleek CO2 monitor designed by [Daniel Gernert] might look like something cooked up in Amazon’s consumer electronics division. But open up that 3D printed case, and you’ll find a surprisingly low parts count that’s been cleverly packed in so as to make the most of the enclosure’s meager internal dimensions.
No wasted space here.
There are, if you can believe it, just three principle components to this device: a Seeed Studio Seeeduino XIAO microcontroller, a Infineon S2GO PAS CO2 sensor board, and a ring of WS2812B LEDs. You could even delete the ring altogether and replace it with a single addressable LED to accomplish the same goal, but we’d say the full ring is money-well-spent if you’re going to spin up your own copy.
Functionality is very straightforward — the LED ring will indicate the detected CO2 concentration by lighting up green and working its way through yellow and onto red. The sensor has no wireless capability, but if you plug it into your computer, you can get a local readout of current conditions.
We love environmental monitoring solutions here almost as much as we love intricately designed 3D printed enclosures. If you’d like to see another project where those two concepts aligned, check out this printable ESP8266 sensor enclosure.
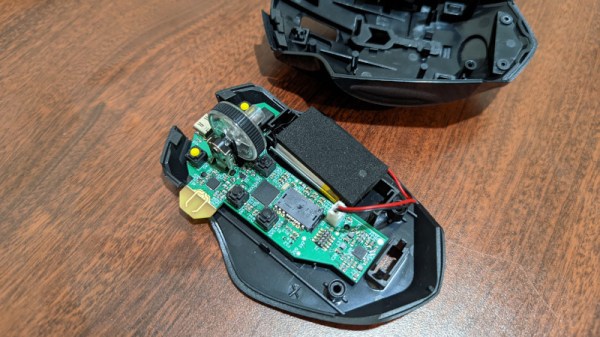
We’ve seen plenty of custom keyboards here on Hackaday. Seriously, like more than we can count. But custom mice? Those are far more elusive. Though we wouldn’t be surprised to see that change should this excellent example from [Tyler Richard] catch on.
How the mouse sees the date on a US quarter
The goal was to build a customizable mouse that could match the performance of Logitech’s MX Master 3, but without the $100 USD price tag. In the end, [Tyler] says his mouse is around 10x as responsive thanks to a 1,000 Hz refresh rate, and the total cost is just a fraction of the retail price of the Logitech. Though as you might expect, there’s a catch or two.
For one thing, he says getting your hands on the PixArt PMW3389 mouse sensor in single quantities can be difficult. It seems like he was able to secure a sample because he’s a student, but you’ll have to figure out your own way to con secure one from the company. There’s also no friendly GUI to configure the mouse, and indeed, you’ll need to write some code should you want to modify any of its buttons. Oh, and despite the fact that the cheapo donor mouse you need to use for parts is wireless, the replacement guts you’ll be fitting it with currently only support wired operation.
Alright, we’ll admit it’s not perfect. But it’s still a huge step in the right direction if you care about being able to spin up your own input devices. With some refinement, and perhaps somebody willing to do bulk buy of the sensors, we could see this project becoming quite popular. In the meantime, you may have to settle for a macro stool.
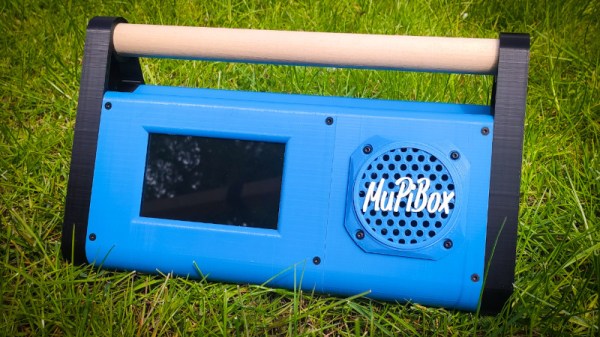
Over the years we’ve seen a lot of Raspberry Pi boards pushed into service as media players. In fact, second to emulating old game consoles, that’s probably the Pi’s most common vocation when it comes to DIY builds. But despite the popularity of this particular use case, it seems like each one has had to reinvent the wheel.
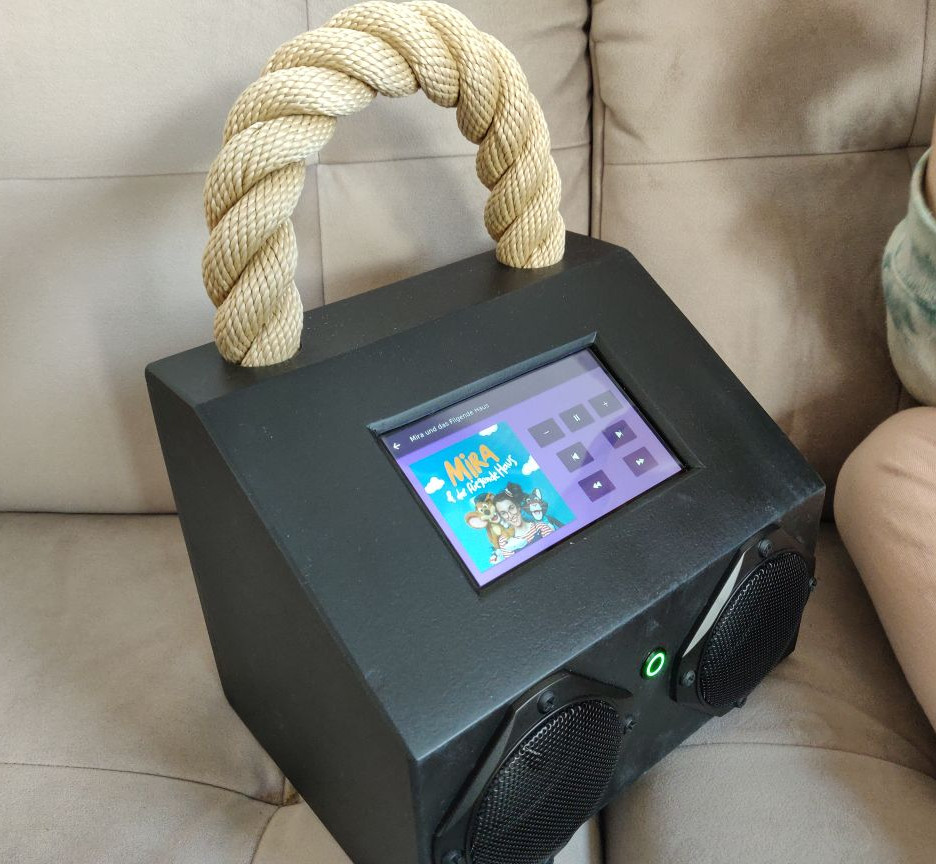
Perhaps there’s where MuPiBox fits in. Developed by [Eric Gerhardt] and [Olaf Split] with the assistance of [Andreas Lippmann] and [Andrew Frericks], this project aims to turn everyone’s favorite Linux single-board computer into everyone’s favorite music player. MuPiBox provides not only the software to run your new high-tech boom box, but it even standardizes the hardware design and provides a 3D printable enclosure — though naturally there’s still room for interpretation if you don’t want yours to look exactly like all the others.
Your MuPiBox can look like whatever you want.
At the very minimum you’ll need a Raspberry Pi, a HifiBerry MiniAmp, and a speaker, though the instructions also recommend you invest in a Pimoroni OnOff SHIM (or wire up something comparable) to facilitate more graceful shutdowns. For the best experience you’ll also want a five inch Waveshare touch screen display and a USB power bank so your beats can go mobile.
The video below shows off the polished stock GUI, which is simple enough that even children should be able to navigate around and find their favorite tracks. Which is good, especially since it’s in German. The video also shows off some advanced setup features so you don’t have to pull the SD card out of the Pi just to change the WiFi network it’s attached to. There’s also a web interface that you can access from other devices on the network.
It’s a slick project, and we really like the aesthetics of the 3D printable enclosure. But even if you don’t want to replicate the project exactly, there’s certainly components here which could be utilized in your own Pi media center build.
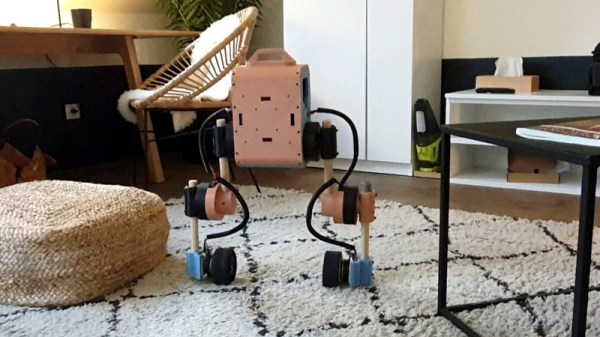
We’ve seen enough DIY robotic platforms here on Hackaday to know that most of them take the literal and figurative path of least resistance. That is, they tend to be some type of wheeled rover. But of course, there are plenty of other forms of locomotion, should you want to take on something a bit more challenging.
This biped robot from [Tast’s Robots] is a perfect example. While it’s still technically wheeled, its self-balancing nature makes things quite a bit more complex. It doesn’t just stand upright either, it also has a unique ability to crouch down by rotating its motorized knees and hips. As demonstrated in the video below, it can even navigate relatively uneven terrain — pulling off such a smooth transition between hardwood and carpet is no easy feat for a self-balancing bot like this.
But the best part? It isn’t just fully open source, it’s also designed to be built with only the tools and capabilities available to the average home gamer. That means 3D printed components, wooden dowels, and RC car parts. Even the power supply, a Ryobi 18 V tool battery, is easy to source and relatively hacker friendly.
Just as impressive as the hardware is the suite of software packages developed to handle things like balancing, locomotion, and reverse kinematics. Each one is maintained and documented as their own individual Apache-licensed projects, making them far easier to utilize than they would be if it was all implemented as one monolithic system.
If you really want to ditch the wheels, we’ve seen a few biped walkers in the past. But frankly, none of them can compare to the capabilities and scope of this project.
In honor of our recently announced 2022 Cyberdeck Contest, we decided to do things a little differently for this week’s Hack Chat. Rather than pick just one host, we looked back through the archive and selected some of the most impressive builds we’ve seen and asked their creators if they’d like to take part in a freewheeling discussion about their creations and the nascent community surrounding these bespoke computing devices.
Despite conflicting time zones and at least one international vacation, we were able to put together an impressive panel to helm this special Cyberdeck Brainstorming Hack Chat:
So what did this accomplished group of cyberdeck builders have to talk about? Well, quite a bit. During a lively conversation, these creators not only swapped stories and details about their own builds, but answered questions from those looking for inspiration and guidance.
bootdsc’s radio-packed VirtuScope
The discussion immediately kicked off with what’s perhaps the most obvious question: why build a cyberdeck if we already have laptops and smartphones — mobile computing form factors which [Io Tenino] admits are likely as close to perfect as we can get with current technology. Most of the builders agreed that a big part of the appeal is artistic, as the design and construction of their personal deck allowed them to show off their creativity.
But what of productivity? Can these custom machines do more than look good on a shelf? There seemed to be consensus that it was difficult to compete with a standard laptop in terms of general purpose computing, but that a cyberdeck tailored to a specific use case could be a powerful tool.
For example, [bootdsc] built a high-power WiFi adapter as well as an RTL-SDR receiver and up-converter into the VirtuScope, while [Io Tenino] says the Joopyter’s integrated printer is occasionally used to run off a grocery list. [H3lix] also mentioned that the trend towards ever-thinner laptops has meant removing ports and expansion options which used to be taken for granted, a potentially frustrating situation for hardware hackers that a cyberdeck can alleviate.
Naturally, the Chat also covered more technical aspects of cyberdeck design. There was quite a bit of discussion about powering these custom machines, and whether or not internal batteries were even a necessary design consideration. In keeping with the survivalist theme, [cyzoonic] included 18650 cells and an integrated charger, while [Io Tenino] is content to use a standard USB battery bank. Ultimately, like most aspects of an individual’s cyberdeck, the answer largely depended on what the user personally wished to accomplish.
[Io Tenino]’s Joopyter comes from a decade that never existed.As you might expect with [Back7] in attendance, there were also several questions about the logistics of using a Pelican case as the enclosure for your build. Different techniques were discussed for mounting hardware within the case without compromising its integrity, such as gluing your fasteners to the inside of the case, or 3D printing an internal framework.
Others wondered if the protection provided by these cases was really necessary given the relatively easy life most of these machines will lead, especially given their considerable cost. Although to that end, we also saw some suggestions for alternative cases which provide a similar look and feel at a more hacker-friendly price point.
Though they are certainly popular, Pelican cases are just one option when planning your own build. Many chose to 3D print their own enclosures, and there’s even the argument to be made that the rise of desktop 3D printing has helped make cyberdeck construction more practical than it has been in the past. Others prefer to use the chassis of an old computer or other piece of consumer electronics as a backbone for their deck, which fits well with the cyberpunk piecemeal aesthetic. That said, the Chat seemed in agreement that care needed to be taken so as not to destroy a rare or valuable piece of vintage hardware in the process.
This Hack Chat was a great chance to get some behind the scenes info about these fantastic builds, but even if you didn’t have a specific question, it was an inspiring discussion to say the least. We’re willing to bet that the design for some of the cyberdecks that get entered into the contest will have been shaped, at least in part, due to this unique exchange of niche ideas and information. Special thanks to [bootdsc], [Back7], [H3lix], [a8ksh4], [Io Tenino], and [cyzoonic] for taking the time to share this glimpse into their fascinating community with us.
The Hack Chat is a weekly online chat session hosted by leading experts from all corners of the hardware hacking universe. It’s a great way for hackers connect in a fun and informal way, but if you can’t make it live, these overview posts as well as the transcripts posted to Hackaday.io make sure you don’t miss out.
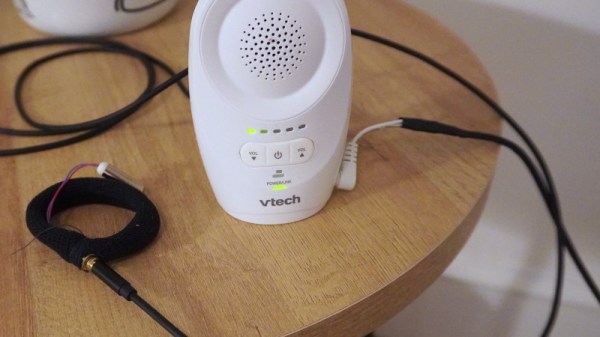
Anyone who’s ever slept through a morning’s alarm can tell you that sounds, even loud piercing ones, don’t always wake a person out of a deep sleep. Similarly, hearing a baby cry on the other side of the monitor might not always wake a parent up in the middle of the night. So what’s the solution? This haptic baby monitor created by [Guy Dupont] certainly looks like it has some promise.
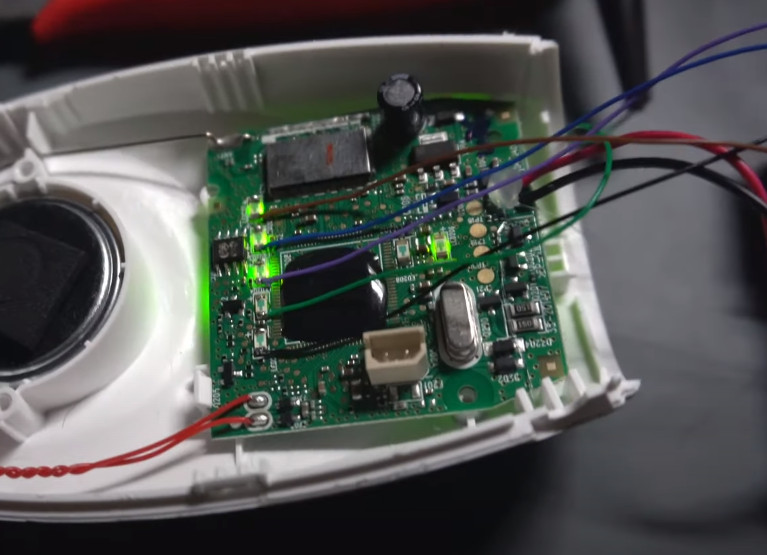
[Guy] picked up a fairly standard baby monitor from VTech and popped it open to see how he could tie a vibration motor into the original circuitry. He originally thought he’d have to do some signal processing magic to figure out the amplitude of the audio, but then he realized that the five LEDs on the front of the unit that light up to indicate the audio level were already doing the hard work for him.
Detecting audio level by reading the status of the LEDs.
So he wired each of the LEDs up to the pins of a Seeed Studio XIAO nRF52840 microcontroller, and wrote some code that would poll their status a few hundred times per second. Dividing the total number of LEDs by the count of how many are currently illuminated gives him a nice average that he can use to set the intensity of the vibration motor that he’s built into a stretchy armband.
For extra points, [Guy] is also using the Bluetooth capability of the XIAO to provide a rudimentary configuration service — just connect up to the MCU with a Bluetooth serial application on your computer or phone, and fire off a value between 0 and 10 to augment the motor’s intensity. There’s also a BLE characteristic which can be read from a client device to determine the currently detected audio amplitude, which could be used to chart how well the baby is sleeping over time. Alternately, as demonstrated at the end of the video, you could use it to play Flappy Bird.
It’s an elegant modification that could potentially hold promise for parent’s who need a bit of extra help keeping tabs on their miniature humans. This isn’t the first time we’ve seen hackers try to improve upon the classic baby monitor, but this is arguably the most approachable attempt we’ve seen to date.
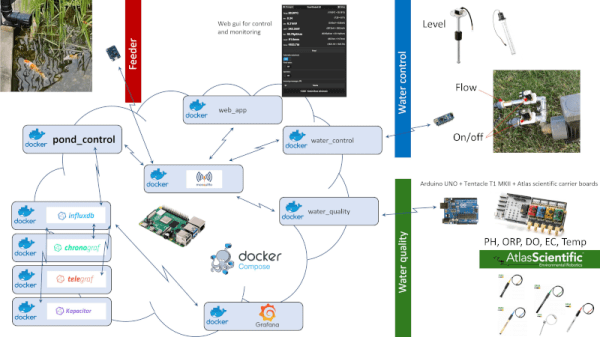
What do you think of when you hear the word pond? If you’re like most people, it conjures up images of a simple water-filled hole in the ground, maybe with a few fish added in for good measure. But not [Anders Johansson] — his pond is a technical marvel, utilizing more unique pieces of hardware and software than many of the more traditional projects that have graced these projects over the years.
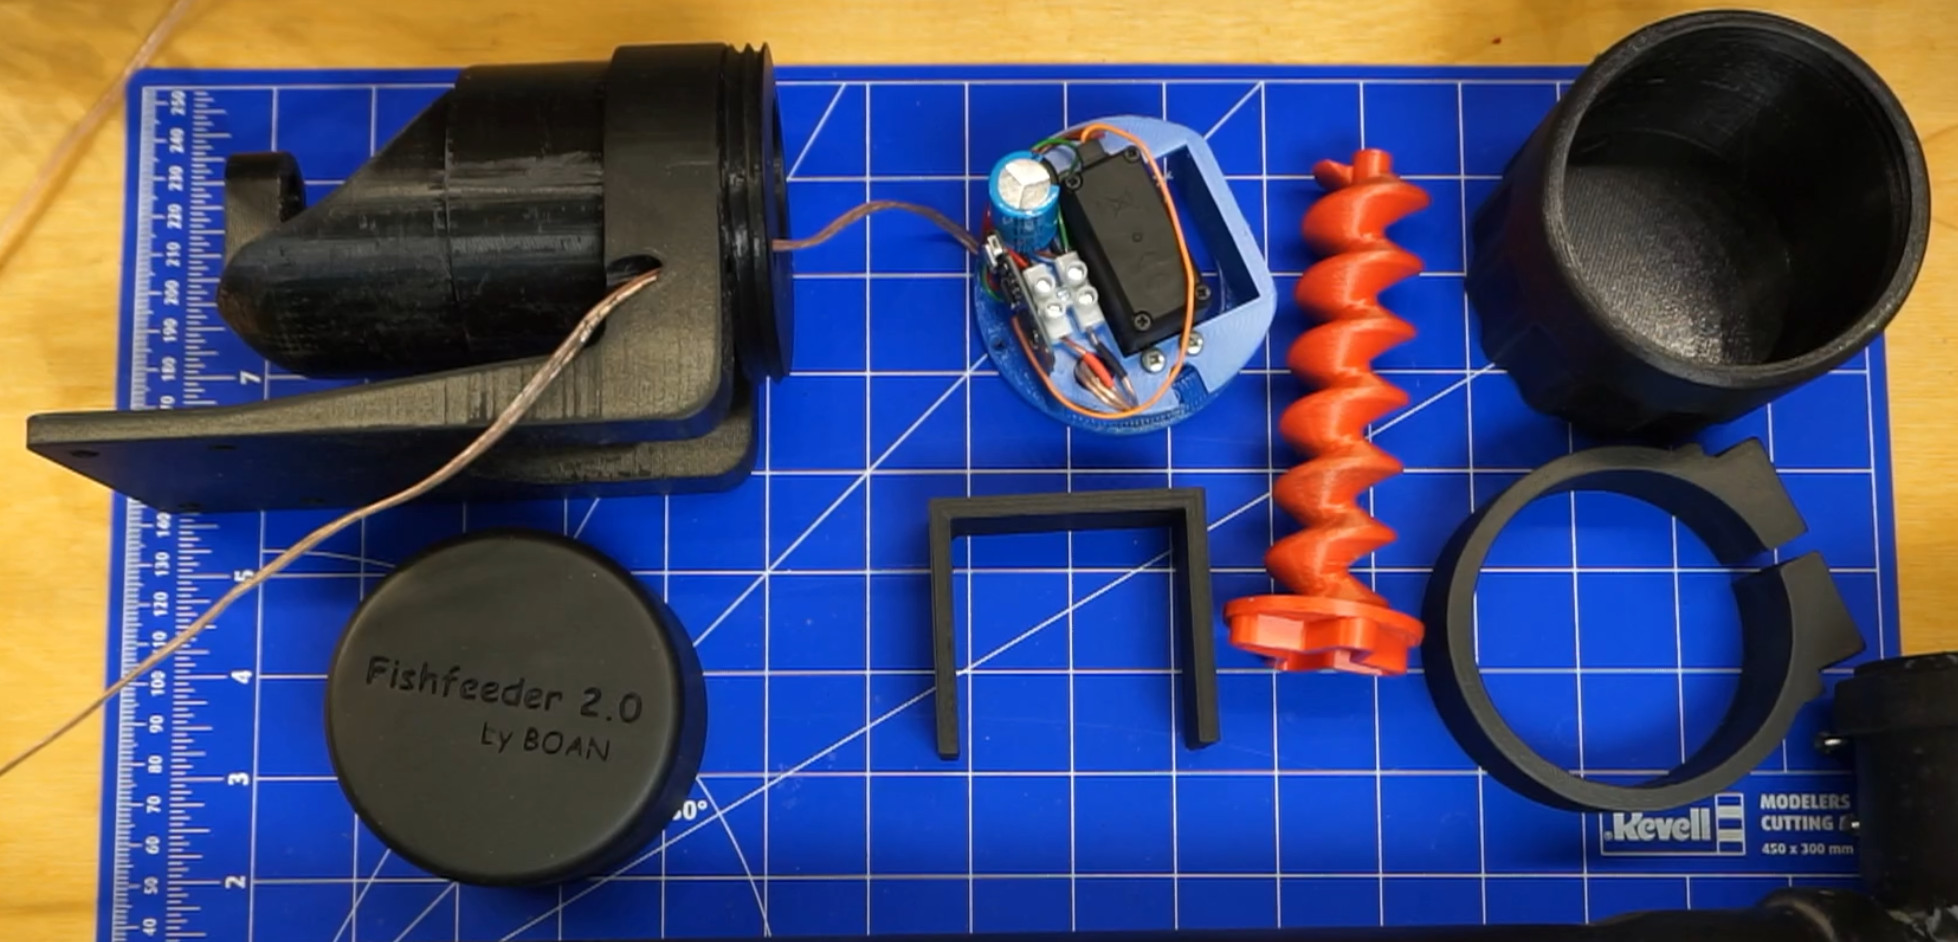
In fact, this is one of those projects that is so grand in scope that any summary we publish here simply can’t do it justice. The aptly-named Poseidon project is built up of several modular components, ranging from an automated fish feeder to an array of sensors to monitor the condition of the water itself. How many other ponds can publish their current water level, pH, and oxygen saturation over MQTT?
The ESP8266 fish feeder is just one element of Poseidon
[Anders] has provided schematics, 3D models, and source code for all the various systems built into the pond, but the documentation is where this project really shines. Each module has it’s own detailed write-up, which should provide you with more than enough guidance should you want to recreate or remix what he’s put together. Even if you use only one or two of the modules he’s put together, you’ll still be ahead of the game compared to the chumps who have to maintain their pond the old fashioned way.
In the past we’ve seen projects that tackled some of the individual elements [Anders] has developed, such as 3D printed fish feeders, but after searching through the archives we can’t find anything that’s even half as ambitious as Poseidon. At least, not for ponds. It reminds us more of a highly advanced aquaponics setup, and we wonder if that might not be a possible spin-off of the core project in the future.