It used to be a spectrum analyzer was an exotic piece of gear. However, these days it is pretty common for a scope to have some ability to do the job — that is, plot amplitude versus frequency. However, a dedicated commercial product will usually have a lot more bandwidth and other features. [Signal Path] picked up an Anrtitsu 7.1 GHz portable spectrum analyzer. An expensive bit of kit — anywhere from around $4,000 to $8,000 on eBay — if it is working, but this one was not. It needed power, but it was also missing the internal flash card that the device uses to boot.
Being portable, there’s a lot of digital and RF electronics crammed into a very small space. The initial tear down didn’t look very interesting because it was mostly an RF shield. However, many tiny screws later, you can finally see the actual electronics.
Perhaps you heard about Oumuamua (don’t ask us how to pronounce that). The cigar-shaped object is the first item found by astronomers that is known to have come from outside the solar system and is continuing to pass through, not being captured by the sun’s gravitational field. A recent paper from [Shmuel Bialy] and [Abraham Loeb] from Harvard suggests that the thing could be a discarded light sail from an alien spacecraft.
Of course, it is fun to speculate that anything in space we don’t understand could be alien. However, the paper is doing more than just speculating. The rotation rate of the object suggests it is fairly flat (pancake-like, was the exact phrase used). In addition, it appears to experience “non-gravitational” acceleration — that is, it is accelerating due to some force other than gravity.
Others have suggested that the acceleration is due to material boiling off as the sun warms it. However, there’s no indication of that happening and activity like that ought to also change the spin rate which does not appear to be happening. Solar wind pressure could explain the changes, though. You might think that proves nothing since the solar wind pushes on everything. However, it is just like the wind in the atmosphere — sure it pushes on your car, your house, and a sailboat, but only the sailboat moves appreciably from it.
If you are used to coding with almost any modern tool except the Arduino IDE, you are probably accustomed to having on-chip debugging. Sometimes having that visibility inside the code makes all the difference for squashing bugs. But for the Arduino, most of us resort to just printing print statements in our code to observe behavior. When the code works, we take the print statements out. [JoaoLopesF] wanted something better. So he created an Arduino library and a desktop application that lets you have a little better window into your program’s execution.
To be honest, it isn’t really a debugger in the way you normally think of it. But it does offer several nice features. The most rudimentary is to provide levels of messaging so you can filter out messages you don’t care about. This is sort of like a server’s log severity system. Some messages are warnings and some are informational, and some are verbose. You can select what messages to see.
In addition, the library timestamps the messages so you can tell how much time elapsed between messages and what function you were in during the message. It can also examine and set global variables that you preconfigure and set watches on variables. It is also possible to call functions from the serial monitor.
One of the best things about working at the Linux (or similar OS) command line is the use of pipes. In simple terms, a pipe takes the output of one command and sends it to the input of another command. You can do a lot with a pipe, but sometimes it is hard to work out the right order for a set of pipes. A common trick is to attack it incrementally. That is, do one command and get it working with the right options and inputs. Then add another command until that works. Keep adding commands and tweaking until you get the final results.
Pipes can do a lot. They match in with the original Unix philosophy of making each tool do one thing really well. Pipe is really good at allowing Linux commands to talk to each other. If you want to learn all about pipes, have a look at the Linux Info project’s guide. They even talk about why MSDOS pipes were not really pipes at all. (One thing that write up doesn’t touch on is the named pipe. Do a “man fifo” if you want to learn more for now and perhaps that will be the subject of a future Linux Fu.)
This program — called up — continuously runs and reruns your pipeline as you make changes to the pipe. This way, every change you make is instantly reflected in the output. Here’s the video, here’s a quick video which shows off the interactive nature of up.
Installing
The GitHub page assumes you know how to install a go program. I tried doing a build but I didn’t have a few dependencies. Turns out the easy way to do it was to run this line:
go get -u github.com/akavel/up
This put the executable in ~/go/bin — which isn’t on my path. You can, of course, copy or link it to some directory that’s on your path or add that directory to your path. You could also set an alias, for example. Or, like I did in the video, just specify it every time.
Perfect?
This seems like a neat simple tool. What could be better? Well, I was a little sad that you can’t use emacs or vi edit keys on the pipeline, at least not as far as I could tell. This is exactly the kind of thing where you want to back up into the middle and change something. You can use the arrow keys, though, so that’s something. I also wished the scrollable window had a search feature like less.
Otherwise, though, there’s not much to dislike about the little tool. If writing a pipeline is like using a C compiler, up makes it more like writing an interactive Basic program.
Steganography involves hiding data in something else — for example, encoding data in a picture. [David Buchanan] used polyglot files not to hide data, but to send a large amount of data in a single Twitter post. We don’t think it quite qualifies as steganography because the image has a giant red UNZIP ME printed across it. But without it, you might not think to run a JPG image through your unzip program. If you did, though, you’d wind up with a bunch of RAR files that you could unrar and get the complete works of the Immortal Bard in a single Tweet. You can also find the source code — where else — on Twitter as another image.
What’s a polyglot file? Jpeg images have an ICC (International Color Consortium) section that defines color profiles. While Twitter strips a lot of things out of images, it doesn’t take out the ICC section. However, the ICC section can contain almost anything that fits in 64 kB up to a limit of 16 MB total.
The ZIP format is also very flexible. The pointer to the central directory is at the end of the file. Since that pointer can point anywhere, it is trivial to create a zip file with extraneous data just about anywhere in the file.
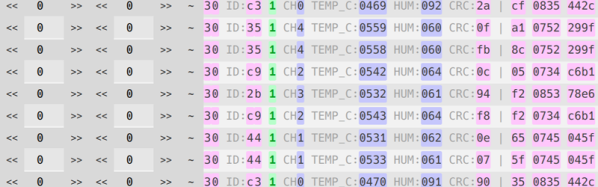
Maybe its a capture file from a network dump. Maybe it’s from an Arduino. Maybe it is a random file off the Internet. But there will be a time when you have a file full of seemingly meaningless numbers and you need to impose order. We usually resort to a printout and highlighter, but BitBench seems like a better option. That link will take you to the code, but if you want to play with a live instance, the author has one loaded with example data.
If you look at the live example, there’s an area up top with a lot of raw hex data. The area below that shows a format string. By default that’s:
From the page, here’s the description of the format:
Use “h” for hex (default 4 bits), “b” for binary (default 1 bit), “d” for decimal (default 8 bits).
Use optional bit length prefix numbers. Use “~” to invert bits, use “^” to reverse LSB/MSB. Other characters are output as-is.
So in the example string, hh is an 8-bit hex number. ID: is just a label, followed by another 8-bit number. Then the bottom displays the data formatted as you wish and gives you a way to pad the fields with extra bits and see the results. You can also invert or shift all the bits.
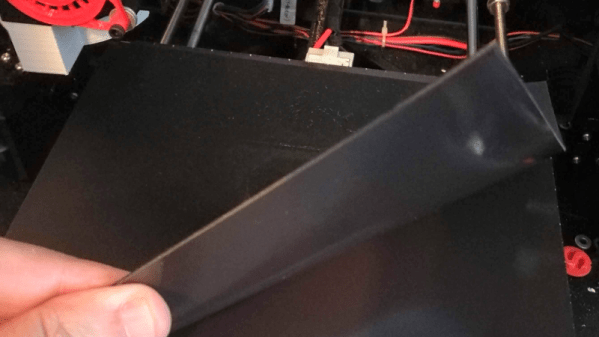
Just like Goldilocks found some porridge too hot and some too cold, 3D printers often have beds that don’t stick well enough or stick too well. A few weeks ago I switched two of my three printers to use magnetic beds and thought I’d share with you how that worked out. Spoiler alert: like most things it has its plusses and minuses.
It isn’t a secret that 3D printing is not a plug-and-play operation, especially at the price most of us are willing to pay for printers. There are lots of variables to get right: temperature, speeds, bed leveling, and a bunch of other things. However, one of the things that vexes many people is the relationship between getting that first layer to stick and being able to get the print off the bed when you are done. It is hard to find a happy medium. If the first layer won’t stick, you print is doomed. If the first layer sticks too well, you are likely to damage the part or your fingers getting it removed. I switched to BuildTak surfaces long ago, and many people like PEI. But it is sometimes hard to get a big part removed. A few weeks ago, I took the plunge and bought some magnetic build surfaces for two of my printers. These were “no name” inexpensive affairs from Ali Express.
The idea is simple. There are two sheets that look like a rubberized plastic and have magnetic properties. One piece has some 3M adhesive on the back. The other has one surface that resembles BuildTak. Once you glue down the one sheet you leave it alone. Then you put the other sheet on top and print on it. When you are done, you can pull the sheet out and flex it to pop the print off. That’s the theory, anyway. Continue reading “Better 3D Printing Through Magnets”→