Faux Silkscreen On A PCB Made With A Laser Cutter

If you’re getting PCBs professionally made, silkscreen usually comes free as part of the package. However, if you’re making your own, the job is on you. [Tony Goacher] makes his own PCBs on a CNC router, so he’s not getting any silkscreening as part of that bargain. But he wondered—could he do something analogous with a laser cutter?

The answer is yes. The silkscreen layer was first exported from DesignSpark, with the file then sent to LightBurn to prep it for laser cutting. The board outline layer was first engraved on to a piece of scrap as an alignment aid. Then, the board was placed in the laser cutter, with the silkscreen scorched directly on to the fiberglass.

The results are encouraging, if imperfect. [Tony] says he ran at “quite fast speed at quite high power.” The markings are all there, but they’re a little melty and difficult to read. He noted at lower speeds and lower power, the results were a bit more readable.

PCBs aren’t really an ideal engraving or laser marking material, but this technique could be servicable for some basic markings on DIY PCBs. We look forward to seeing how [Tony] improves the process in future. Video after the break.
Continue reading “Faux Silkscreen On A PCB Made With A Laser Cutter”

Simple NTP Clock Uses Custom RGB 7-Segment Displays

A great majority of hackers build a clock at some point. It’s a great way to get familiar with electronics and (often) microcontrollers, and you get to express some creativity along the way. Plus, you get something useful when you’re done! [Tadas Ustinavičius] recently trod this well-worn path and built a neat little NTP clock of their own.

The build uses an ESP 12F as the core of the operation. It’s charged with querying an NTP time server via its WiFi connection in order to maintain accurate timekeeping around the clock. For display, it drives a series of custom 7-segment displays that [Tadas] built using 3D-printed housings. They use WS2812B addressable LEDs and thus can display a rainbow of colors.

For initial configuration, the phone creates its own WiFi hotspot with a web interface for changing settings. Once configured, it connects to the Internet over WiFi to query an NTP server at regular intervals.

It’s a simple build that does a simple job well. Projects like these can be very valuable, as they teach you all kinds of useful skills. If you’ve been working on your own clock design, don’t hesitate to let us know. You can use a microcontroller, relays, or even a ball.

Creating A Numbers Station Of Your Very Own

Numbers stations are a weird phenomenon where odd voices read out long strings of numbers or random codewords to the confusion of the vast majority of the listening audience. If you’ve ever wanted to build one of your own, you could follow the example of [AudioWanderer].

NumberMumble, as it’s called, is a numbers station emulator. It doesn’t signal spy networks or reveal national secrets. Instead, it randomly plays audio samples using an Arduino, including characteristic bursts of white noise that make it sound more authentic. It relies on the Mozzi library to help with audio tasks, including generating white noise and playing back samples. It’s also kitted out with a filter knob for varying the tone. Audio output is via PWM.

If you want to confuse your neighbours with oddball audio, put this thing on a radio transmitter and get broadcasting. But don’t, because that’s illegal without the proper licenses or — you know — if you happen to be a real spy. Video after the break.

Continue reading “Creating A Numbers Station Of Your Very Own”

Arduino Turned Into Something Kinda Like A Pager

Video may have killed the radio star, but cell phones and smart phones all but killed the pager. They still exist, of course, but only in very niche applications. [João Santos] wanted a pager-like experience for himself, though, so he enlisted an Arduino and got to work. Watch a video of the system working below.

The build uses an Arduino Uno to drive a simple HD44780 LCD display with 16 characters each across two lines of text. It’s hooked up to a Wemos D1, which uses its WiFi connection to get online. To this end, it’s capable of talking to a web application which allows users to enter text messages. It receives these messages, passes them to the Arduino Uno over I2C, and then the Uno shuttles the message to the display. It’s overkill, but [João] just found it quicker to get everything up and running via this route.

Continue reading “Arduino Turned Into Something Kinda Like A Pager”

A Simple Seismometer You Can Build Yourself

If you’re a child, there are certain things you’re taught even though they’re probably not directly relevant to your life. We teach young kids all about dinosaurs, and we teach older kids all about how the mitochondria is the powerhouse of the cell. We also teach kids about natural phenomena like earthquakes, and the equipment used to measure them. Namely, seismometers. You might like to satisfy your own child-like curiosity by building one of your own, like [mircemk] did.

Output from the build showing tremors in the Earth.

The build starts with a sensitive geophone of [mircemk’s] own design. That’s basically a microphone but it’s for picking up vibrations in the ground, not in the air. However, a geophone is not enough. You need to be able to pick up the signals from the geophone and then plot them if you want a seismometer.

First, the signals from the geophone must be amplified, which is achieved with a small circuit based around the LM358 op-amp. From there, the signal is sent to an Arduino where the output is captured via the analog-to-digital converter. This passes the signal to an attached PC which plots the results using a piece of software called NERdaq, which was developed for schools that built their own slinky-based seismometers.

[mircemk] reports that this setup has served as a reliable tool for visualizing earthquake activity for over 6 years. Though, it bears noting, it’s not calibrated so don’t expect to get science grade results out of it. Regardless, though, it’s a super cool way to understand more about what is going on with the geology around us. Video after the break.

Continue reading “A Simple Seismometer You Can Build Yourself”

Cheap DIY Microscope Lamp Makes Tiny Macro Shots Look Great

For optical microscopes, light is everything. If you don’t have a good amount of light passing through or bouncing off your sample, you’ve got nothing for your eyeballs or a camera to pick up. To aid in this regard, [Halogenek] whipped up a nifty microscope lamp with some LEDs.

The build uses a neat arch-shaped PCB with a hole in the middle for the microscope’s optics to pass through. Surrounding this are the LEDs, which provide a circle of light focused on the sample, akin to the ring lights so favored by today’s online influencers. The LEDs are powered via USB C, so the lamp can be run off of any garden-variety phone charger you might have lying around.

[Halogenek] reports that the lamp has proven useful for extreme macro shots of PCBs. It’s an easy build to replicate or redesign your own way if you’re doing similar work.

Microscopes are super useful, and there are all kinds of hacks you can do to make them perform better in your quest for science. Meanwhile, if you’ve been jazzing up your own lab hardware, let us know—we’d love to hear about it!

Retro Unit Converter Is A Neat Little Gadget

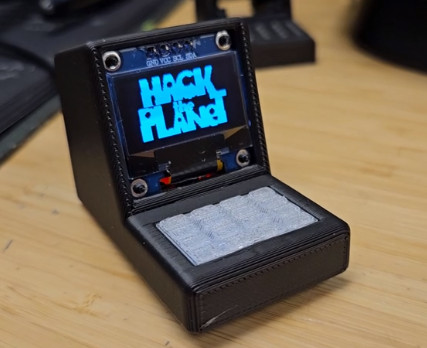
These days, unit conversions aren’t something we have to worry about so much. If you’re sitting at a computer, you can usually just tap away in your browser to get a quick conversion done, or you can ask your smartphone for an answer. [HackMakeMod] wanted a bespoke device for this, though, and built a tiny little retro-styled unit converter.

It’s a straightforward build that uses a handful of familiar components. An ESP8266 D1 Mini development board is the heart of the operation, running off a small battery harvested from a disposable vape pen. It runs a 0.96 inch OLED display which has a menu system for selecting from a whole bunch of different unit conversions. Navigating the menu is done via a rotary encoder with an integrated push button. Everything’s wrapped up in a neat 3D printed enclosure that was given a nice worn, weathered finish after printing.

[HackMadeMod] also clearly thought about usability, too. Turning the encoder dial faster ramps up the numbers exponentially so you’re not stuck jogging for ages when you need to enter a bigger figure.

It’s not something a lot of us would have a use case for, given that smartphones are always there and probably faster to use. However, it is a tidy little gadget, and a well-presented one at that. Video after the break.

Continue reading “Retro Unit Converter Is A Neat Little Gadget”