A High Performance Ski-Sled For The Big Kids

Sledding is a pastime often left to younger humans, though there is no good reason why this must be the case. [JoshXarles] is an adult with a strong enthusiasm for carving up the snow, and set out to build a high-performance sled this winter. 

It’s a ski-based design, and [Josh]’s goal from the outset was to build a rig with serious handling credentials. His favored run features several 180 degree switchbacks, so it’s important to be able to corner well without losing speed. This was achieved by using sidecut skis with a carefully designed steering system, allowing the sled to carve corners in the same way as a downhill skier. The frame of the sled is built out of aluminium box tubing, bolted together to form a strong structure. There’s also attractive wooden decking which completes the look.

The sled performed admirably in initial testing, with good steering feel and plenty of speed downhill. We’d love to try ourselves, weather permitting, of course. There are also electric options for those not blessed with geologically-suitable features to sled down. Video after the break.

Continue reading “A High Performance Ski-Sled For The Big Kids” →

PaintBot Does The Art For You

Digital imagery is great, but there’s a certain charm to a real, handpainted piece. However, we live in an age of CNC, and the robots are always willing to try something new if they’re properly instructed how to do it. In this vein, [Alexander Leiser] developed PaintBot to paint beautiful pictures for him.

The ‘bot uses aluminium extrusion and stepper motors to move around. A 3D printed bracket was printed to hold a paintbrush so the artbot can do its work. [Alexander] wrote a script in C# to parse images and generate the requisite G-code for the ‘bot. Over time, this expanded into a full application, with a GUI and provision for automatic color changing. There’s plenty of logic required, to cover things like cleaning the brush between colors and composing the image properly. The medium of choice is acrylic on canvas, after early experiments with paper were found to be unsatisfactory.

The output from PaintBot is impressive, with a certain digital quality to the way the individual paint strokes make up the final image. [Alexander] has also wrapped up the software and named it PaintCam. Distributed on Thingiverse, it allows anyone with a 3D printer to use it as a robot painter themselves.

The project shows that it’s possible to create a nice artwork using CNC hardware, and we’d love to see what this could do with a neural network back end doing some artistic interpretation. If you build such a system, be sure to let us know! Video after the break.

Continue reading “PaintBot Does The Art For You” →

How To Slice Lightweight Aircraft Parts For 3D Printing

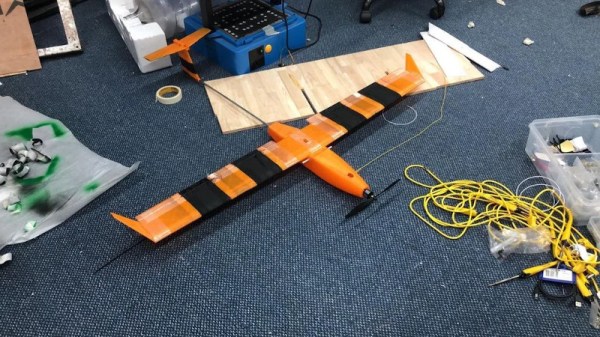
Historically, remote control aircraft were produced much like their early full-sized counterparts. Wooden structures were covered with adhesives and taut fabric membranes. Other techniques later came to the fore, with builders looking to foam and other materials. Of course, these days 3D printers are all the rage, so perhaps one can simply print out a whole plane? As [sahevaantaneja] discovered, it’s not that easy!

One of the foremost problems is the process of slicing. This is where 3D geometry is transformed into the G-code which defines the path taken by the 3D printer during production of a component. Slicer software is generally optimised for working with mostly-solid objects, and some tweaks can be required when working with thin-walled designs.

These challenges come to bear with an aircraft design, which, by necessity must be lightweight. [sahevaantaneja] does a great job of explaining the journey of discovery in which their design was optimised to work with conventional slicers. This allowed the various components to be printed without errors, while retaining their strength to survive in flight.

The design was successful in test flights –  a great reward after much experimentation. We’ve seen other 3D printed designs take flight, too. Video after the break.

Continue reading “How To Slice Lightweight Aircraft Parts For 3D Printing” →

Arkanoid Clock Is Exactly What It Sounds Like

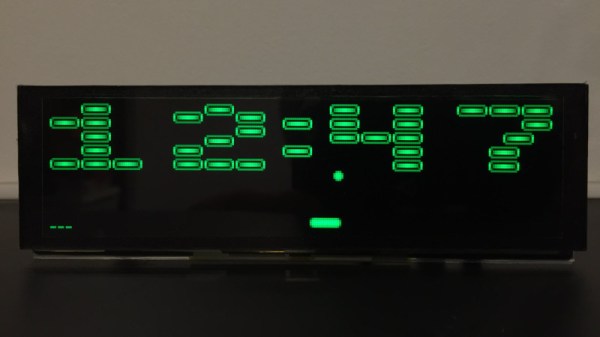
A clock can be a simple device that keeps you aware of the current time, but it can also be so much more. It can express an aesthetic ideal from yesteryear, or be a throwback to a popular cultural touchstone. It can even be both, in the case of the brilliant Arkaclock from [Victor Serrano].

The build started when [Victor] wished to create an old-school arcade-style game. Aiming to work with limited hardware, just like the pioneers, he settled on using the PIC18F86K22, with less than 4KB of RAM and just 64KB of program space to play with. Hooked up to a 256 x 64 OLED screen with a pleasant green glow, he set about recreating Arkanoid in assembly language.

With this done, [Victor] noted that the retro-looking display was rather pleasant. At this point, the device was repurposed into a clock, with the program generating an Arkanoid level in the shape of the current time. The AI would then play the game, destroying the bricks each minute before the level changed.

It’s an excellent timepiece, and one that would be perfect for the wall of any indie game studio. Other retro games make for great clocks, too. Video after the break.

Continue reading “Arkanoid Clock Is Exactly What It Sounds Like” →

Bluetooth Intervalometer Makes Time Lapses Easy

Taking timelapses is a fun pastime of many a photographer. While most modern cameras have some features to pull this off, if you want to get really into it, you’ll want an intervalometer to run the show. Chasing just that, [Zach] decided that rather than buying off-the-shelf, a DIY build was in order.

The build relies on an Arduino Nano to run the show, in combination with the popular HC-05 Bluetooth module. The Bluetooth module allows the device to communicate with a smartphone app which [Zach] created using RoboRemo. This is a platform that makes creating custom USB, WiFI and Bluetooth apps easy for beginners. The app sends instructions to the intervalometer regarding the number of photos to take, and the time to wait between each shot. Then, it triggers the time lapse, and the Arduino triggers the camera by shorting the relevant pins on a TRS plug inserted into the camera.

It’s a straightforward build that most hackers could probably complete with parts from the junk box. Plus, building your own offers the possibility of customising it exactly to your needs. Of course, you can eschew modernity and do things mechanically instead. Video after the break.

Continue reading “Bluetooth Intervalometer Makes Time Lapses Easy” →

Irrigation Controller Uses Google Calendar To Make Things Easy

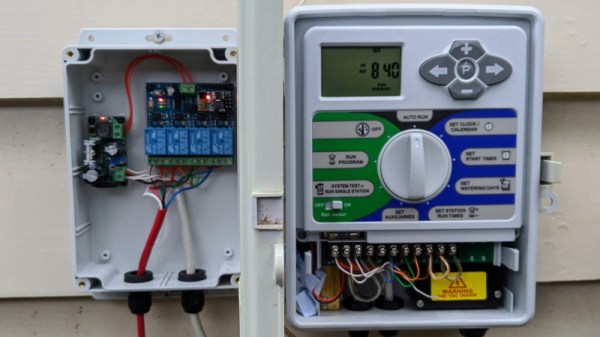
Irrigation controllers have been around for a long time, often using similar hardware inside that would be familiar to the average maker. However, many of the products on the shelf at your local hardware store can be quite expensive for what amounts to a microcontroller, display, and relay board. [oscillatory] had such a rig, but wanted to bring it into the 21st century, IOT style.

The existing Holman irrigation system consisted of a control box, hooked up to four solenoid valves controlled by relays. [oscillatory] decided that replacing this with something fancier would thus be straightforward. A relay board packing an ESP8266 was sourced, and flashed with the Tasmota firmware. This was then hooked up to run off the Holman’s 24 VAC supply via a CCTV power supply, allowing the new controller to be run in parallel with the existing hardware, just in case. Scheduling is then controlled by Google Calendar, in concert with Home Assistant.

[oscillatory] now has a watering system that can be controlled over the web, and without the need to install any custom apps. Simply creating a calendar entry is enough for the system to spring into action. We’ve seen others use a similar approach, too.  It’s a great example of using off-the-shelf parts to whip up a useful custom home automation setup!

Stout Homebrew Radio Pumps Out 200W Of AM Goodness

In this day and age, with cheap online shopping, software defined radio and bargain-basement Baofengs from China, the upstart radio ham is spoilt for choice. Of course, there’s nothing quite like the charm of keying up your own homebrewed rig, cooked up in the garage from scratch. [Paul], aka [VK3HN], knows just how it feels, and put together an epic 200 watt Class D AM rig to blast his signal on the airwaves.

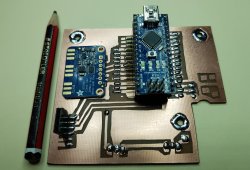
An example of an Arduino used in one of [Paul]’s builds.
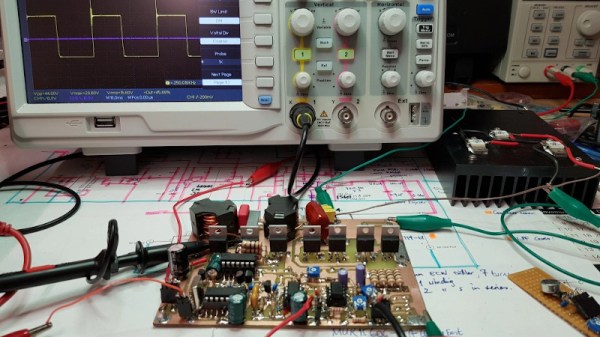
It’s a build following on from the work of another radio ham, [Laurie], aka [VK3SJ]. Younger hackers will note the Arduino Nano at the heart of the project, running the VFO and handling all the relevant transmit/receive switching. We can only imagine how welcome modern microcontrollers must have been to old hands at amateur radio, making synthesizing all manner of wild frequencies a cinch.

The amount of effort that has gone into the build is huge. There are handwound coils for the PWM low-pass filter, and the PCB is home-etched in ferric chloride, doing things the old-school way. There’s also a healthy pile of dead components that sacrificed their lives in the development of this build. Perhaps our favorite part is the general aesthetic – we can’t get over the combination of hand-drawn copper traces and off-the-shelf Arduinos.

Many components perished in the development of this powerful rig.

It’s a build that far exceeds the Australian legal limits, so it only gets keyed up to 120W in real use. This has the benefit of keeping the radio operating far in the safety zone for its components, helping keep things cool and stable. We’re sure [Paul] will be getting some great contacts on this rig. If you’re suffering from low power yourself, consider an amplifer build. Video after the break.

Continue reading “Stout Homebrew Radio Pumps Out 200W Of AM Goodness” →