Make Your Own Phosphorescent Material

Phosphors are key to a whole swathe of display and lighting technologies. Cathode ray tubes, vacuum fluorsecent displays, and even some white LEDs all use phosphors to produce light. [Hydrogen Time] decided to make a green phosphorescent material, and has shared the process on Youtube, embedded below.

The aim is to produce zinc sulfide crystals doped with copper impurities. This creates a phosphor with a familiar green glow. [Hydrogen Time] starts by noting that it’s important to make sure all chemicals used are of good quality, as even slight impurities can spoil the final product.

Zinc sulfide is made into an aqueous solution, before a highly diluted copper sulfate solution is added, along with ammonium chloride to act as a flux. The mixture is stirred, before being heated in a tube flushed with argon. After firing, the phosphor is washed with water and allowed to cool.

The final product is demonstrated to glow a vibrant green under UV light, showing the process to be successful. [Hydrogen Time] intends to use the homebrew phosphor in future work to produce a display. It recalls us of [Jeri Ellsworth], producing her own EL wire at home. Video after the break.

Continue reading “Make Your Own Phosphorescent Material” →

Open Source LIDAR Lets You Get Down To The Nitty Gritty

If you’re unfamiliar with LIDAR, you might have noticed it sounds a bit like radar. That’s no accident – LIDAR is a backronym standing for “light detection and ranging”, the word having initially been created as a combination of “light” and “radar”. The average person is most likely to have come into contact with LIDAR at the business end of a police speed trap, but it doesn’t have to be that way. Unruly is the open source LIDAR project you’ve been waiting for all along.

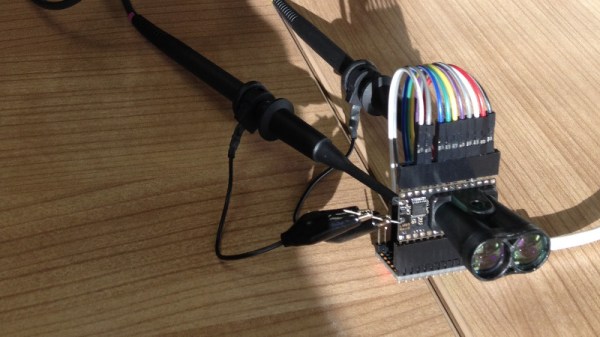
Unlike a lot of starter projects, LIDAR isn’t something you get into with a couple of salvaged LEDs and an Arduino Uno. We’re talking about measuring the time it takes light to travel relatively short distances, so plenty of specialised components are required. There’s a pulsed laser diode, and a special hypersensitive avalanche photodiode that operates at up to 130 V. These are combined with precision lenses and filters to ensure operation at the maximum range possible. Given that light can travel 300,000 km in a second, to get any usable resolution, a microcontroller alone simply isn’t fast enough to cut it here. A specialized  time-to-digital converter (TDC) is used to time how long it takes the light pulse to return from a distant object. Unruly’s current usable resolution is somewhere in the ballpark of 10 mm – an impressive feat.

It’s a complicated project, requiring the utmost attention to detail to get any results at all. The team behind Unruly have done a great job of both designing and documenting the project. It’s great to see an open source LIDAR package in the wild, giving hackers more options than just the pre-baked commercial modules on the market. We can’t wait to see where the project goes next.

For more on LIDAR, check out last week’s Hackaday podcast – we cover Unruly, as well as a handful of other standout projects in the field.

This Vintage Phone Goes Cellular

Way back in the good old days, life ran at a slower pace. It took us almost a decade to get to the moon, and dialling the phone was a lazy affair which required the user to wait for the rotary mechanism to rewind after selecting each digit. Eager to bring a taste of retro telephony into the modern era, [Marek] retrofitted this vintage Polish telephone with a GSM upgrade.

The phone [Marek] salvaged had already been largely gutted, so there was little to lose in the transformation. A Motorola D15 GSM module was sourced from an alarm system to provide a network connection to the project. An Atmega328 was then used to translate the rotary dial mechanics into something more usable by the cellular module.

Attention to detail can really make a project shine, and [Marek] didn’t skimp in this area. The original ringer was rewound to operate with a half H-bridge at a lower voltage more suitable to the modern electronics inside. The microcontroller also helped out by using its PWM hardware to simulate a dialtone and the characteristic sound of pulse dialling.

It’s always nice to see retro hardware given a new lease on life. Unfortunately, GSM networks aren’t long for this world, so a further update may be required before long. These old phones have plenty of potential, as we’ve seen before.

A Lemon Battery Via 3D Printing

There are a whole bunch of high school science experiments out there that are useful for teaching students the basics of biology, physics, and chemistry. One of the classics is the lemon battery. [iqless] decided to have a play with the idea, and whipped up a little something for his students.

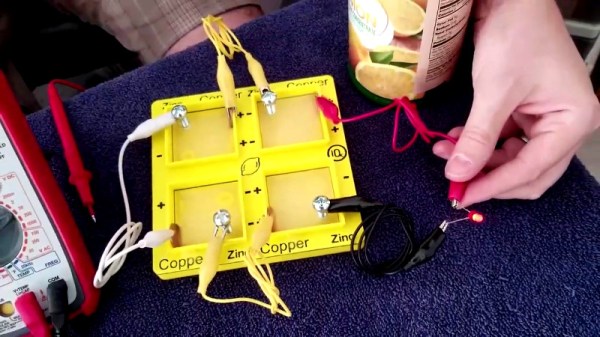
The basic lemon battery is remarkably simple. Lemon juice provides the electrolyte, while copper and and zinc act as electrodes. This battery won’t have a hope of charging your Tesla, but you might get enough juice to light an LED or small bulb (pun intended).

[iqless] considered jamming electrodes directly into lemons to be rather unsophisticated. Instead, an electrolyte tray was 3D printed. The tray can be filled with lemon juice (either hand-squeezed or straight from a bottle) and the tray has fixtures to hold copper pennies and zinc-plated machine screws to act as the electrodes. The tray allows several cells to be constructed and connected in series or parallel, giving yet further teaching opportunities.

It’s a fun twist on a classroom staple, and we think there are great possibilities here for further experimentation with alternative electrolytes and electrode materials. We’d also love to see a grown-up version with a large cascade of cells in series for lemon-based high voltage experiments, but that might be too much to ask. There’s great scope for using modern maker techniques in classroom science – we’ve discussed variations on the egg drop before. Video after the break.

Continue reading “A Lemon Battery Via 3D Printing” →

3D Printing With Tomography In Reverse

The 3D printers we’re most familiar with use the fused deposition process, in which hot plastic is squirted out of a nozzle, to build up parts on a layer by layer basis. We’ve also seen stereolithography printers, such as the Form 2, which use a projector and a special resin to produce parts, again in a layer-by-layer method. However, a team from the University of North Carolina were inspired by CT scanners, and came up with a novel method for producing 3D printed parts.

The process, as outlined in the team’s paper.

The technique is known as Computed Axial Lithography. The team describe the system as working like a CT scan in reverse. The 3D model geometry is created, and then a series of 2D images are created by rotating the part about the vertical axis. These 2D images are then projected into a cylindrical container of photosensitive resin, which rotates during the process. Rather than building the part out of a series of layers in the Z-axis, instead the part is built from a series of axial slices as the cylinder rotates.

The parts produced have the benefit of a smooth surface finish and are remarkably transparent. The team printed a variety of test objects, including a replica of the famous Thinker sculpture, as well as a replica of a human jaw. Particularly interesting is the capability to make prints which enclose existing objects, demonstrated with a screwdriver handle enclosing the existing steel shank.

It’s a technique which could likely be reproduced by resourceful makers, assuming the correct resin isn’t too hard to come by. The resin market is hotting up, with Prusa announcing new products at a recent Makerfaire. We’re excited to see what comes next, particularly as the high cost of resin is reduced by economies of scale. Video after the break.

[via Nature, thanks to Philip for the tip!]

Continue reading “3D Printing With Tomography In Reverse” →

Yell At Your Desk To Get Up In The Morning

Standing desks are great conversation starters in the office – whether you like it or not. How do you know someone’s got a standing desk? Don’t worry, they’ll tell you. Standing desks have their benefits, but for maximum flexibility, many people choose a desk that can raise and lower depending on their needs. [Wassim] had just such a desk, but found pushing the buttons too 20th century for his tastes. Naturally, Google Assistant integration was the key here.

[Wassim] started out intending to capture and then spoof the desk controller’s signals to the motors, before realising it was likely easier to simply spoof button presses instead. This was achieved through a handful of NPN transistors and an Onion Omega2+ microcontroller board. Then it was a simple case of coding the controller to press the various buttons in response to HTTP requests received over WiFi. Google Assistant integration was then handled with IFTTT, though [Wassim] also discusses the possibility of implementing the full Smart Home API.

It’s entertaining to watch [Wassim] issue commands and have the desk slowly rise in response. Of course, there are other approaches, like this sneaky use of PVC to hack the office furniture.

https://medium.com/@wassimchegham/hey-google-set-my-desk-to-standing-mode-b21dcc40d4b5

Arduboy Brings New Life To Dreamcast VMU

The Dreamcast VMU was a curious piece of hardware. Part memory card, part low-end LCD gaming toy, its fate was sealed once SEGA abandoned the console platform on January 31, 2001. With a limited market penetration and no major killer app, the VMU is a largely forgotten piece of ephemera from a past era. All the more reason to refit one with an Arduboy, instead.

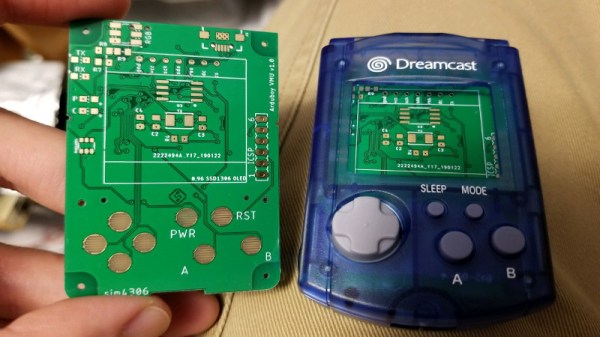
[sjm4306] has taken the Arduboy and repurposed it into a VMU-friendly form factor. The PCB is designed to fit snug inside the plastic case, with conductive traces for the original rubber membrane buttons already in place on the main board. There are some minor fit and finish issues with the first prototype – problems with drill sizes, and connectors that don’t quite fit flush with the housing. Mistakes like these are familiar to any maker who has built a custom PCB or two in their time, and [sjm4306] is confident the bugs will be worked out in the second revision.

It’s a fun project that brings some fun gaming action to an otherwise forgotten platform. If an Arduboy isn’t enough, you could always try to fit a Pi Zero instead. And if you don’t have a VMU, you can always emulate one. Video after the break.

Continue reading “Arduboy Brings New Life To Dreamcast VMU” →