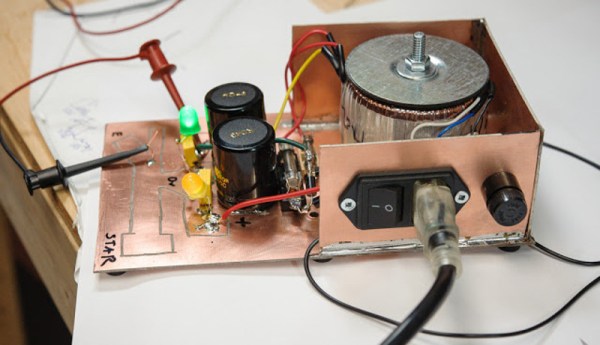
Power Supply Design For Clean Jazz Amps

Power supply design is a broad field, requiring entirely different tools and techniques depending on what you’re working with. Creating a low-cost and compact mobile phone charger is a completely different ball game to designing the power supply for a medium-sized laser cutter, for example. [Vasily Ivanenko] has been designing a power supply for a clean jazz guitar amplifier, and has helpfully documented the process.

For a guitar amplifier which prides itself on clean tones, it’s highly important to avoid all sources of noise, to let the natural sound of the guitar come through as clearly as possible. [Vasily] notes that this requires careful component selection, as well as consideration of the placement of key parts and the construction of the power supply. Strategies to minimise inductive and capacitive coupling are discussed, as well as grounding schemes to minimise undesirable hum or buzz during amplifier operation.

The article is the first of a three part series, in which [Vasily] will then cover the full design of the guitar amp, including a focus on the design of the power amplifier stage. We’ve seen some of [Vasily]’s work before, like this discussion of how to build high quality audio amplifiers for ham radio use. 

Sound-Triggered Eye Protection For The Forgetful Among US

Eyes are fragile things. They tend to fail under extreme heat, pressure, and are easily damaged by flying objects. Enterprising humans have developed a wide range of eye protection solutions, but most only work when the user remembers to put them on. [gocivici] had just such a problem, forgetting to put his safety glasses back on when working. Naturally, the solution was found through hacking.

The build starts with a regular baseball cap. [gocivici] fitted an Arduino nano, which is connected to a small microphone. The Arduino uses the microphone to determine the sound level in the room. Above a certain trigger level, the Arduino triggers a servo to move protective glasses into place in front of the wearer’s eyes, protecting them from flying shrapnel from whatever they may be working on.

It’s a fun build, that obviously still has the pitfall that you’re going to get hurt if you forget to wear your magic hat for the day. Another approach could be putting your multimeter display in your goggles so you never want to take them off in the first place. Video after the break.

Continue reading “Sound-Triggered Eye Protection For The Forgetful Among US” →

Humans Vs. Zombies Via The ESP8266

Zombies, for the most part, remain fictional and are yet to trouble human communities. Despite the many real world calamities we face, the zombie concept remains a compelling one and the subject of many books, films, and video games. [CNLohr] was at MagStock Eight when he met [Aaron], who has developed a real world game in this vein. (YouTube, embedded below.)

[Aaron]’s game goes by the name of SpyTag, and is played by a group of people who each have a small device affixed to their wrist. Two players start off as zombies, and the rest are humans. The zombies can use their devices as proximity detectors to hunt down nearby humans, and the humans can use their devices to detect nearby zombies, helping them escape and evade.

The devices operate using the ESP8266, in AP+station mode. The proximity sensing works on a very simple method. Devices show their human or zombie status by appearing as a WiFi AP by that name, and proximity detection is achieved by showing the signal strength of the opposite AP on an LED bar on the device. Once zombies get close enough to human devices, the humans are infected and become zombies themselves.

It’s a tidy and lightweight way to implement the gameplay, and requires no infrastructure or support hardware outside of the wristband hardware for the players. While this method would likely be vulnerable to spoofing, [CNLohr] reports that future work will likely switch to using the ESP-NOW protocol to make the game more secure.

[Aaron] has shared the project on Github for those interested in digging deeper into the code. We’ve seen a similar game played before, using IR instead. Video after the break.

[Thanks to Baldpower for the tip!]

Continue reading “Humans Vs. Zombies Via The ESP8266” →

Use Your 360 Controllers On The Original Xbox

Microsoft’s original Xbox was regarded curiously by gamers and the press alike at launch. It was bigger, bulkier, and featured an eldritch monstrosity as its original controller. Thankfully, Microsoft saw fit to improve things later in the console’s lifespan with the Controller S, but nothing quite compares to the simple glory of the Xbox 360 controller. Now, there’s a way to use one on your original Xbox.

This project is the work of [Ryzee119], who previously adapted the controller for use with the Nintendo 64. An Arduino Pro Micro, acting as a master controller, talks to a MAX3421 USB host controller, which interfaces with an Xbox 360 wireless receiver, either genuine or third-party. The Arduino reads the data from the wireless receiver and then emulates a standard controller to the original Xbox. The system can handle up to four players on wireless 360 controllers, requiring an extra Arduino per controller to act in slave mode and emulate the signals to the original Xbox. In testing, lag appears roughly comparable with an original wired controller. This is a particularly important consideration for fast-paced action games or anything rhythm based.

It’s a well executed, fully featured project that should improve your weekly Halo 2 LAN parties immensely. No more shall Greg trip over a controller cable, spilling Doritos and Mountain Dew on your shagpile carpeting. Video after the break.

[Thanks to DJ Biohazard for the tip!]

Continue reading “Use Your 360 Controllers On The Original Xbox” →

Purge Buckets To Help With Multimaterial Printing

3D printing is cool, but most basic fused deposition printers just print in a single color. This means that if you want a prettier, more vibrant print, you need to paint or perform some other kind of finishing process. Multimaterial printers that can switch filaments on the fly exist, but they often have an issue with waste. [3DMN] decided to attempt building a purge bucket as a solution.

[3DMN] was previously familiar with using a purge block when running multimaterial prints. A basic block model is printed along side the actual desired part. The block is printed so that it is at the same layer height as the desired part, so the nozzle can purge cleanly without stringing plastic all over the print bed.

Tired of the waste, [3DMN] designed a purge bucket which moves with the Z-axis of his Geeetech A20M printer. The bucket attaches to the Z-axis with lock nuts and is always at the same height relative to the nozzle, regardless of the stage of printing. When a material change is required, the nozzle moves to the bucket, purges the filament, and then moves back to the print. The bucket features a 3mm silicone wiper to help ensure there is no material left clinging to the nozzle after the purge is complete, and aluminium tape which helps prevent the purged filament sticking to the walls of the bucket.

[3DMN] notes there’s also a speed increase for some prints, due to no longer needing to print purge objects along with the main part. The parts are available on Thingiverse for those of you wishing to experiment with your own setup.

Multimaterial printing can have some great visual results, and it’s great to see the community providing solutions to improve the process and reduce the waste involved.  We’ve also seen filament splicing, which is another unique approach to multimaterial prints. Video after the break.

Continue reading “Purge Buckets To Help With Multimaterial Printing” →

The TRS80 Model 100 Gets A Brain Transplant

We’ll forgive you if you were busy in the ’80s, and missed the TRS80 Model 100. It was a portable version of the original, ran on four AA batteries, and even had an integrated acoustic coupler which proved handy for workers on the go. However, time is rarely kind, and [Trammell] had come across a non-functional example for just $20. It was time to bring this relic screaming into the modern age.

The motherboard was toast, so [Trammell] decided to wire up a Teensy++ directly to the Hitachi HD44102 display driver chips. Being an older LCD, the display needed a negative bias voltage, so a few diodes, capacitors and a PWM line stepped in to create a charge pump. There was no character generator on board, so the heavy lifting is all handled by the Teensy itself. The keyboard was a simple enough matrix design, so that was wired straight up.

[Trammell]’s work with this iteration got as far as acting as a USB serial terminal, and there was some work done on VT100 emulation. However, according to Twitter, the next stage involves an iCE40 FPGA and some music with which we’re altogether too familiar.

[Trammell] owns a working Model 100, too – employed in some modem experiments, no less.

R/C Whirlygig Is Terrifyingly Unstable

In the days during and immediately after World War II, aerospace research was a forefront consideration for national security. All manner of wild designs were explored as nation states attempted to gain the upper hand in the struggle for survival. The Hiller Hornet was one such craft built during this time – a helicopter which drove the rotor through tip-mounted ramjets. Unsurprisingly, this configuration had plenty of drawbacks which prevented it from ever reaching full production. The team at [FliteTest] had a soft spot for the craft, however, and used it to inspire their latest radio controlled experiment.

Initial experiments consisted of a modified foam wing from a model seaplane, with two left wings facing opposite directions, and joined in the middle. Two motors and props were fitted to the wings to provide rotational motion. After some initial vibration issues were solved, the improvised craft generated barely enough lift to get off the ground. Other problems were faced with centripetal forces tearing the propellers off the wing due to the high rotational speeds involved.

A second attempt started from scratch, with a four wing setup being used, with much higher camber, with the intention to generate more lift with a more aggressive airfoil, allowing rotational speeds to be decreased. The craft was capable of getting off the ground, but instabilities likened to the pendulum rocket fallacy prevented any major gain in altitude.

We’d love to see a redesign to solve some of the issues and allow the craft to sail higher into the air. If you think you know the solution to the whirly bird’s dynamic problems, be sure to let us know in the comments. It should be possible, as we’ve seen successful designs inspired by maple seeds before. Video after the break.

[Thanks to Baldpower for the tip!]

Continue reading “R/C Whirlygig Is Terrifyingly Unstable” →