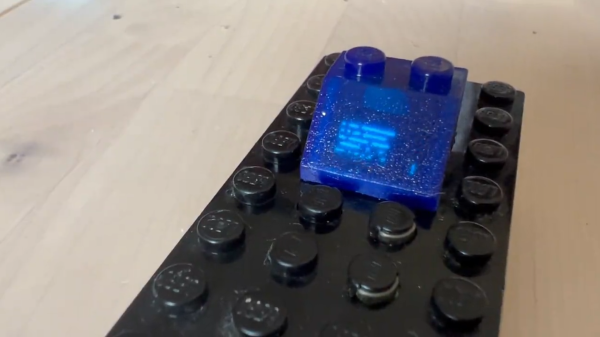
Urgon solders close up to see the work

Vision Impaired Electronics Engineer Shows The Way To Get Things Done

A funny thing happens as the average electronics hobbyist gets older: Their eyes- well they just don’t work the same as they used to. But what if your life started out with compromised vision? In this epic forum post (Google translated from Polish to English), we meet nearly blind hacker [Urgon]. He goes into great detail about his condition and how it affects not just his daily life, but also his abilities as an electronics engineer. Or conversely, how it doesn’t.

[Urgon]’s origin story is familiar. At eight years old, he disassembled his first television. His self-education continued by using his remaining vision to soak up every bit of literature about electronics that he could get his hands on. A well-intentioned but protective mother kept him away from soldering irons, fearing that the close proximity to his good eye might not bode well for his remaining vision.

If Urgon can solder 0805's, so can you!
If Urgon can solder SOIC’s 0805’s, so can you!

Despite a failed eye, and his other having quite severe glaucoma, [Urgon] has persevered. He uses assistive technologies as you’d expect, but notes that in more recent times some excellent free software has surpassed some of the commercial products he used in the past.

While even the sighted among us often shy away from SMD components, [Urgon] dives right in. SOIC packages and 0805 parts don’t hold him back. Bright LED flashlights, zooming in with his smart phone, and surely a healthy dose of patience make his hackery possible.

That’s not to say that [Urgon] hasn’t had some noteworthy incidents. He’s suffered electric shock from the 400 V capacitors in an ATX PSU, burned his face with his soldering iron, and even managed to step on a DIP package. Barefoot. Yes, the pins were facing up.

But wait- there’s more! In this follow-up post, [Urgon] discusses more assistive/adaptive technologies and how hackers like you and I can focus our efforts on things the vision impaired will find most helpful.

Our hats are off to [Urgon] and those like him who persevere despite the odds. We can all learn from [Urgon]’s hacker spirit and his dedication to the craft. We recently covered some blind software hackers who have taken it upon themselves to fly passenger jets– virtually, of course!

Thanks to [Moryc] for the excellent tip!


A Rotary Phone As A Computer Peripheral

It’s an age-old conundrum for anyone working with retro hardware: preserve its original condition or not? The answer depends so often on a complex mix of how rare, obsolete or unusable the device is in its original form , and what the intended use for the device will be. For [Typhon Mind] who needed a novelty method of recording best wishes at a wedding through an old dial phone there was no need for it to be entirely original, so the solution was to turn it into a USB device for a host computer.

Out went the original circuitry, and in came a USB hub, a USB audio interface, and an Arduino. The original earpiece would suffice, but the microphone was replaced with a more modern one. The Arduino will register the cradle switch, and also power a set of LED addressable lights under the unit.

The result is a phone that retains all its looks, but has a new life as a PC peripheral. We’d venture to suggest that also using the Arduino to read the dial and produce DTMF tones might make it a valid peripheral for a VOIP application and complete the transformation, but that’s something that could be done at a later date. Maybe it could even be given a GSM makeover.

Solder Paste Dispenser Without Giant Compressor

We have certainly all had our moments with solder paste. Some of us hate it; it’s sticky and gooey, and it gets everywhere. That is, unless you have a solder paste dispenser. The trouble with these is that they typically require the use of an air compressor, which can be cumbersome to haul around in certain situations. If you need a solder paste dispenser that fits conveniently where air compressors won’t, take a look at this small one from [Nuri Engineer] called the solderocket.

This design foregoes the traditional compressor in favor of pressurized carbon dioxide canisters. These are common enough and used for things like rapidly inflating bicycle tires, but for this more delicate procedure the pressurized gas needs to be handled more daintily. A rotary knob is attached to the canister to regulate pressure, and a second knob attached to a microcontroller adjusts the amount of time the air pressure is applied to the solder paste. With this small compact setup, any type of paste can be delivered to a PCB without needing to use messy stencils or needing larger hardware like a compressor.

This could be just the tool that you need if you regularly work with surface-mount components. Of course there are other methods of dispensing solder paste that don’t require any compressed gas of any kind, but as long as something is around that gets the job done, we can’t really argue with either method.

Fifty Shades Of Brown: 3D Printing With Sugar

[Norbert Heinz] has been busy for the 2021 Hackaday Prize entry, working on the design of a direct granule extruder for 3D printing with waste materials, or materials that are not provided in the form of a filament. Sugar is pretty common in most households, so since that’s already available in granular form, [Norbert] gave 3D printing with granulated sugar a try. (Video, embedded below.)

[Editor’s note: He earned fifth place for this one! Well, not the sugar in particular, but the overall great work on granular extruders.]

Success was somewhat variable, as the gloopy material is notoriously fickle to work with, but the setup did produce some structures that stayed in one piece, at least for a while. Initially [Norbert] tried it real slow, effectively printing with the liquified sweet stuff, by dragging a molten blob of it around on the end of the extruder nozzle. Whilst this did work, the resulting print resolution did leave something to be desired. The next thing tried was increased print speed. This produced clearer prints, as the sugar did not have time to caramelise, or form a noticeable blob, but as soon as the bed started to cool, it caused it to crack badly.

Going slow seemed to be the way forward, as more time to cool may have reduced the stresses in the structure due to the increased cooling time. But anyway, the way we see it, is it’s fun trying, and if it fails, you can just eat it, so long as you disregard all that food safety stuff anyway.

[Norbert] documents the granule extruder journey on the project Hackaday.io page, so it should be straightforward enough to duplicate this is you were so inclined.

We’ve covered a few sugary hacks before; Need a renewable bed adhesive? out of glue stick? try sugar as a bed adhesive! Printing in gloopy, sloppy materials is nothing new at all, we covered it nearly ten years ago.

Continue reading “Fifty Shades Of Brown: 3D Printing With Sugar”

Bring A Minitel Terminal Back To Life WIth An ESP32

Most of us who are old enough are likely to have had our first experience of an online service some time in the 1990s, either through the likes of Compuserve or via an ISP. For our French readers the online experience will have come much earlier, as a forward-thinking telecommunications environment led to every household in the country receiving a viewdata terminal. The Minitel system as it was called was a runaway success, and was only finally turned off as late as 2012. Many of the terminals survive to make a great basis for projects, and it’s one of these that [Louis H] has taken and enhanced with an ESP32.

One of the special things about this project is that unlike so many other Minitel conversions it doesn’t involve tearing into the terminal itself. Instead the PCB plugs into the socket on the back of the unit and emulates the line for the terminal to talk to. It can then be used as an SSH terminal over WiFi, or as a serial terminal for the ESP32 itself for example running a MicroPython firmware. If you can handle the French AZERTY keyboard there is no easier way to drag a viewdata terminal into the 2020s, as you can see in the video below the break.

Chez Hackaday, we love these nostalgic gems from the 1980s. Indeed we like this classic French public network so much that we’ve featured it quite a few times. Here for example is a similar project using an Arduino. Continue reading “Bring A Minitel Terminal Back To Life WIth An ESP32”

Ken Shirriff Breaks Open The Yamaha DX7

For better or worse, this synthesizer was king in the 1980s music scene. Sure, there had been synthesizers before, but none acheived the sudden popularity of Yamaha’s DX7. “Take on Me?” “Highway to the Dangerzone”?  That harmonica solo in “What’s Love Got to Do With It?”  All DX7. This synth was everywhere in pop music at the time, and now we can all get some insight from taking a look at this de-capped chip from [Ken Shirriff].

To be clear, by “look” that’s exactly what we mean in this case, as [Ken] is reverse-engineering the YM21280 — the waveform generator of the DX7 — from photos. He took around 100 photos of the de-capped chip with a microscope, composited them, and then analyzed them painstakingly. The detail in his report is remarkable as he is able to show individual logic gates thanks to his powerful microscope. From there he can show exactly how the chip works down to each individual adder and array of memory.

[Ken]’s hope is that this work improves the understanding of the Yamaha DX7 chips enough to build more accurate emulators. Yamaha stopped producing the synthesizer in 1989 but its ubiquity makes it a popular, if niche, platform for music even today. Of course you don’t need a synthesizer to make excellent music. The next pop culture trend, grunge, essentially was a rebellion to the 80s explosion of synths and neon colors and we’ve seen some unique ways of exploring this era of music as well.

Thanks to [Folkert] for the tip!

ESP32 Brings Air Purifier Online With Home Assistant

A lot of hackers are rightfully concerned about the privacy issues that surround many of today’s “smart” gadgets, but it’s hard to argue that the ability to remotely control devices around your home isn’t convenient. Enter self-hosted, open source projects like Home Assistant. This provides the framework for building out a home automation system without having your soul information sold, but as you might expect, you’re going to have to put some effort in to get the most of it.

For example, take a look at this Phillips AC4014 air purifier that [Anton] connected to Home Assistant by way of an ESP32. Rather than getting too bogged down in reverse engineering the purifier’s surprisingly complex internal electronics, he took the easy way out and wired a couple of relays across the power and fan speed buttons; this allows the device to be easily controlled by the microcontroller, without impacting the functionality of the original controls.

But since those front panel controls still work, that meant [Anton] needed a way for the ESP32 to detect the device’s status and report that to Home Assistant so everything stayed in sync. So he looked around on the PCB for a trace that got powered up when the air purifier was up and running, which he connected to a pin of the microcontroller through a transistor. This let’s the firmware determine if the machine is running or not just by checking if the appropriate pin has gone high.

Speaking of the firmware, [Anton] decided to use ESPHome rather than trying to write his own code from scratch. This project allows you to rapidly add new devices to Home Assistant by providing the firmware with a relatively simple YAML configuration file, which he’s provided as an example. In fact, he’s provided quite a lot of examples with this project, down to an annotated image of the PCB that shows where to tap your wires into. He’s done quite a service for anyone who’s got this same model of air purifier.

This unit doesn’t appear to have any capability of actually checking the quality of the air in the room, but we’ve recently seen a low-cost IKEA product that can do exactly that. Even better, it can be easily modified to report its findings over the network using the ESP8266.