A 3D Printed Grinder For Printed Lens Blanks

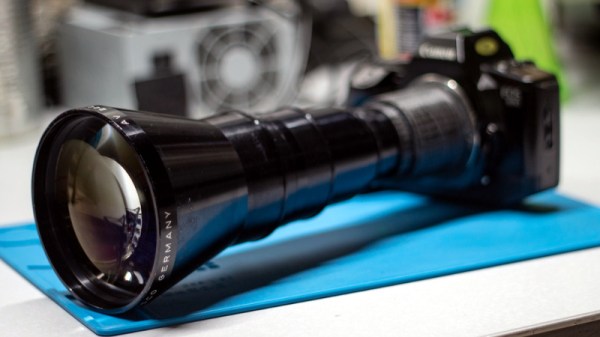
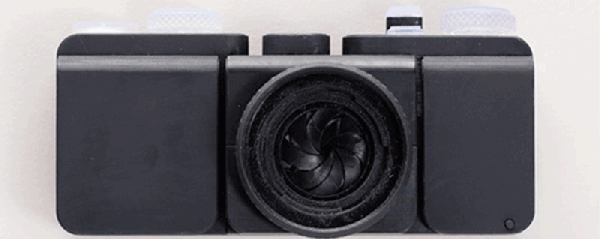
When one thinks of applications for 3D printing, optical components don’t seem to be a good fit. With the possible exception of Fresnel lenses, FDM printing doesn’t seem up to the job of getting the smooth surfaces and precision dimensions needed to focus light. Resin printing might be a little closer to the mark, but there’s still a long way to go between a printed blank and a finished lens.

That gap is what [Fraens] aims to fill with this homebrew lens grinding machine. It uses the same basic methods used to grind and polish lenses for centuries, only with printed components and lens blanks. The machine itself consists of a motorized chuck for holding the lens blank, plus an articulated arm to hold the polishing tool. The tool arm has an eccentric drive that wobbles the polishing tool back and forth across the blank while it rotates in the chuck. Lens grinding requires a lot of water and abrasive, so a large bowl is provided to catch the swarf and keep the work area clean.

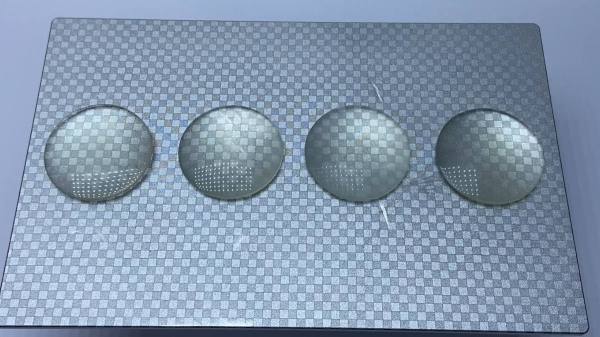
Lens blanks are printed to approximately their finished dimensions using clear resin in an SLA printer. [Fraens] spent a lot of time optimizing the printing geometry to minimize the number of print layers required. He found that a 30° angle between the lens and the resin pool worked best, resulting in the clearest blanks. To polish the rough blanks, a lapping tool is made from polymer modeling clay; after baking it dry, the tool can hold a variety of pads and polishing compounds. From there it’s just a matter of running the blank through a range of abrasives to get the desired final surface.

Are the lenses fantastic? Well, they’re probably not going to make it into fine optical equipment, but they’re a lot better than you might expect. Of course, there’s plenty of room for improvement; better resins might result in clearer blanks, and perhaps degassing the uncured resin under vacuum might help with bubbles. Skipping the printed blanks and going with CNC-machined acrylic might be worth a try, too.

Continue reading “A 3D Printed Grinder For Printed Lens Blanks”

Trying Out A 3D Printed Microscope Lens Adapter

If you want to take pictures of tiny things close up, you need a macro lens. Or a microscope. [Nicholas Sherlock] thought “Why not both?” He designed a 3D-printed microscope lens adapter that you can find on Thingiverse. Recently, [Micael Widell] tried it out with a microscope lens and you can see the results in the video below.

A $20 microscope lens allows for some amazing shots. There are two designs that fit different cropped-image and full-frame cameras. As you might expect, the depth of field is razor-thin, probably sub-millimeter. Additionally, with a 4X lens on a 35 mm sensor, the field of view is about 9 mm so you have to have a steady hand just to keep everything in frame.

Continue reading “Trying Out A 3D Printed Microscope Lens Adapter”

Printed Adapter Puts Vintage Lens Back To Work

While browsing through an antiques shop, [Nick Morganti] came across a Kodak slide projector with an absolutely massive lens hanging off the front. Nearly a foot long and with a front diameter of approximately four inches, the German-made ISCO optic was a steal for just $10. The only tricky part was figuring out how to use it on a modern DSLR camera.

After liberating the lens from the projector, [Nick] noted the rear seemed to be nearly the same diameter as the threaded M42 mount that was popular with older film cameras. As luck would have it, he already had an adapter that let him use an old Soviet M42 lens on his camera. The thread pitch didn’t match at all, but by holding the lens up to the adapter he was able to experiment a bit with the focus and take some test shots.

Encouraged by these early tests, [Nick] went about designing a 3D printed adapter. His first attempt was little more than a pair of concentric cylinders, and was focused like an old handheld spyglass. This worked, but it was quite finicky to use with the already ungainly lens. His second attempt added internal threads to the mix, which allowed him to more easily control focus. After he was satisfied with the design, he glued a small ring over the adapter so the lens could no longer be unscrewed all the way and accidentally fall out.

To us, this project is a perfect application of desktop 3D printing.[Nick] was able to conceptualize a one-of-a-kind design, test it, iterate on it, and arrive on a finished product, all without having to leave the comfort of his own home. To say nothing of the complex design of the adapter, which would be exceedingly difficult to produce via traditional means. Perhaps some people’s idea of a good time is trying to whittle a lens bayonet out of wood, but it certainly isn’t ours.

So it’s probably little surprise we’ve seen a number of similar projects over the years. From monstrous anamorphic adapters to upgraded optics for the Game Boy Camera, it seems there’s a healthy overlap between the 3D printing and photography communities.

3D Printing Your Own Sturdy Lens Caps

Lens caps are important for protecting expensive camera lenses from damage. Dust, grit, and other nasty things will all quickly spoil the quality of a shot, and can even permanently damage a lens if you’re unlucky. However, lens caps are also lost quite easily. Thus, it’s useful to be able to make your own, and [DSLR CNC DIY] has the low down on how to do it. 

The benefit of printing your own lens caps is customization. No matter the oddball size and shape of your lens, when you’re 3D printing your own cap, you can design it to fit. The video also shows off the benefits of being able to embed text right into the body of the cap, so you’re never confused as to which cap goes with which lens. The caps use the metal lever from a binder clip in order to provide the clamping force necessary to hang on to the lens. It’s an improvement over some living-hinge designs that grow weaker over time.

Overall, if you’ve got a bunch of lenses that need a new cap, this could be the project for you. It’s also likely much cheaper and easier than hunting down replacement caps for obscure lenses online. Alternatively, contemplate what you could do with fancy lens adapters. Video after the break. Continue reading “3D Printing Your Own Sturdy Lens Caps”

3D Printed Lenticular Lens Makes 3D Display

[Bitluni] has been experimenting with resin printing lenses — in particular, lenticular lenses. You’ve probably seen lenticular lenses before in 3D greeting cards or children’s books. By presenting a slightly different image at different angles, your eyes perceive stereo vision giving the illusion of depth. You can see his results in the video below.

Honestly, even if you don’t want to make a display like this yourself, the demonstration of how a lenticular lens works using a laser is worth watching. Sure, you know in theory what’s going on, but seeing it visually exposed is great.

Continue reading “3D Printed Lenticular Lens Makes 3D Display”

3D-Printed Extension For Extreme Macro Photography Includes Lens Electronic Control

Macro photography — the art of taking pictures of tiny things — can be an expensive pastime. Good lenses aren’t cheap, and greater magnification inflates the price even further. One way to release a bit more performance from your optics comes in the form of an extension tube, which mounts your lens further from the camera to zoom in a little on the image. Back in the day with a film SLR you could make a rough and ready tube with cardboard and tape, but in the age of the digital camera the lens has become as much a computer peripheral as an optical device. [Nicholas Sherlock] has solved this problem by creating a 3D-printed extension tube for his Canon that preserves connections between camera and lens.

More details of this 300mm monster’s construction go so far beyond a plastic tub formed of two threaded sections with adapter plates at the ends. He’s using off-the-shelf metal rings to fit camera and lens just right, but making the electronic contacts is where it gets interesting. On end uses pogo pins, the other provides a contact block made of nail heads. In both cases the 3D-printed parts are designed to provide mounting points for the pins and nails. The assembly technique is worth a look both because of the design and as an example of how to document all the juicy details we’re constantly looking for in a great hack.

The results speak for themselves, in that the photography provides an impressive level of close-up detail. If you would like to build your own tube, it is available on Thingiverse.

Macro extensions seem far between here, but we’ve brought you a few lens repairs in our time.

[via /r/photography]

A 3D Printed Camera (Including The Lens)

Barring the RepRap project, we usually see 3D printers make either replacement parts or small assemblies, not an entire finished product. [Amos] is the exception to this rule with his entirely 3D-printed camera. Everything in this camera is 3D printed, from the shutter to the lightproof box to the lens itself. It’s an amazing piece of engineering, and a testament to how far 3D printing has come in just a few short years.

35mm film is the most common film by far, and the only one that’s still easy to get and have developed at a reasonable price. This 3D-printed camera is based on that standard, making most of the guts extremely similar to the millions of film cameras that have been produced over the years. There’s a film cartridge, a few gears, a film takeup spool, and a lightproof box. So far, this really isn’t a challenge for any 3D printer.

The fun starts with the lens. We’ve seen 3D printers used for lens making before, starting with a 3D print used to create a silicone mold where a lens is cast in clear acrylic, 3D printed tools used to grind glass, and an experiment from FormLabs to 3D print a lens. All of these techniques require some surface finishing, and [Amos]’ lens is no different. He printed a lens on his Form 2 printer, and started polishing with 400 grit sandpaper. After working up to 12000 grit, the image was still a bit blurry, revealing microscopic grooves that wouldn’t polish out. This led him to build a tool to mechanically polish the lens. This tool was, of course, 3D printed. After polishing, the lens was ‘dip polished’ in a vat of uncured resin.

The shutter was the next challenge, and for this [Amos] couldn’t rely on the usual mechanisms found in film cameras. he did find a shutter mechanism from 1885 that didn’t take up a lot of depth, and after modeling the movement in Blender, designed a reasonable shutter system.

Building an entire camera in a 3D printer is a challenge, but how are the pictures? Not bad, actually. There’s a weird vignetting, and everything’s a little bit blurry. It’s hip, trendy, and lomo, and basically amazing that it works at all.