Demo Relativity For A C-Note

If you are a science fiction fan, you probably hate the theory of relativity. After all, how can the Enterprise get to a new star system every week if you can’t go faster than the speed of light? [Nick Lucid] wants to set you straight: it is real, and you can prove it to yourself for under $100.

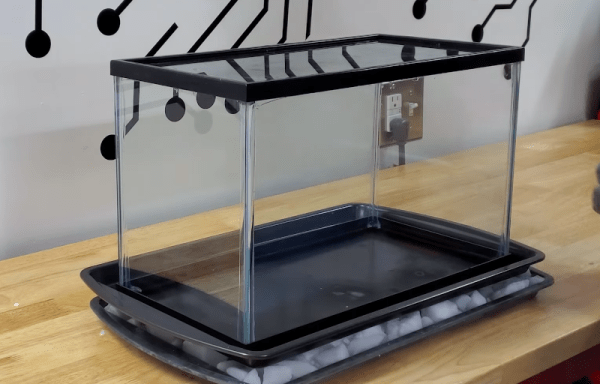
The idea uses muons created in our atmosphere by cosmic rays colliding with gasses in the atmosphere. So how do you detect muons yourself? [Nick] shows you how to do it with a fish tank, dry ice, and rubbing alcohol. If that sounds like a cloud chamber, you aren’t wrong.

A cloud chamber is undeniably cool, but how does it prove relativity? You’ll see several kinds of particles interacting with your cloud chamber, but you can tell which ones are muons by the size and motion of the streaks. The muons don’t last very long. So you’d expect very few muons to make it to the surface of the Earth. But they not only reach the surface but go deep under it, as well.

So how do you explain it? Relatively. The muon experiences its average 2.2 microseconds lifetime in what appears to us to be over 150 microseconds, even if it is moving relatively slowly for a muon. Some muons are faster or live longer, so we see a lot of them hit the Earth every minute of every day. This is due to time dilation and also explains length contraction because the muon moves at a certain speed, yet it appears to go further to us than to the muon.

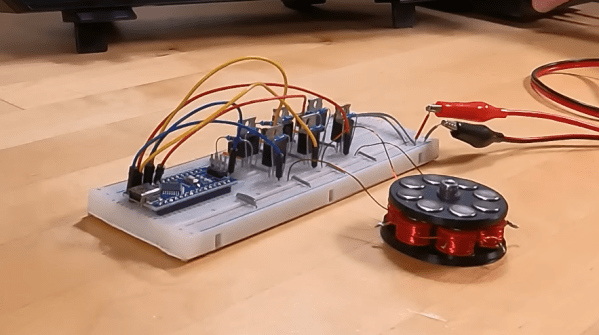
Coincidentally, we recently discussed this same effect relative to using muons for underground navigation. If you want an easier way to count muons with a computer, you can build a detector for about the same price as the cloud chamber.

Continue reading “Demo Relativity For A C-Note”

Microsoft BASIC For The Dragon 64 Recovered

There are a great many pieces of software of yesteryear that are no longer readily accessible. It’s now possible to cross Microsoft BASIC for the Dragon 64 off that list, with the source code now posted for all to enjoy on GitHub.

The repository concerns the Microsoft 16K BASIC Interpreter as built for the Motorola 6809, as used in the Dragon 64 computer. This is also known as BASIC-69 or Extended Color Basic.

Hilariously, the source code was recovered from 340 pages of fan-fold tractor paper stored in four bundles. The output of a Motorola assembler was printed back in 1983 at Dragon Data’s R&D facility in Wales, and was recently recovered after being stored in an attic for much of the last four decades. The paper was carefully scanned at the 2022 Dragon Meetup, before passing the resulting images through OCR software. The output was then manually corrected and the source code was complete for both the 32K and 64K mode ROMs. There are some differences between the scanned source and what Microsoft shipped, which is outlined in the repository.

We’ve seen other heroic retrocomputer recovery efforts before, too, like the work to save the Polish CROOK OS. If you’ve been working on similar feats, be sure to let us know.

Much Better VGA From An ESP32

The ESP32 series from Espressif have been a successful line of products, offering a powerful microcontroller with on-chip wireless networking. There’s a snag though in their practice of calling all of them ESP32s despite wildly varying specifications and even different processor cores, such that it’s easy to lose track of exactly what the chip in front of you can do. [Bitluni] was faced with updating his VGA library to include a newer variant, and was pleasantly surprised to find that it includes a far more capable display peripheral which enables significantly higher resolutions than previously.

The part in question is the ESP32-S3, a version of the chip with the dual Extensa cores we’re familiar with from earlier versions, but the interesting addition of an LCD controller. His previous VGA on ESP32 used the I2S peripheral and sacrificed some of the available bits to create sync pulses, while this version is not only faster but also includes dedicated sync hardware. He can now do up to 16-bit colour in as much as 1024×768 resolution as can be seen in the video below the break, though this feat requires a slightly out of spec framerate that only works on some screens. It’s by no means perfect because the peripheral is intended for LCD rather than VGA use, but it’s pushing microcontroller VGA to new heights and we look forward to any other uses people will put it to.

We covered the original Bitluni ESP32 VGA library when it first appeared.

Continue reading “Much Better VGA From An ESP32”

A BASIC Interpreter For The Raspberry Pi Pico

It’s pretty easy to program the Raspberry Pi Pico in Python, or you can use C or C++ if you so desire. However, if you fancy the easy language of yesteryear, you might like PiccoloBASIC from [Gary Sims].

Putting it simply, piccoloBASIC is a BASIC interpreter that runs on the Raspberry Pi Pico. It features all the good bits of BASIC such as GOTO and GOSUB commands, that fancier languages kind of look down upon. It’s also got enough built-in routines to handle regular programming life, like sleeps, delays, a basic pseudorandom number source, trigonometric functions, and the ability to deal with floating point numbers. As far as microcontroller tasks go, it’s got rudimentary support for talking to GPIOs right now via the pinon and pinoff commands. However, it’s probably not the way to go if you want to bit-bang an SD card to within an inch of its speed rating.

Down the road, [Gary] hopes to add support for features like the Pico’s I2C, SPI, and PIO hardware, along with networking protocols and Bluetooth. PEEK and POKE are also hopefully on the way for those that like to fiddle with memory directly.

Meanwhile, if you’re looking for a different yet similar take, explore the port of MMBasic to the Pico platform. Video after the break.

Continue reading “A BASIC Interpreter For The Raspberry Pi Pico”

An open engine bay for a small car. The wheels are off so the hubs and brakes are visible to the side and the electric motor mounted on top of the vehicle's original engine block is in the center of the image.

A Different Approach To EV Conversions

While there are a lot of exciting electric vehicles finally coming to market, many of us feel nostalgic for the fossil cars of our youth. [Mihir Vardhan] restored his grandfather’s car with an unusual gas-to-EV conversion.

While this conversion starts in the usual fashion by pulling out the gas engine, [Vardhan] takes a different tack than most by not just bolting an electric motor up to the transmission. Instead, he and his crew removed the head and pistons from the petrol burner and bolted the electric motor to the top on an L-shaped bracket. Using the timing belt to transfer power to the crankshaft, there is no need to figure out additional motors for the A/C compressor or power steering pump, greatly simplifying implementation.

[Vardhan] did need to add a vacuum pump for the braking system and used a DC/DC converter to step down the 72V traction battery voltage to the 12V needed to charge the accessory battery. While it doesn’t exactly boast the performance of a Tesla, his bargain-basement conversion does yield a converted vehicle that can get around town for only around $3k US, even if it does mean your EV still needs oil changes. We think this could work even better on a vehicle with a timing chain instead of a belt, but it’s certainly an interesting way to go about the conversion process.

We’ve covered our fondness for EV conversions in the past for cars, motorcycles, and boats if you’d like to dig deeper. Have your own EV conversion you think we should cover? Send us a tip!

Continue reading “A Different Approach To EV Conversions”

Do-Everything LED Indicator Light Runs From 4V To 60V

If you’re working with 3.3V or 5V circuits, it’s easy for you to throw on a power or status LED here or there. [Tom Gralewicz] has found himself in a pickle, though, often working on projects with voltages like 36V or 48V. Suddenly, it’s no longer practical to throw an LED and a resistor on a line to verify if it’s powered or not. Craving this simplicity, [Tom] invented the Cheap Universal LED Driver, or CULD, to do the job instead.

The CULD is designed as a simple LED indicator that will light up anywhere from 5V to 50V. It’s intended to be set-and-forget, requiring no fussing with different resistor values and no worries for the end user that excessive current draw will result.

The key part ended up being the LV2862XLVDDCR – a cheap switching regulator. It can output 1 mA to 600 mA to drive one or several LEDs, and it can do so anywhere from a 4V to 60V input. Assemble this on a coin-sized PCB with some LEDs, and you’ve got your nifty do-everything indicator light. With a bridge rectifier onboard, it’ll even work on AC circuits, too.

[Tom] has built a handful himself, but he open-sourced the design in the hopes it will go further. By his calculations, it would be possible to build these in quantities of 1000 for a BOM cost of less than $0.50 each, not counting assembly or the PCB itself. We’d love to see them become a standard part of hacker toolkits, too. If you’ve got a pick-and-place plant that’s looking for work this week, maybe get them on to something like this and see what you can do! If it turns out to be a goer, maybe drop us a note on the tipsline, yeah?

You Can 3D Print A 12,500 RPM Brushless Motor

Typically, when most of us need a motor, we jump online to order one from a catalogue. [Levi Janssen] recently had to build his own for a college project, however, and learned a lot along the way.

[Levi] whipped up his brushless DC motor design in OnShape. The motor has six coils in the stator, with the rotor carrying eight neodymium magnets. It’s an axial flux design, with the rotor’s magnets sitting above the coils. This makes construction very easy using 3D printed components. Axial flux motors also have benefits when it comes to power density and cooling, though optimization is outside the scope of [Levi]’s work here.

[Levi]’s video covers both the development of the motor itself as well as the drive circuit, too. The latter is of key value if you’re interested in the vagaries of driving these motors, which is far more complex than running a simple brushed motor. He even gets his motor up to 12,500 rpm with his homebrewed drive circuit.

Making your own motors can help you solve some difficult engineering challenges, like building motorized rollerblades. Alternatively, if winding coils sounds too slow and too hard, you can just use off-the-shelf gear and hack it to make it work. Here, we support both methods.

Continue reading “You Can 3D Print A 12,500 RPM Brushless Motor”