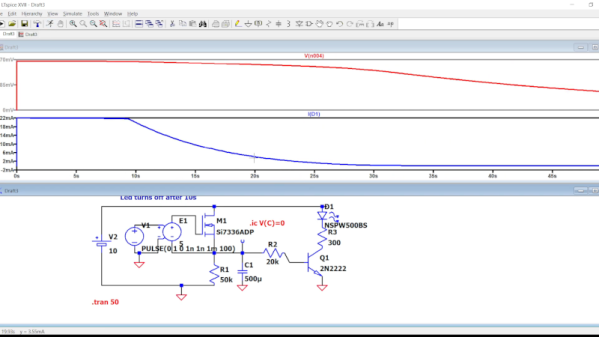
Two-Thirds Keyboard Is Inspired By The Typesetting Era

We see all kinds of custom keyboard builds around here. Most of them are intended to optimize typing to the user’s desires. This glorious build from [Attoparsec] isn’t one of those, and is instead part of the growing joke keyboard genre. The so-called Two-Thirds Keyboard is inspired by the long-gone typesetting era.

The build is based on the typecases used in the era when type was assembled by hand. Typesetters would grab “majuscule” letters from the upper case of type, and “miniscule” letters from the lower case of type, when setting a page, which would go on to influence how we refer to those letters today. Letters that came up more often, like e and s, would get larger compartments in the type cases, while rarer letters like z and q would get smaller compartments. The Two-Thirds keyboard replicates this by giving the most common letters the biggest keys, while rarer letters and upper-case majuscule letters get smaller keys. The overall layout matches that of the popular Two-Thirds California Case of type that grew popular in the US in the typesetting era.

There were some engineering issues in building the keyboard. While stabilizers are available for wide keys like Enter and Space in regular keyboard designs, stabilizing keys that are wide and high is fussy. The build relies on multiple switches to enable them to move cleanly. Nor were 2×2 and 2×3-sized custom keycaps readily available. In the end, resin printing was key to producing all the necessary components.

Typing on the keyboard is not quick, but lower speeds were probably acceptable in the typesetting era. Regardless, [Attoparsec] used it for a full week to do it justice, going from around 10  wpm to 22 wpm by the end of the test.

It’s a fun build, but by no means the slowest keyboard we’ve ever seen.

Continue reading “Two-Thirds Keyboard Is Inspired By The Typesetting Era”

An art deco style computer made of several grey/blue boxes with silver grates on top of a maple platform.

Clean Slate Is A Vintage Amplifier-Inspired PC

Hacks that bring a vintage flair to modern electronics never get old, and [Jeffrey Stephenson] delivers with his Project Clean Slate inspired by vintage tube amps.

Thinking outside the traditional single box PC, [Jeffrey] built his computer into a series of component-specific boxes all attached to a platform housing the Micro ATX motherboard. The base is made of plywood with a birds-eye maple veneer and each of the component boxes features two different sizes of wire mesh to manipulate the viewer’s perception of the dimensions. Even the I/O and graphics card plates are custom made from aluminum for this build.

If you really want to dig into how this PC came to life, there’s a very detailed build log including every step of the process from bare board to finished product. We love when we get an inside look at the thought process behind each design decision in a build.

We’ve featured [Jeffrey] before with his Humidor Cluster, and you may also like this PC inside a vintage radio.

Continue reading “Clean Slate Is A Vintage Amplifier-Inspired PC”

Nixie Display Module Is Addressable Via SPI

There are plenty of SPI interface screens on the market, but few of them have the charm of the good old Nixie tube. [Tony] decided to whip up a simple three-Nixie module that could be addressed via SPI. 

The stacked construction keeps things compact.

The module relies on a PIC16F15344 microcontroller to run the show, using its built-in SPI interface. It’s built with four stacked-up PCBs for ease of assembly and testing. It uses an internal buck converter to create the 170 volts required for the Nixie tubes from a 6 to 12 volt input. The high-voltage lines are routed towards the inside of the stack to minimize any nasty shocks when handling, though caution would still be advisable.

Driving the display is as simple as sending 16-bit words over the SPI interface, with the device operating in SPI client mode 1. If you’re looking for a simple way to have projects write output to a nice Nixie display, this module could be just what you’re looking for. Alternatively, if you can’t lay your hands on the tubes, there are other pretty solutions out there, too. Video after the break.

Continue reading “Nixie Display Module Is Addressable Via SPI”

A two picture montage of a boy wearing a sonic the hedgehog costume with LEDs in them. The left picture is at night with the boy wearing sunglasses and a face mask with the sonic costume head piece lit up. The right picture is during the day with the boy wearing a face mask, holding a plastic pu mpkin bucket for candy and wearing a lit up sonic the hedgehog costume in the front yard of a house.

LEDs Put New Spin On A Sonic The Hedgehog Costume

[Wentworthm] couldn’t say no to his son’s plea for a Sonic the Hedgehog costume for Halloween but also couldn’t resist sprucing it up with LEDs either. The end result is a surprisingly cool light up Sonic the Hedgehog costume.

a picture of a breadboard with an Arduino Nano on it, with wires going out to 3d printed tear dropped shapes that have LED strips in them, with some LED strips on.

After some experimentation, [Wentworthm] ordered two costumes and ended up mixing and matching the head piece of one with the body suit of the other. For the head, [Wentworthm] created six 3D printed “quills” that had slots for the WS2812B LED strips to slide into and diffuse out the sides, with each quill sliding into the folds of the Sonic head “spikes”. Sewn strips of cloth were used to house the LED strips that were placed down the sides of the costume. An additional 3D printed switch housing was created to allow for a more robust interface to the two push buttons to activate the LEDs. An Arduino Nano, soldered to a protoboard, was used to drive the LED strips with a USB battery pack powering the whole project.

[Wentworthm] goes into more detail about the trials and errors, so the post is definitely worth checking out for more detail on the build. Halloween is always a great source of cool costumes and we’ve featured some great ones before, like a light up crosswalk costume to making a giant Gameboy colour costume.

Video after the break!

Continue reading “LEDs Put New Spin On A Sonic The Hedgehog Costume”

a 3d printed case, sitting on a table with cactuses in the background, with a 3d rendered holo assistant reflected in a cone of polycarbonate sheets from a flat HDMI display pointed up

Anime Inspired Holographic Virtual Assistant

[Jessp] has created a very cute and endearing DIY virtual assistant called Maria. The build combines a 3D printed housing that uses a modern take on the “Pepper’s Ghost” illusion to render a virtual, three-dimensional anime inspired assistant that can take commands to get information about the weather, play music or set timers.

The hub houses a Raspberry Pi 4B and a 3.2 inch LCD HDMI screen mounted flat on its back to render the perspective corrected “Maria” character using a technique borrowed from the Pepper’s Cone project. Polycarbonate sheets are formed into a cone, allowing for the 3D effect of rendering the virtual assistant model. A consumer grade mini USB microphone is used to receive voice commands along with a consumer grade USB speaker for audio feedback. The virtual assistant offloads the text to speech services to Google Cloud, along with using a weather API and Spotify developer account to for its musical options.

All source code is available on [Jessp]’s GitHub page, including build instructions and STL files for the housing. We’ve featured open source voice assistants in the past, including Mycroft and a even a HAL-9000 virtual assistant (running Kalliope) but it’s nice to see further experimentation in this space.

Continue reading “Anime Inspired Holographic Virtual Assistant”

Clever Control Loop Makes This Spinning Drone Fault-Tolerant

Most multi-rotor aircraft are about as aerodynamic as a brick. Unless all its motors are turning and the control electronics are doing their thing, most UAVs are quickly destined to become UGVs, and generally in spectacular fashion. But by switching up things a bit, it’s possible to make a multi-rotor drone that keeps on flying even without two-thirds of its motors running.

We’ve been keeping a close eye on [Nick Rehm]’s cool spinning drone project, which basically eschews a rigid airframe for a set of three airfoils joined to a central hub. The collective pitch of the blades can be controlled via a servo in the hub, and the whole thing can be made to rotate and provide lift thanks to the thrust of tip-mounted motors and props. We’ve seen [Nick] manage to get this contraption airborne, and hovering is pretty straightforward. The video below covers the next step: getting pitch, roll, and yaw control over the spinning blades of doom.

The problem isn’t trivial. First off, [Nick] had to decide what the front of a spinning aircraft even means. Through the clever uses of LED strips mounted to the airfoils and some POV magic, he was able to visually indicate a reference axis. From there he was able to come up with a scheme to vary the power to each motor as it moves relative to the reference axis, modulating it in either a sine or cosine function to achieve roll and pitch control. This basically imitates the cyclic pitch control of a classic helicopter — a sort of virtual swashplate.

The results of all this are impressive, if a bit terrifying. [Nick] clearly has control of the aircraft even though it’s spinning at 250 RPM, but even cooler is the bit where he kills first one then two motors. It struggles, but it’s still controllable enough for a bumpy but safe landing.

Continue reading “Clever Control Loop Makes This Spinning Drone Fault-Tolerant”

Bare-Metal STM32: Setting Up And Using SPI

The Serial Peripheral Interface (SPI) interface was initially standardized by Motorola in 1979 for short-distance communication in embedded systems. In its most common four-wire configuration, full-duplex data transfer is possible on the two data (MOSI, MISO) lines with data rates well exceeding 10 Mb/s. This makes SPI suitable for high-bandwidth, full-duplex applications like SD storage cards and large resolution, high-refresh displays.

STM32 devices come with a variable number of SPI peripherals, two in the F042 at 18 Mb/s and five in the F411. Across the STM32 families, the SPI peripheral is relatively similar, with fairly minor differences in the register layout. In this article we’ll look at configuring an SPI peripheral in master mode.

Continue reading “Bare-Metal STM32: Setting Up And Using SPI”