Nifty MIG Welder Built From Scrap

A MIG welder is a great tool to have. With machine fed wire and gas protecting the arc, it can make it easy to weld well without requiring a lot of manual skill from the operator. [PROFESSOR PARDAL BRASIL] decided to build his own MIG welder using scrap parts, and it’s an inspiring bit of work.

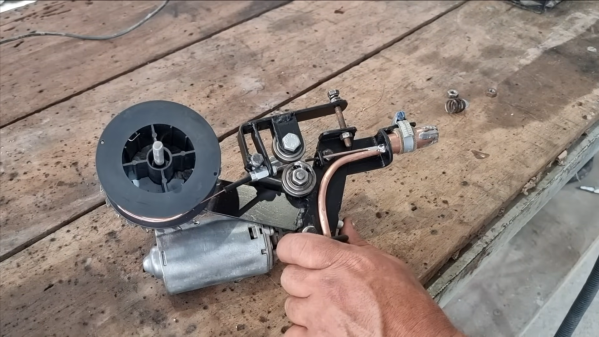
The build is along the lines of so many YouTube contraptions, using bits and pieces thrown together in oddball ways. A windscreen wiper motor is used to create a wire feeder, with jammed-up ball bearings acting as rollers. Speed control of the wiper motor appears to be via a variable resistor created by moving two plates closer together in a bath of salt water. This enables the wire feed rate to be easily controlled, albeit in a wet and messy fashion. The build includes a device for producing carbon dioxide for use as shielding gas, too. This is achieved by mixing a solution of water and bicarbonate soda with vinegar, and then pumping the resulting carbon dioxide into an inner tube for storage. The power supply for actually creating an arc comes courtesy of car batteries.

The resulting welder is janky as all heck, but it does successfully weld some steel plates together. Job done, as they say. Video after the break.  Continue reading “Nifty MIG Welder Built From Scrap”

The Wirtz Pump Spins

Over the ages, a lot of human activity has been concerned about getting water from where we find it to where we want it. If you want to move water to a lower elevation, there’s no problem. But if you want to move water up, you need a pump. The ancients used what we call Archimedes’ screw to raise water. But a Wirtz pump as [Steve Mould] shows in the video below, is another kind of spiral pump that is also very old and uses the same basic principle as the screw pump.

In a way, the Wirtz is just an Archimedes’ screw in cross-section. Part of what makes it work, however, is air-locking. [Steve] made a small model but found it didn’t work exactly as he expected. Of course, investigating that led to some interesting observations.

Continue reading “The Wirtz Pump Spins”

A Buzzing, Flashing Phone Ringer For The Elderly

For a lonely person, elderly or otherwise, the sound of a ringing phone can be music to the ears, unless of course it’s another spam call. But what good is a phone when you can’t hear it well enough to answer?

[Giovanni Aggiustatutto] was tasked with building an additional ringer for a set of cordless landline phones belonging to an elderly friend. Rather than try to intercept the signal, [Giovanni] chose to simply mic up the phone base that’s connected to the phone port on the router and send a signal over Wi-Fi to a second box which has a loud piezo buzzer and a handful of LEDs.

At the heart of this build is a pair of ESP8266 Wemos D1 minis and an Arduino sound sensor module inside a pair of really nice-looking 3D printed boxen that may or may not have been inspired by an IKEA air quality sensor. On the receiving side, a green LED indicates the system is working, and the red LEDs flash as soon as a call comes in.

All the code, schematics, and STL files are available for this build, and between the Instructable and the build video after the break, you should have no trouble replicating it for the hard-of-hearing in your life.

Continue reading “A Buzzing, Flashing Phone Ringer For The Elderly”

Micromanipulator Touches The Tiny Things, Cheaply

Some things are small and fragile enough that they cannot be held or touched by even the steadiest of hands. Such cases call for a micromanipulator, and [BYU CMR]’s DIY micromanipulator design can be 3D printed and assembled with the help of some common hardware, and a little CA glue.

You may recall an ultra-tiny Nerf-like blaster recently; clearly such a tiny mechanical device cannot be handled directly, yet needed to be loaded and have its trigger pressed. A micromanipulator is exactly the tool for such a job. This design is in fact the very same one used to move and manipulate that tiny blaster at a microscopic level.

The design doesn’t include any end effectors — those depend on one’s application — but there is a mount point for them and the manipulator can effectively move it in X, Y, and Z axes by turning three different knobs. In addition, because the structural parts can be 3D printed and the hardware is just some common nuts and screws, it’s remarkably economical which is always a welcome thing for a workshop.

Tattoo-Removal Laser Brought Out Of Retirement For A Megawatt Of Fun

We’ve got to say that [Les Wright] has the most fun on the internet, at least in terms of megawatts per dollar. Just look at his new video where he turns a $30 eBay tattoo-removal laser into a benchtop beast.

The junk laser in question is a neodymium:YAG pulse laser that clearly has seen better days, both externally and internally. The original pistol-grip enclosure was essentially falling apart, but was superfluous to [Les]’ plans for the laser. Things were better inside the business end of the gun, at least in terms of having all the pieces in place, but the teardown still revealed issues. Chief among these was the gunk and grunge that had accumulated on the laser rod and the flash tube — [Les] blamed this on the previous owner’s use of tap water for cooling rather than deionized water. It was nothing a little elbow grease couldn’t take care of, though. Especially since the rest of the laser bits seemed in good shape, including the chromium:YAG Q-switch, which allows the lasing medium to build up a huge pulse of photons before releasing them in one gigantic pulse.

Cleaned up and with a few special modifications of his own, including a custom high-voltage power supply, [Les]’ laser was ready for tests. The results are impressive; peak optical power is just over a megawatt, which is enough power to have some real fun. We’ll be keen to see what he does with this laser — maybe blasting apart a CCD camera?

Continue reading “Tattoo-Removal Laser Brought Out Of Retirement For A Megawatt Of Fun”

Tech In Plain Sight: Skyscrapers

It is hard to imagine that for thousands of years, the Great Pyramid of Giza was the tallest manmade structure in the world. However, like the Lincoln Cathedral and the Washington Monument, which also held that title, these don’t count as skyscrapers because they didn’t provide living or working space to people. But aside from providing living, retail, or office space, skyscrapers also share a common feature that explains why they are even possible: steel frame construction.

Have you ever wondered why pyramids appear in so many ancient civilizations? The answer is engineering. You build something. Then, you build something on top of it. Then you repeat. It just makes sense. But each upper layer adds weight to all the lower layers, so you must keep getting smaller. Building a 381-meter skyscraper like the Empire State Building using self-supporting walls would mean the ground floor walls would be massive. Steel lets you get around this.

In Antiquity

You might think of high-rise buildings as a modern thing, but that’s actually not true. People seem to have built up to the best of their abilities for a very long time. Some Roman structures were as high as ten stories. Romans built so high that Augustus even tried to limit building height to 25 meters — probably after some accidents.  In the 12th century, Bologna had as many as 100 towers, one nearly 100 meters tall.

There are many other examples, including mudbrick structures rising 30 meters in Yemen and 11th-century Egyptian structures rising 14 stories. In some cases, building up was due to the cost or availability of property. In others, it was to stay inside a defensive wall. But whatever the reason, self-supporting walls can only go so high before they are impractical.

So steel and iron frames grabbed the public’s attention with things like Joseph Paxton’s Crystal Palace in 1851, and Gustav Eiffel’s Tower in 1887.

Continue reading “Tech In Plain Sight: Skyscrapers”

How Not To Build An RP2040 Board

We love that these days you can buy ready-made microcontroller boards that are very capable. But sometimes you need to — or just want to — do it yourself. Unfortunately, you really should design everything twice: once to figure out where all the problems are, and the second time to do it better. If you want to create your own board for the RP2040 then you are in luck. [Jeremy] has made the first (and second) iteration or an RP2040 board and shares with us what he would not do again.

In all fairness, he also has a blog post talking about what he did, so you might want to start there. However, we think his most valuable advice was his final word: Don’t fail to get started on your design. The longest journey, after all, begins with the first step.

His other advice is good, too. For example, don’t plug your new board into a computer because an error in the power supply could take the whole computer out. He also warns you not to do like he did and forget to order the $10 solder stencil with the PCBs.

Some of it is just good advice in general. For example — buy more small components than you think you need. There’s nothing worse than needing three resistors, having three resistors, and then watching one of the three fly across the room or stick to your soldering iron and melt into a pool of slag. Buy ten and you’ll save money in the long run.

In the end, the board did work and what he learned might help you if you decide to tackle a similar project yourself. [Jeremy’s] board is fairly large, but if you have an appetite for something smaller, check out the RPDot or the RP2040 Stamp.