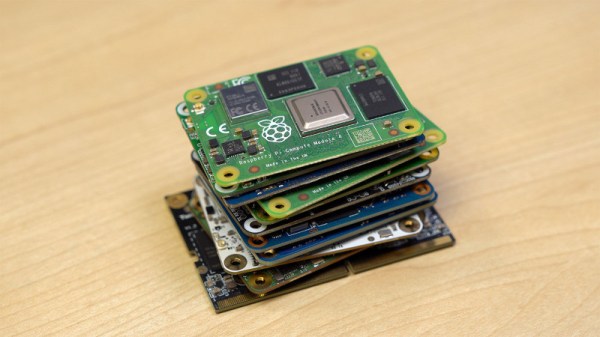
A Fancy Connected Caliper For Not A Lot

An essential for the engineer is a decent caliper, to measure dimensions with reasonable accuracy. Some of us have old-fashioned Vernier scales, while many up-to-date versions are electronic. When entering large numbers of dimensions into a CAD package matters can become a little tedious, so the fancier versions have connectivity for automatic reading transfer. [Mew463] didn’t want to shell out the cash for one of those, so modified a cheaper caliper with an ESP32-C3 microcontroller to provide a Bluetooth interface.

Many cheaper calipers have a handy hidden serial port, and it’s to this interface the mod is connected via a simple level shifter. The ESP and associated circuitry is mounted on a custom PCB on the back of the caliper body, with a very neatly designed case also holding a small Li-Po cell. It adds a little bulk to the instrument, but not enough to render it unusable. Whether the work required to design and build it is worth the cost saving over an off-the-shelf connected caliper is left to the reader to decide.

We’ve covered similar hacks in the past, but this one’s to a very high standard. Meanwhile if calipers are of interest to you then they’re a subject we’ve examined in some significant detail.

A Love Letter To The Sphere Computer

[Ben Z] loves the Sphere computer, a very early entry in the personal computer boom of the mid 1970s. The 6800 CPU was unique in its day that it was a full system — at least in theory. If you could afford the whole system, you got a nice case with a keyboard and a memory-mapped display board. You can see a great video tour of the system below the break.

The Sphere suffered from a few problems, none of which were easily foreseeable by its designer. First, the 6800 didn’t get the traction that the 8080-derived CPUs did. Second, the S-100 bus would prove to be popular but that nearly always meant an 8080-type processor in practice. Third, while an all-in-one system was the right idea, it was pricey at the time, and many people would opt for something less expensive even if it had less capability. People also wanted to leverage hardware they may have already had. It was easier to imagine hooking up a surplus TeleType, for example, to a more conventional computer than to a Sphere that expected its own display hardware and keyboard.

Continue reading “A Love Letter To The Sphere Computer”

27 Litres And 12 Cylinders, With A Practical Station Wagon Body

If you were to name one of the most famous individual road cars in the world, what would it be? If you’re British and of a Certain Age, then it’s possible your nomination is for sale, because “The Beast”, the one-off creation of [John Dodd] using a 27-litre Rolls-Royce Merlin aero engine, is up for auction. The Late Brake Show’s [Jonny Smith] has given it a drive, and we’ve pasted the resulting video below the break.

A second-hand motor isn’t usual Hackaday fare, but it’s the manner of this car’s building which we think will draw you in. [John] originally acquired somebody’s failed project featuring not a Merlin but its de-tuned derivative intended for tanks. He solved the problem of finding a transmission able to handle the immense power, and built it up with a pretty 1970s coupe body. After a fire a few years later he commissioned a new body from a dragster manufacturer, which is the wildly period estate car you’ll see in the video. It famously originally had a Rolls-Royce Cars grille, for which he ended up in court in the 1980s as the carmaker sought successfully to have it removed.

The tale of this car is one of epic scale hackery, as there is quite simply nothing else like it. It was once the world’s most powerful road car, and remains capable of well over 200 miles per hour. Sadly we couldn’t afford to buy it even if we could fit its immense length in our parking space.

Hungry for more epic British car hackery? Have we got the roadster for you!

Continue reading “27 Litres And 12 Cylinders, With A Practical Station Wagon Body”

The USB Protocol, Explained

If you can explain what a USB PID, a J state, a K state, and an SOF are, you can probably stop reading now. But if you don’t know or you want a refresher, you can spend 15 minutes watching [Sine Lab’s] straightforward explanation of the USB protocol details. You can find the video below.

The motivation for this is he wants to add USB to his projects using an ATMega with a hardware USB implementation. Honestly, most of the time, you’ll just consume some premade library and get it working that way. However, understanding the terminology can help you, especially if things don’t go as planned.

Continue reading “The USB Protocol, Explained”

Low-Power Wi-Fi Includes E-Paper Display

Designing devices that can operate in remote environments on battery power is often challenging, especially if the devices need to last a long time between charges or battery swaps. Thankfully there are some things available that make these tasks a little easier, such as e-ink or e-paper displays which only use power when making changes to the display. That doesn’t solve all of the challenges of low-power devices, but [Albertas] shows us a few other tricks with this development board.

The platform is designed around an e-paper display and is meant to be used in places where something like sensor data needs to not only be collected, but also displayed. It also uses the ESP32C3 microcontroller as a platform which is well-known for its low power capabilities, and additionally has an on-board temperature and humidity sensor. With Bluetooth included as well, the tiny device can connect to plenty of wireless networks while consuming a remarkably low 34 µA in standby.

With a platform like this that can use extremely low power when not taking measurements, a battery charge can last a surprisingly long time. And, since it is based on common components, adding even a slightly larger battery would not be too difficult and could greatly extend this capability as well. But, we have seen similar builds running on nothing more than a coin cell, so doing so might only be necessary in the most extreme of situations.

More Drill Press Mods: Adding A VFD Means No More Belt Changes

A decent drill press is an essential machine tool for almost any kind of shop, and marks a significant step up in precision compared to a hand drill. The ability to drill square, true holes is one thing, but the added power over what’s possible with a portable tool is the real game changer. If only you didn’t have to switch around those damn belts to change speeds, though.

You don’t, of course, if you go through the effort to add a variable frequency drive to your drill press like [Midwest Cyberpunk] did, along with some other cool mods. The donor tool for these mods came from — where else? — Harbor Freight. Some will quibble with that choice, but the tool was pretty cheap, and really all [Midwest] was interested in here was some decent castings and a quill with acceptable runout, since the entire power train of the tool was slated for replacement. The original motor gave way to a beefy Baldor 3-phase/240-volt motor controlled by a VFD mounted on a bracket to the left of the drill press head, allowing the stock belt and step pulley transmission to be greatly simplified. Continue reading “More Drill Press Mods: Adding A VFD Means No More Belt Changes”

Making Dry Ice At Home Is Just As Hard As It Sounds

Along the road to developing his own cryocooler to produce liquid nitrogen, there are a number of interesting rabbit holes [Hyperspace Pirate] has found himself taking a look at. For example, using dry ice for a pre-cooling stage and subsequently wondering what it’d take to make this dry ice oneself.

Getting the CO2 required for the dry ice is the easy part, requiring nothing more complicated than baking soda and a suitable acid (like hydrochloric acid). The other options to gather CO2 include using yeast, capturing the gas from the air people breathe out, calcium hydroxide, etc., none of which are as easy or convenient.

The acid is mixed with the baking soda, with the produced gas led through a bubbler and subsequent dehumidification stage before being collected. For the more involved part of getting dry ice, a bit more science is needed. First, a compressor is used to get pressurized CO2 into a previously evacuated tank at 160 psi (~12 bar). For the next phase the compressed gas has to be compressed further so that it condenses into a liquid. This involves a second compressor stage and a repurposed paintball tank. At the needed pressure of 1000 psi (69 bar), safety is essential.

With liquid carbon dioxide in the paintball tank, all it takes at this point is to turn the tank upside-down to get the liquid part near the exhaust valve and crank it open. Capturing the dry ice at this point is another fascinating challenge, which was partially solved by a 3D printed mold, with plenty of room for improvement still.

Given the cost and effort involved in producing it, just buying dry ice at the local store looks like it’s still the way to go for your Halloween fog machine this year. But it’s a fascinating experiment regardless, especially since it actually produced results — unlike some of the attempts we’ve covered previously.

Continue reading “Making Dry Ice At Home Is Just As Hard As It Sounds”