Add Wood Grain Texture To 3D Prints – With A Model Of A Log

Adding textures is a great way to experiment with giving 3D prints a different look, and [PandaN] shows off a method of adding a wood grain effect in a way that’s easy to play around with. It involves using a 3D model of a log (complete with concentric tree rings) as a print modifier. The good news is that [PandaN] has already done the work of creating one, as well as showing how to use it.
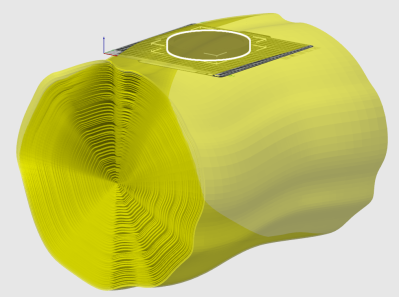
The model of the stump — complete with concentric tree rings — acts as a modifier for the much-smaller printed object (in this case, a small plate).

In the slicer software one simply uses the log as a modifier for an object to be printed. When a 3D model is used as a modifier in this way, it means different print settings get applied everywhere the object to be printed and the modifier intersect one another.

In the case of this project, the modifier shifts the angle of the fill pattern wherever the models intersect. A fuzzy skin modifier is used as well, and the result is enough to give a wood grain appearance to the printed object. When printed with a wood filament (which is PLA mixed with wood particles), the result looks especially good.

We’ve seen a few different ways to add textures to 3D prints, including using Blender to modify model surfaces. Textures can enhance the look of a model, and are also a good way to hide layer lines.

In addition to the 3D models, [PandaN] provides a ready-to-go project for Bambu slicer with all the necessary settings already configured, so experimenting can be as simple as swapping the object to be printed with a new 3D model. Want to see that in action? Here’s a separate video demonstrating exactly that step-by-step, embedded below.

Continue reading “Add Wood Grain Texture To 3D Prints – With A Model Of A Log”

Spin-Casting This Telescope Mirror In Resin Didn’t Go To Plan

For most of us, mirrors are something we buy instead of build. However, [Unnecessary Automation] wanted to craft mirrors of his own for a custom telescope build. As it turns out, producing optically-useful mirrors is not exactly easy.

For the telescope build in question, [Unnecessary Automation] needed a concave mirror. Trying to get that sort of shape with glass can be difficult. However, there’s such a thing as a “liquid mirror” where spinning fluid forms into a parabolic-like shape. Thus came the idea to spin liquid resin during curing to try and create a mirror with the right shape.

That didn’t quite work, but it inspired a more advanced setup where a spinning bowl and dense glycerine fluid was used to craft a silicone mold with a convex shape. This could then be used to produce a resin-based mirror in a relatively stationary fashion. From there, it was just necessary to plate a shiny metal layer on to the final part to create the mirror effect. Unfortunately, the end result was too messy to use as a viable telescope mirror, but we learn a lot about what didn’t work along the way.

The video is a great journey of trial and error. Sometimes, figuring out how to do something is the fun part of a project, even if you don’t always succeed. If you’ve got ideas on how to successfully spin cast a quality mirror, drop them in the comments below. We’ve seen others explore mirror making techniques before, too.

Continue reading “Spin-Casting This Telescope Mirror In Resin Didn’t Go To Plan”

ZX Mechtrum Deluxe keyboard close-up

The Keyboard Sinclair Never Made

For those of us who’ve spent far too long hammering rubber keys into submission, a glorious solution has arrived. [Lee Smith] designed the ZX Mechtrum Deluxe, the ultimate keyboard upgrade for your beloved ZX Spectrum 48k. Thanks to [morefunmakingit], you can see this build-it-yourself mechanical mod below. It finally brings a proper spacebar and Spectrum-themed Wraith keycaps into your retro life.

The Metrum Deluxe is a full PCB redesign: no reused matrices or clunky membrane adapters here. [Lee Smith] got fed up with people (read: the community, plus one very persistent YouTuber) asking for a better typing experience, so he delivered. Wraith keycaps from AliExpress echo the original token commands and BASIC vibe, without going full collector-crazy. Best of all: the files are open. You can download the case on Printables and order the PCB through JLCPCB. Cherry on top (pun intended): you’ll finally have a spacebar your thumbs can be proud of.

So whether you’re into Frankenstein rigs or just want your Spectrum to stop feeling like an air mattress, check this video out. Build files and link to the keycaps can be found on Youtube, below the video.

Tip: if you foster a secret love for keyboards, don’t miss the Keebin’ with Kristina’s series on all sorts of keyboards.

Continue reading “The Keyboard Sinclair Never Made”

The 1972 INTERCAL Compiler Revealed

Have you ever heard of INTERCAL? If you haven’t, don’t feel bad. This relatively obscure language dates back to 1972 with the goal of being difficult to read and write. It is the intellectual parent of systems like brainf**k and other bad languages. Now, you can read the INTERCAL-72 source code thanks to a found printout. It will help if you can read SPITBOL, another obscure language that is a compiled version of SNOBOL (which is like an old-fashioned non-Unix awk program).

How strange it INTERCAL? Well, one of the statements is PLEASE. If you don’t use it enough, you’ll offend the interpreter, who will then ignore your program. But if you use it too much, then you are a suck up and, therefore, your program will be ignored again. If you think GOTO is a bad idea, you’ll just hate COME FROM, although that was from a later version of INTERCAL.

Continue reading “The 1972 INTERCAL Compiler Revealed”

Render of a simple clockwork orrery

Planetary Poetry With A Tiny Digital Core

Some hacks just tickle the brain in a very particular way. They’re, for a change, not overly engineered; they’re just elegant, anachronistic, and full of mischief. That’s exactly what [Frans] pulls off with A Gentleman’s Orrery, a tiny, simple clockwork solar system. Composed of shiny brass and the poise of 18th-century craftsmanship, it hides a modern secret: there’s barely any clockwork inside. You can build it yourself.

Mechanism of a simple clockwork orreryPeek behind the polished face and you’ll find a mechanical sleight of hand. This isn’t your grandfather’s gear-laden planetarium. Instead of that, it operates on a pared-down system that relies on a stepper motor, driving planetary movement through a 0.8 mm axle nested inside a 1 mm brass tube. That micro-mechanical coupling, aided by a couple of bevel gears, manages to rotate the Moon just right, including its orientation. Most of the movement relies on clever design, not gear cascades. The real wizardry happens under the hood: a 3D-printed chassis cradles an ESP32-C6, a TTP223 capacitive touch module, STSPIN220 driver, and even a reed switch with magnetic charging.

You can even swap out the brass for a stone shell where the full moon acts as the touch control. It’s tactile, it’s poetic, and therefore, a nice hack for a weekend project. To build it yourself, read [Frans]’ Instructable.

Continue reading “Planetary Poetry With A Tiny Digital Core”

3D Printing A Capable RC Car

You can buy all sorts of RC cars off the shelf, but doing so won’t teach you a whole lot. Alternatively, you could follow [TRDB]’s example, and design your own from scratch.

The Lizard, as it is known, is a fun little RC car. It’s got a vaguely Formula 1-inspired aesthetic, and looks fetching with the aid of two-tone 3D printed parts. It’s designed for speed and handling, with a rear-wheel-drive layout and sprung suspension at all four corners to soak up the bumps. The majority of the vehicle is 3D printed in PETG, including the body and the gearbox and differential. However, some suspension components are made in TPU for greater flexibility and resistance to impact. [TRDB] specified commercial off-the-shelf wheels to provide good grip that couldn’t easily be achieved with 3D-printed tires. An ESP32 is responsible for receiving commands from [TRDB’s] custom RC controller running the same microcontroller. It sends commands to the speed controller that runs the Lizard’s brushed DC motor from a 3S lithium-polymer battery.

The final product looks sleek and handles well. It also achieved a GPS-verified top speed of 48 km/h as per [TRDB’s] testing. We’ve seen some other great DIY RC cars over the years, too, like this example that focuses on performance fundamentals. Video after the break.

Continue reading “3D Printing A Capable RC Car”

Ender 3 Pro Gets A Second Job As A Stator Winder

Sometimes, you find yourself in need of a coil. You could sit around winding thousands of turns of copper wire yourself, but that would be remarkably tedious. Thus, instead, you might follow the example of [OJengineering] and choose to get a machine to do it for you.

This build first popped up on on Reddit, with [OJengineering] explaining that they had repurposed an Ender 3 Pro 3D printer to wind a stator for them. The reasoning was sound—a replacement stator for their motorcycle cost $1000 in their local area, so rewinding their own would be much cheaper. The idea was straightforward enough—the 3D printer was a capable motion control platform that really just needed to be retooled to drag wire around instead of squirting hot plastic. In a later update, they explained that they had created a Python program that spits out appropriate stator winding G-code from user-entered parameters. This G-code commands the 3D printer’s head to make rectangle winds around the stator core while moving up and down to appropriately distribute the wire. The device can be seen in action in a video on YouTube.

It’s a hacky build, but one that does nevertheless get the winding done. That’s the thing about 3D printers—they’re really just simple motion systems that can do whatever you tell them. You just need a way to generate the right G-code to do the job.

We’ve featured some other nifty coil winders before, too. Video after the break.

Continue reading “Ender 3 Pro Gets A Second Job As A Stator Winder”