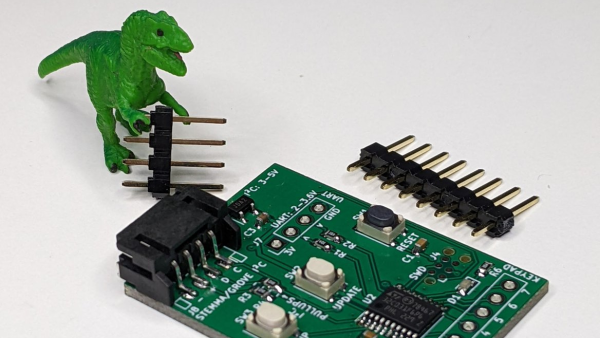
Adversarial IR Hoodie Lets You Own The Night In Anonymity

If you’re in the market for something to obfuscate your nefarious nocturnal activities, rejoice — this adversarial infrared hoodie may be just what you’re looking for.

Not that we condone illegal activities, of course, and neither does artist [Mac Pierce], who created “The Camera-Shy Hoodie.” His purpose seems to be exploring the nature of the surveillance state, or rather to perplex it in the name of anonymity. The idea is simple — equip a standard hoodie with a ring of super-bright IR LEDs, and control them with an RP2040.

We’ve seen blinding hoodies before, but here the LEDs strobe on and off in one of three different patterns, all of which are timed to confound the autoexposure mechanism in just about any surveillance camera by not giving it time to adjust to the rapidly and drastically changing light level. The result is near-total obfuscation of the wearer’s facial features, at least when the camera is in night-vision mode. Check out the results in the video below.

There are some nice touches to [Mac]’s approach, like aluminum PCBs for the LEDs and the use of soldered-on fabric snaps to attach them to the inside of the hoodie, making them easy to remove for laundering. With the LEDs peeking through holes in the fabric, the hoodie looks pretty run-of-the-mill — until, of course, night falls and the USB battery bank in the hoodie’s pocket powers up the light show.

Granted, this won’t exactly help you avoid detection — the big ball of light around your head will be instantly seen by even the most casual observer. But at least it makes it easier to keep your face to yourself. And it won’t help much in daylight — for that, you might want something a little more like this passive adversarial ugly sweater.

Continue reading “Adversarial IR Hoodie Lets You Own The Night In Anonymity”

A Medium Format Camera From Scratch

Film photography may now be something so outdated as to be unknown to our younger readers, but as an analogue medium it has enjoyed a steady enthusiast revival. There is still a bonanza of second-hand cameras from the days when it was king to be found, but for some photographers it’s preferable to experiment with their own designs. Among them is Reddit user [elelcoolbeenz], who has produced their own medium format camera for 120 roll film.

The camera has a plastic 3D printed body and a single meniscus lens, and perhaps most interestingly, a 3D printed shutter too. It’s heavily reminiscent of the Holga and Lomo plastic cameras that have carved a niche for themselves, and it gives the same photographic effects from its dubious quality optics.

There’s a snag of course, that the STLs are not yet available We say not yet, because this comes with a detailed explanation in that further work is required on the shutter and a more commonly available lens is found rather than a one-off. We still think it’s worthy of featuring at this stage though, because it serves to illustrate that building a camera is not impossible. We’d love to see more of them, though we expect few of them to go to the lengths this aluminium one did.

Review Of The YARD Stick One Radio Dongle

When it comes to SDR, you can usually find cheap products that receive and expensive products that can also transmit. The YARD Stick One bucks that trend. It can send and receive from 300 MHz to 928 MHz, thanks to the onboard TI CC1111 chip.Ā [Wim Ton] on Elektor put the device through its paces. While the frequency range isn’t as broad as some devices, the price is right at about $99. YARD, by the way, stands for Yet Another RF Dongle.

The frequency range isn’t as cut and dry as it might seem. According to the product’s home page: “official operating frequencies: 300 MHz – 348 MHz, 391 MHz – 464 MHz, and 782 MHz – 928 MHz; unofficial operating frequencies: 281 MHz – 361 MHz, 378 MHz – 481 MHz, and 749 MHz – 962 MHz.” The unofficial operating frequencies are not supported by the chip but appear to work in practice.

Continue reading “Review Of The YARD Stick One Radio Dongle”

Hackaday Links Column Banner

Hackaday Links: March 5, 2023

Well, we guess it had to happen eventually — Ford is putting plans in place to make its vehicles capable of self-repossession. At least it seems so from a patent application that was published last week, which reads like something written by someone who fancies themselves an evil genius but is just really, really annoying. Like most patent applications, it covers a lot of ground; aside from the obvious capability of a self-driving car to drive itself back to the dealership, Ford lists a number of steps that its proposed system could take before or instead of driving the car away from someone who’s behind on payments.

Examples include selective disabling conveniences in the vehicle, like the HVAC or infotainment systems, or even locking the doors and effectively bricking the vehicle. Ford graciously makes allowance for using the repossessed vehicle in an emergency, and makes mention of using cameras in the vehicle and a “neural network” to verify that the locked-out user is indeed having, say, a medical emergency. What could possibly go wrong?

Continue reading “Hackaday Links: March 5, 2023”

Graphene And Copper Nanowire Thermal Interface With Low Thermal Resistance

With the increasing waste heat production by today’s electronics in ever smaller spaces, drawing this heat away quickly enough to prevent thermal throttling or damage is a major concern. This is where research by Lin Jing and colleagues from Carnegie Mellon University’s Department of Mechanical Engineering demonstrates a thermal interface material (TIM) that should provide a significant boost here. In the article, published in ACS Nano (paywalled; open access preprint alternative) the construction of this copper and graphene ‘sandwich’ TIM is described, along with tests.

The general idea is to use pillars between the two surfaces that can quickly carry the heat from the hot surface to the cool one. Although pure copper versions exist and do work, they suffer from the complications of having to build up these copper pillars in place, and subsequent oxidation reducing the effectiveness. While graphene and similar materials have shown superior heat-transfer capabilities, interfacing these materials with copper and other metals has proven problematic.

What Lin Jing et al. demonstrate in this study is to use essentially the pure copper approach, but to combine it with earlier research by Raghav Garg et al. (2017), who demonstrated how to grow 3-dimensional graphene structures. By cladding the copper pillars with graphene, this material improves heat transfer by 60%, while preventing oxidation of the metal. While the challenge is obviously to transfer these findings to something that can be mass-produced for consumer devices, it demonstrates how much potential there is in the use of graphene, which is a relatively new material for such applications due to how hard it was to produce until recently.


Yesterday’s Drill Press Packed With Tomorrow’s Upgrades

Those who hibernate in their workshops have a habit of re-imagining their relationship to tools. And [Marius Hornberger] is no exception, but the nine upgrades he’s added to his grandfather’s old drill press puts this machine on a whole other level.

In proper storytime fashion, [Marius] steps us through each upgrade, the rationale, and the time and effort that went into crafting the solution. Some of these upgrades, like a digital readout (DRO), add modern features to an old-school device. Others, like an oil mist cooling system and a compressed air chip blower, borrow from other machines with similar setups. Some, like the chip guard, are nice personal touches. And a few, like the motorized table with automatic clamp, transform the entire operator experience. On the whole, these upgrades follow a gentle theme of personalizing the machine to [Marius’] tastes, giving him a delightful, more personal operator experience that’s tuned through his everyday use. Amid the sheer volume of tweaks though, we’re convinced that you’ll find something that tickles your tinkering fancy.

It’s worth mentioning that the pneumatic table clamp alone (at 4:28) makes the entire video worth the watch. If you’ve ever had the mishap of pinching your finger or struggling to hold the table steady while clamping it in place, this little upgrade takes all of that away, replacing the swivel handle with a homebrew pneumatic cylinder made in the shop. With a single button press, a swoosh of compressed air either clamps or releases the table. Best of all, the setup still sports a hand clamp if [Marius] is operating without a compressed air source.

It’s also worth mentioning that a couple of [Marius’] upgrades completely skip the CAD step altogether. Instead, [Marius] creates templates directly off the drill press with tracing paper and then immediately transfers them onto stock materials. It’s a nice reminder that not every small project needs to start with a 3D model.

If all these upgrades are getting you ready to modify your machine, look no further than the video description where he’s courteously posted inks to key components behind these upgrades.

The story of many-a-workshop often involves reinventing your machine tools. If you’re looking for more tales of tool upgrades, have a look at resurrecting a machine from literal ashes or a machine that improves itself.

Continue reading “Yesterday’s Drill Press Packed With Tomorrow’s Upgrades”

Showing a RAM chip being removed from a Pi 4 board, hot air gun in the shot. Area around the chip is covered with kapton tape.

Upgrade RAM On Your Pi 4, The Fun Way

The Raspberry Pi shortage has been a meme in hacker circles for what feels like an eternity now, and the Pi 4 seems to be most affected – though, maybe it’s just its popularity. Nevertheless, if you’re looking for a Pi 4, you would need to look far and wide – and things are way worse if you need the 8 GB version specifically. Or so we thought – [MadEDoctor] shows us that refreshing online store pages isn’t the only way, having successfully upgraded the RAM chip on the Pi 4 from 1 GB to 8 GB with help of a hot air gun.

These chips are BGA, and those might feel intimidating if you’re just starting out with hot air – however, we recommend you watch this video, as [MadEDoctor]’s approach is of the kind that brings BGA replacement to hobbyist level. First off, you get a compatible RAM chip somewhere like Aliexpress – lucky for us, those come equipped with a set of balls from the factory. The default balls are made of lead-free solder, and [MadEDoctor] reballed the RAM chip with leaded solder balls to lower the melting point, but it’s by no means a requirement that you do the same.

In fact, you only need a hot air gun, flux, a soldering iron and some solder wick to perform the replacement – no reballing equipment. Put some kapton or metal tape on the board for heat shielding, get the old chip off with hot air, use an iron with wick to clean the pads, add some flux, align the chip, then use hot air to solder a new chip onto the board. Replacing this chip can get your Pi 4 to the highly-sought-after 8 GB target – as an aside, we’re surprised that there was no configuration needed, as the Pi 4 booted right up and successfully recognized the extra RAM added.

We’d personally recommend preheating for such an upgrade – that said, this sure went without a hitch, and such a RAM swap method doesn’t require any stencils, solder paste or solder ball applications. Drop by the video description for compatible RAM chip part numbers, make sure you have your tacky flux and solder wick in order, and let [MadEDoctor] walk you through upgrading your Pi 4 the hacker way. Is this hack to your liking? Take it up a notch with this laptop soldered-in RAM upgrade journey, or that one RAM upgrade for an old GPU to comply to Apple’s whims.