A DIY Proximity Sensor, Using Just Scrap Parts And Software

[mircemk] shows how to create a simple non-contact proximity sensor using little more than an Arduino Nano board, and a convenient software library intended to measure the value of capacitors.

The prototype has a threshold set via potentiometer for convenience.

The basic idea is that it’s possible to measure a capacitor’s capacitance using two microcontroller pins and the right software, so by using a few materials to create an open-style capacitor, one can monitor it for changes and detect when anything approaches enough to alter its values past a given threshold, creating a proximity sensor.

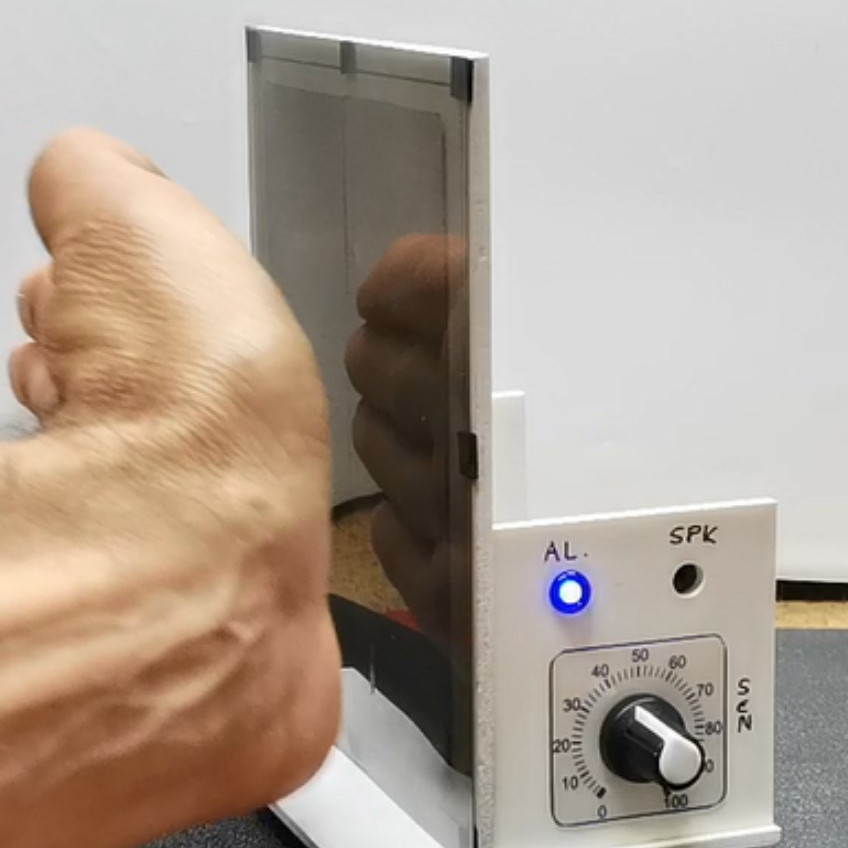
The sensor shown here is essentially two plates mounted side-by-side, attached to an Arduino Nano using the Capacitor library which uses just two pins, one digital and one analog.

As configured, [mircemk]’s sensor measures roughly thirty picofarads, and that value decreases when approached by something with a dielectric constant that is different enough from the air surrounding the sensor. The sensor ignores wood and plastic, but an approaching hand is easily detected. The sensor also detects liquid water with similar ease, either in the form of pooled liquid, or filled bottles.

We’ve also seen a spring elegantly used as a hidden touch sensor that works through an enclosure’s wall by using similar principles, so the next time you need a proximity or touch-sensitive sensor in a project, reaching for the junk box might get you where you need to go. Watch [mircemk]’s sensor in action in the video, just below the page break.

Continue reading “A DIY Proximity Sensor, Using Just Scrap Parts And Software”

Casting Concrete With A 3D-Printed Mould

We’re accustomed to covering the use of 3D printing in casting, usually as a lost-PLA former in metal casting. That’s not the only use of the technique though, and perhaps one of the simplest is to use a 3D-printed mould for casting concrete. It’s what [ArtByAdrock] is doing in their latest video, casting an ornamental owl model.

The first part of the video below the break deals with the CAD steps necessary to produce the mould, and depending on your CAD proficiency may not be the most interesting part. The process creates a mould with two halves, a pouring hole, and registration points. Then a 3D printer produces it using flexible TPU. The pour is then simplicity itself, using a casting cement mix at a consistency similar to pancake batter. The video shows how a release spray provides easy separation, and the result is a fresh concrete owl and a mould ready for the next pour.

We can see that maybe readers have only so much space in their lives for concrete owls, but this process could be a valuable part of the armoury when it comes to making some less decorative items. It’s not the first time we’ve looked at this type of work.

Continue reading “Casting Concrete With A 3D-Printed Mould”

A FreeCAD sticker, a FreeCAD pencil, a Hackaday Jolly Wrencher SAO PCB and the board-to-be-encased next to each other

FreeCAD Foray: Shells For All Our PCBs

Are you the kind of hacker who tries to pick up FreeCAD, but doesn’t want to go through a tutorial and instead pokes around the interface, trying to transfer the skills from a CAD suite you’ve been using before? I’ve been there too, and in my experience, FreeCAD doesn’t treat such forays lightly. It’s a huge package that enables everything from architecture to robotics design, so if you just want a 3D-printed case for a PCB project, the hill can be steep. So let’s take that first simple project as an example, and see if it helps you learn a little bit of FreeCAD.

This board needs a case – badly.

As motivation, I recently built a USB-C PSU board that uses a DC PSU and does the USB-C handshaking to provide 20 V to a laptop. It is currently my only 100 W USB-C PSU, and my 60 W PSU just died, which is why I now use this board 24/7. I have brought it on two different conferences so far, which has highlighted a problem – it’s a board with tons of exposed contacts, which means that it isn’t perfectly travel-friendly, and neither it is airport-friendly – not that I won’t try and bring it anyway. So, currently, I have to watch that nothing shorts out – given the board has 3.3 V close to 20 V at 9 A, it’s a bit of a worry.

This means I have to design some sort of case for it. I was taught SolidWorks in the half a year that I spent in a university, and honestly, I’m tired of the licensing and proprietary format stuff. When it comes to more hobbyist-accepted tools like Fusion360, I just don’t feel like exchanging one proprietary software for another. So, FreeCAD is the obvious choice – apart from OpenSCAD, which I know and love, but I don’t always want to think up fifteen variable names for every silly little feature. That, and I also want to fillet corners every now and then.

For a full-open-source workflow, today’s PCB is designed with KiCad, too. Let’s see about installing FreeCAD, and the few things you need to import a KiCad board file into FreeCAD.

Continue reading “FreeCAD Foray: Shells For All Our PCBs”

Modeling Home Heating Systems With Circuit Simulation Software

Electricity flow is generally invisible, silent, and not something that most humans want to touch, so understanding how charge moves around can be fairly unintuitive at first. There are plenty of analogies to help understand its behavior, such as imagining a circuit as a pipe of water, with pressure standing in for voltage and flow standing in for current. But you can flip this idea in reverse and use electric circuits to model other complex phenomena instead. [Oxx], for example, is using circuit theory to model his home’s heating systems.

To build his model, he’s using LTSpice, a free circuit simulation program. Using voltage to model temperature and current to model heat flow, he’s set up a model for his home to compare the behavior of a heat pump and a propane furnace. A switch model already in LTSpice with built-in hysteresis takes the place of the thermostat. Using temperature data for a single day in January [Oxx] can see how each of his two heating systems might behave, and the model for the heat pump is incredibly close to how the heat pump behaved in real life.

The model includes all kinds of data about the system, including the coefficient of performance of the heat pump and its backup electric resistive heater, and the model is fairly accurate at predicting behavior. Of course, it takes a good bit of work to set up the parameters for all of the components since our homes and heating systems won’t be included in LTSpice by default, but it does show how powerful an electric circuit analog can be when building models of other systems. If you’ve never used this program before, we’ve featured a few guides to getting started that you can take a look at.

Thanks to [Jarvis] for the tip!

Continue reading “Modeling Home Heating Systems With Circuit Simulation Software”

A Brief History Of Perpetual Motion

Conservation of energy isn’t just a good idea: It is the law. In particular, it is the first law of thermodynamics. But, apparently, a lot of people don’t really get that because history is replete with inventions that purport to run forever or produce more energy than they consume. Sometimes these are hoaxes, and sometimes they are frauds. We expect sometimes they are also simple misunderstandings.

We thought about this when we ran across the viral photo of an EV with a generator connected to the back wheel. Of course, EVs and hybrids do try to reclaim power through regenerative braking, but that’s recovering a fraction of the energy already spent. You can never pull more power out than you put in, and, in fact, you’ll pull out substantially less.

Not a New Problem

If you think this is a scourge of social media and modern vehicles, you’d be wrong. Leonardo da Vinci, back in 1494, said:

Oh ye seekers after perpetual motion, how many vain chimeras have you pursued? Go and take your place with the alchemists.

There was a rumor in the 8th century that someone built a “magic wheel,” but this appears to be little more than a myth. An Indian mathematician also claimed to have a wheel that would run forever, but there’s little proof of that, either. It was probably an overbalanced wheel where the wheel spins due to weight and gravity with enough force to keep the wheel spinning.

Continue reading “A Brief History Of Perpetual Motion”

An IBM M2 Keyboard Lives Again

There’s a mystique in old keyboard circles around the IBM Model M, the granddaddy of PC keyboards with those famous buckling spring key switches. The original Model M was a substantial affair with a sheet metal backplane that would probably serve well as a weapon in a zombie apocalypse and still allow writing a Hackaday piece afterward, but later on in the life of these ‘boards there was also a lighter version. The M2 as these models are dubbed has a few known problems, and [Anders Nielsen] scored one online that turned out to have dodgy capacitors. His video, below the break, takes us through the disassembly of his M2 and provides a relaxing tour of these not-quite-so-famous peripherals.

As you’d expect, three-decade-old plastic isn’t always in the best shape, so disassembly and unlatching all those little tabs has to be performed with care. The keys come off and the springs are on show, but we get a nasty shock when they all fall out of place as the top is removed. It appears the rookie mistake is to not turn the ‘board upside down before parting it. Replacing the caps is an easy process after all that, and we get a little dive into the 6805 processors used in model Ms.

If you have a model M of any description then you’re probably at home with the clack-clack-clack sound they make, but have you ever looked at its ancestor, the model F?

Continue reading “An IBM M2 Keyboard Lives Again”

Showing the modchip installed into a powered up Xbox, most of the board space taken up by a small Pi Pico board. A wire taps into the motherboard, and a blue LED on the modchip is lit up.

An Open XBOX Modchip Enters The Scene

If you’ve ever bought a modchip that adds features to your game console, you might have noticed sanded-off IC markings, epoxy blobs, or just obscure chips with unknown source code. It’s ironic – these modchips are a shining example of hacking, and yet they don’t represent hacking culture one bit. Usually, they are more of a black box than the console they’re tapping into. This problem has plagued the original XBOX hacking community, having them rely on inconsistent suppliers of obscure boards that would regularly fall off the radar as each crucial part went to end of life. Now, a group of hackers have come up with a solution, and [Macho Nacho Productions] on YouTube tells us its story – it’s an open-source modchip with an open firmware, ModXO.

Like many modern modchips and adapters, ModXO is based on an RP2040, and it’s got a lot of potential – it already works for feeding a BIOS to your console, it’s quite easy to install, and it’s only going to get better. [Macho Nacho Productions] shows us the modchip install process in the video, tells us about the hackers involved, and gives us a sneak peek at the upcoming features, including, possibly, support for the Prometheos project that equips your Xbox with an entire service menu. Plus, with open-source firmware and hardware, you can add tons more flashy and useful stuff, like small LCD/OLED screens for status display and LED strips of all sorts!

If you’re looking to add a modchip to your OG XBOX, it looks like the proprietary options aren’t much worth considering anymore. XBOX hacking has a strong community behind it for historical reasons and has spawned entire projects like XBMC that outgrew the community. There’s even an amazing book about how its security got hacked. If you would like to read it, it’s free and worth your time. As for open-source modchips, they rule, and it’s not the first one we see [Macho Nacho Productions] tell us about – here’s an open GameCube modchip that shook the scene, also with a RP2040!

Continue reading “An Open XBOX Modchip Enters The Scene”