Using Kick Assembler And VS Code To Write C64 Assembler

YouTuber [My Developer Thoughts], a self-confessed middle-aged Software Developer, clearly has a real soft spot for the 6502-based 8-bit era machines such as the Commodore 64 and the VIC-20, for which he has created several video tutorials while travelling through retro-computing. This latest instalment concerns bringing up the toolchain for using the Kick Assembler with VS Code to target the C64, initially via the VICE emulator.

The video offers a comprehensive tutorial on setting up the toolchain on Windows from scratch with minimal knowledge. While some may consider this level of guidance unnecessary, it is extremely helpful for those who wish to get started with a few examples quickly and don’t have the time to go through multiple manuals and Wikis. In that regard, the video does an excellent job.

VS Code is a great tool with a large user base, so it’s not surprising that there’s a plugin for using the Kick Assembler directly from the IDE. You can also easily launch the application onto the emulator with just a push of a button, allowing you to focus on learning and working on your application. Once it runs under emulation, there’s a learning curve for running it on native hardware, but there are plenty of tutorials available for that. While you could code directly on the C64 itself, it’s much more pleasant to use modern tools, revision control, and all the conveniences and not have to endure the challenges.

Once you’ve mastered assembly, it may be time to move on to C or even C++. The Oscar64 compiler is a good choice for that. Next, you may want to show off your new skills on the retro demo scene. Here’s a neat C64 demo with a twist. There is no C64.

Continue reading “Using Kick Assembler And VS Code To Write C64 Assembler”

2024 Business Card Challenge: Tiny MIDI Keyboard

The progress for electronics over the past seven decades or so has always trended towards smaller or more dense components. Moore’s Law is the famous example of this, but even when we’re not talking about transistors specifically, technology tends to get either more power efficient or smaller. This MIDI keyboard, for example, is small enough that it will fit in the space of a standard business card which would have been an impossibility with the technology available when MIDI first became standardized, and as such is the latest entry in our Business Card Challenge.

[Alana] originally built this tiny musical instrument to always have a keyboard available on the go, and the amount of features packed into this tiny board definitely fits that design goal. It has 18 keys with additional buttons to change the octave and volume, and has additional support for sustain and modulation as well. The buttons and diodes are multiplexed in order to fit the IO for the microcontroller, a Seeed Studio Xiao SAMD21, and it also meets the USB-C standards so it will work with essentially any modern computer available including most smartphones and tablets so [Alana] can easily interface it with Finale, a popular music notation software.

Additionally, the project’s GitHub page has much more detail including all of the Arduino code needed to build a MIDI controller like this one. This particular project has perhaps the best size-to-usefulness ratio we’ve seen for compact MIDI controllers thanks to the USB-C and extremely small components used on the PCB, although the Starshine controller or these high-resolution controllers are also worth investigating if you’re in the market for compact MIDI devices like this one.

Continue reading “2024 Business Card Challenge: Tiny MIDI Keyboard”

GlowBlaster Uses 405 Nm Laser To Make Its Mark

Ever wish you could do a little target shooting in a galaxy far, far away? Well then you’re in luck, as the Star Wars inspired GlowBlaster designed by [Louis Abbott] can help you realize those dreams with a real-life laser pistol — albeit a much weaker one than you’d want to carry into a Mos Eisley cantina.

Inside the 3D printed frame of the GlowBlaster is a 5 mW 405 nm module, an Arduino Nano, a speaker, a vibration motor, and a 9 V battery. When you pull the trigger, it pushes down on a 12 mm tactile button which causes the Arduino to fire the laser and sprinkle in a bit of theatrics by way of the speaker and vibration motor. There’s also a second button on the side of the blaster that lets you pick between firing modes.

Continue reading “GlowBlaster Uses 405 Nm Laser To Make Its Mark”

Hackaday Links Column Banner

Hackaday Links: June 2, 2024

So you say you missed the Great Solar Storm of 2024 along with its attendant aurora? We feel you on that; the light pollution here was too much for decent viewing, and it had been too long a day to make a drive into the deep dark of the countryside survivable. But fear not — the sunspot that raised all the ruckus back at the beginning of May has survived the trip across the far side of the sun and will reappear in early June, mostly intact and ready for business. At least sunspot AR3664 seems like it’s still a force to be reckoned with, having cooked off an X-class flare last Tuesday just as it was coming around from the other side of the Sun. Whether 3664 will be able to stir up another G5 geomagnetic storm remains to be seen, but since it fired off an X-12 flare while it was around the backside, you never know. Your best bet to stay informed in these trying times is the indispensable Dr. Tamitha Skov.

Continue reading “Hackaday Links: June 2, 2024”

A stack of PCB business cards that can play Snake on an 8x8 LED matrix.

2024 Business Card Challenge: Snakes On A Business Card

Once [Lambert the Maker] saw the Arduboy, he knew the thing was ripe for remixing into a business card with an 8×8 LED matrix instead of an OLED screen. [Lambert] already has a PCB business card for work, but it looks like it doesn’t do anything. So this Snake-playing card is for their personal information.

The brains of this operation is an STM32F0, which required a bit of finesse when it came to programming the LEDs. According to the datasheet, the max current through a given GPIO pin is 30 mA. The LEDs are running at 20 mA through the limiting resistor, so the code only turns on one LED at a time and makes sure the previous one is off first. The whole screen is updated every 125 ms, and persistence of vision takes care of making the animation look right.

In the short videos after the break, you’ll see a preview followed by brief videos on versions one and two. The prototype was built in 2020, when the board house only offered green PCBs with their assembly service. Fast forward to 2024, when the board house is now offering colors other than green.

Version two is actually thinner than a credit card, and features tiny buttons instead of cap-sense pads for input. [Lambert] also added a floating ADC pin that acts as a random number generator, placing the apple in a new location every time the game is powered on.

Continue reading “2024 Business Card Challenge: Snakes On A Business Card”

Hands-On With The Electromagnetic Field 2024 Badge

With every large event in our circles comes a badge, and Electromagnetic Field 2024 is no exception. We’ve told you about the Tildagon when it was announced, it’s a hexagonal badge designed with provision for user-created “Hexpansions”, which can be picked up at future camps. The idea of this badge is to make something with a lifetime beyond the one camp, and we’re interested to have received our badge. It’s unusual for a hacker camp badge in that it costs a little extra rather than just coming with the ticket. Continue reading “Hands-On With The Electromagnetic Field 2024 Badge”

How To Cram 945 LEDs Into A Teeny Tiny Vegas-Style Sphere

[Carl Bugeja] finds the engineering behind the Las Vegas Sphere fascinating, and made a video all about the experience of designing and building a micro-sized desktop version. [Carl]’s version is about the size of a baseball and crams nearly a thousand RGB pixels across the surface.

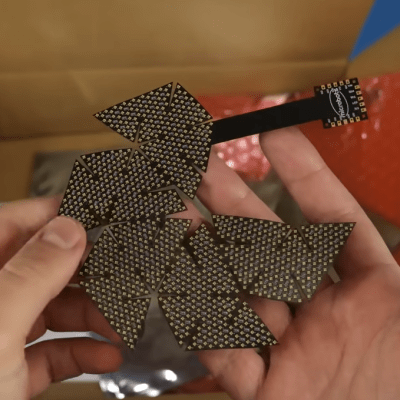
A four-layer flexible PCB is the key to routing data and power to so many LEDs.

Putting that many addressable LEDs — even tiny 1 mm x 1 mm ones — across a rounded surface isn’t exactly trivial. [Carl]’s favored approach ended up relying on a flexible four-layer PCB and using clever design and math to lay out an unusual panel shape which covers a small 3D printed geodesic dome.

Much easier said that done, by the way. All kinds of things can and do go wrong, from an un-fixable short in the first version to adhesive and durability issues in later prototypes. In the end, however, it’s a success. Powered over USB-C, his mini “sphere” can display a variety of patterns and reactive emojis.

As elegant and impressive as the engineering is in this dense little display, [Carl] has some mixed feelings about the results. 945 individual pixels on such a small object is a lot, but it also ends up being fairly low-resolution in the end. It isn’t very good at displaying sharp lines or borders, so any familiar shapes (like circles or eyes) come out kind of ragged. It’s also expensive. The tiny LEDs may be only about 5 cents each, but when one needs nearly a thousand of them for one prototype that adds up quickly. The whole bill of materials comes out to roughly $250 USD after adding up the components, PCB, controller, and mechanical parts. It’s certainly a wildly different build than its distant cousin, the RGB cube.

Still, it’s an awfully slick little build. [Carl] doubts there’s much value in pursuing the idea further, but there are plenty of great images and clips from the build. Check out the video, embedded below.

Continue reading “How To Cram 945 LEDs Into A Teeny Tiny Vegas-Style Sphere”