A frosted glass disk with geometrical markers

Using A Laser Cutter To Replicate An Optical Comparator Screen

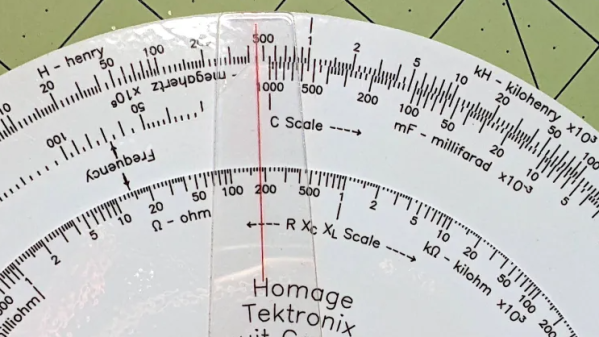
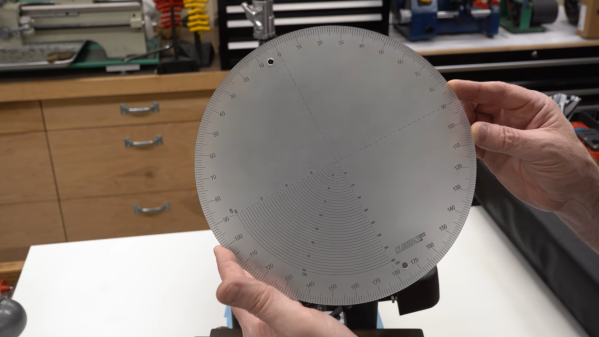
Precision instruments often contain specialized components that are essential to their function, but nearly impossible to replace if they fail. [Andre] had just such a problem with an optical comparator, which is an instrument typically used in machine shops to help check the tolerances of a finished part. It does this by projecting a magnified picture of an object onto a glass screen with markings showing angles and distances.

In the old comparator [Andre] bought on eBay, the markings on the glass had faded to such a degree that the instrument was almost unusable. So he contacted [James] over at Clough42, who was able to create a near-perfect replacement screen by using a laser cutter, as shown in the video embedded below.

The first step was to replicate the screen’s markings in a CAD program. [James] explains the process in Fusion 360, demonstrating how you can generate all the different scales nearly automatically through the proper use of constraints, variables and patterns. He then transferred the drawing to Lightburn, which drives the laser cutter and etches the markings into a sheet of glass covered with CerMark, a marking solution that turns a deep black when heated by a laser.

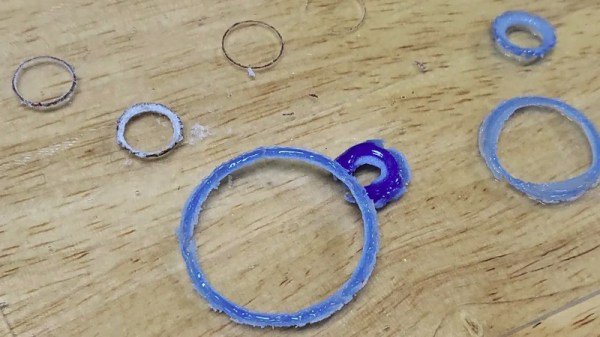
After etching, the final step was to apply frosting to the glass to turn it into a projection screen. While there are several ways to achieve this, [James] went for a simple spray-based method that gave surprisingly good results. It took a few experiments to find out that etching the markings on the back of the glass and applying the frosting on that side as well gave the best combination of sharpness and durability.

[James]’s project shows that even delicate instruments with custom glass components can be repaired, if you just have the right tools. A similar strategy might also work for creating custom scales for analog meters, or even old radio dials. If you’re not familiar with laser cutters, have a look at our experiments with an Ortur model. Thanks for the tip, [poiuyt]!

Continue reading “Using A Laser Cutter To Replicate An Optical Comparator Screen”

Laser-Engraving Hairlines: When A Line Isn’t A Line

When is a line not a line? When it’s a series of tiny dots, of course!

The line is actually tiny, laser-etched craters, 0.25 mm center-to-center.

That’s the technique [Ed Nisley] used to create a super-fine, colored hairline in a piece of clear plastic — all part of his project to re-create a classic Tektronix analog calculator from the 1960s, but more on that in a moment.

[Ed] tried a variety of methods and techniques, including laser engraving a solid line, and milling a line with an extremely tiny v-tool. Results were serviceable, but what really did the trick was a series of tiny laser-etched craters filled in with a red marker. That resulted in what appears — to the naked eye — as an extremely fine hairline. But when magnified, as shown here, one can see it is really a series of small craters. The color comes from coloring in the line with a red marker, then wiping the excess off with some alcohol. The remaining pigment sitting in the craters gives just the right amount of color.

This is all part of [Ed]’s efforts to re-create the Tektronix Circuit Computer, a circular slide rule capable of calculating all kinds of useful electrical engineering-related things. And if you find yourself looking to design and build your own circular slide rule from scratch? We have you covered.

The laser driver's internals, showing the custom PCB, the PSU, connectors and the interlocks.

Laser Driver Design Keeps Safety First

[Les] from [Les’ Lab] has designed a driver for laser diodes up to 10 watts, and decided to show us how it operates, tells us what we should keep in mind when designing such a driver, and talks about laser safety in general. This design is an adjustable current regulator based on the LM350A, able to provide up to 10 watts of power at about 2 volts – which is what his diode needs. Such obscure requirements aren’t easily fulfilled by commonly available PSUs, which is why a custom design was called for.

He tells us how he approached improving stability of the current regulation circuit, the PCB design requirements, and planning user interface for such a driver. However, that’s just part of the battle – regulating the current properly is important, but reducing the potential for accidental injuries even more so. Thus, he talks extensively about designing the driver circuit with safety in mind – using various kinds of interlocks, like a latching relay circuit to prevent it from powering up as soon as power is applied.

Continue reading “Laser Driver Design Keeps Safety First”

3D Print Glass With A Laser Cutter

We’re all familiar with FDM 3D printing, and some of the more well-heeled or adventurous among us may even have taken a faltering step into the world of SLA printers. But for most of us there’s a step further in 3D printing that remains beyond our reach. SLS, or Selective Laser Sintering, creates prints from powder by melting it layer by layer using a laser, and has the advantage of opening up more useful materials than the polymer stock of the other methods. It’s not entirely unreachable though, as [Kenneth Hawthorn] shows us by using a laser cutter to produce SLS prints from powdered glass.

He evolved the technique of repeated fast passes with the laser to gradually melt more glass together as opposed to slower passes. He achieved a resolution as low as 0.1 mm, though he found a better glass color when the laser was less tightly focused. It raises the concern that glass powder is abrasive and thus a threat to any mechanism, thus he’s being extremely careful with the fan settings.

This may not be quite in the league of an SLS printer costing thousands of dollars, but it’s a technique that bears more investigation and could no doubt be refined for more custom fused glass creations. He tells us he was inspired by a previous Hackaday post about sintering sand, and of course we’d like to remind readers of a 3D printer that did the same job with the power of the sun.

Hackaday Podcast 170: Poop Shooting Laser, Positron Is A 3D Printer On Its Head, DIY Pulsar Capture, GPS’s Achilles Heel

Join Hackaday Editor-in-Chief Elliot Williams and Managing Editor Tom Nardi for a recap of all the best tips, hacks, and stories of the past week. We start things off with an update on Hackaday’s current slate of contests, followed by an exploration of the cutting edge in 3D printing and printables. Next up we’ll look at two achievements in detection, as commercial off-the-shelf hardware is pushed into service by unusually dedicated hackers to identify both dog poop and deep space pulsars (but not at the same time). We’ll also talk about fancy Samsung cables, homebrew soundcards, the surprising vulnerability of GPS, and the development of ratholes in your cat food.

Direct Download link

Check out the links below if you want to follow along, and as always, tell us what you think about this episode in the comments!

Continue reading “Hackaday Podcast 170: Poop Shooting Laser, Positron Is A 3D Printer On Its Head, DIY Pulsar Capture, GPS’s Achilles Heel”

Point Out Pup’s Packages With This Poop-Shooting Laser

When you’re lucky enough to have a dog in your life, you tend to overlook some of the more one-sided aspects of the relationship. While you are severely restrained with regard to where you eliminate your waste, your furry friend is free to roam the yard and dispense his or her nuggets pretty much at will, and fully expect you to follow along on cleanup duty. See what we did there?

And so dog people sometimes rebel at this lopsided power structure, by leaving the cleanup till later — often much, much later, when locating the offending piles can be a bit difficult. So naturally, we now have this poop-shooting laser turret to helpfully guide you through your backyard cleanup sessions. It comes to us from [Caleb Olson], who leveraged his recent poop-posture monitor as the source of data for where exactly in the yard each deposit is located. To point them out, he attached a laser pointer to a cheap robot arm, and used OpenCV to help line up the bright green spot on each poop.

But wait, there’s more. [Caleb]’s code also optimizes his poop patrol route, minimizing the amount of pesky walking he has to do to visit each pile. And, the same pose estimation algorithm that watches the adorable [Twinkie] make her deposits keeps track of which ones [Caleb] stoops by, removing each from the worklist in turn. So now instead of having a dog control his life, he’s got a dog and a computer running the show. Perfect.

We joke, because poop, but really, this is a pretty neat exercise in machine learning. It does seem like the robot arm was bit overkill, though — we’d have thought a simple two-servo turret would have been pretty easy to whip up.

Continue reading “Point Out Pup’s Packages With This Poop-Shooting Laser”

Building Petahertz Logic With Lasers And Graphene

There was a time when we thought a 50 MHz 486 was something to get excited about. In comparison, the computer this post was written on clocks in at about 3.8 GHz, which these days, isn’t an especially fast machine. But researchers at the University of Rochester and the  Friedrich-Alexander-Universität Erlangen-Nürnberg want to blow the doors off even the fastest modern CPUs. By using precise lasers and graphene, they are developing logic that can operate at nearly 1 petahertz (that’s 1,000,000 GHz).

These logic gates use a pair of very short-burst lasers to excite electrical current in graphene and gold junctions. Illuminating the junctions very briefly creates charge carriers formed by electrons excited by the laser. These carriers continue to move after the laser pulse is gone. However, there are also virtual charge carriers that appear during the pulse and then disappear after. Together, these carriers induce a current in the graphene. More importantly, altering the laser allows you to control the direction and relative composition of the carriers. That is, they can create a current of one type or the other or a combination of both.

This is the key to creating logic gates. By controlling the real and virtual currents they can be made to add together or cancel each other out. You can imagine that two inputs that cancel each other out would be a sort of NAND gate. Signals that add could be an OR or AND gate depending on the output threshold.

[Ignacio Franco], the lead researcher, started working on this problem in 2007 when he started thinking about generating electrical currents with lasers. It would be 2013 before experiments bore out his plan and now it appears that the technique can be used to make super fast logic gates.

We often pretend our logic circuits don’t have any propagation delays even though they do. If you could measure it in femtoseconds, maybe that’s finally practical. Then again, sometimes delays are useful. You have to wonder how much the scope will cost that can work on this stuff.