"The Great Resistor" color code illumination project

The Great Resistor Embiggens The Smallest Value

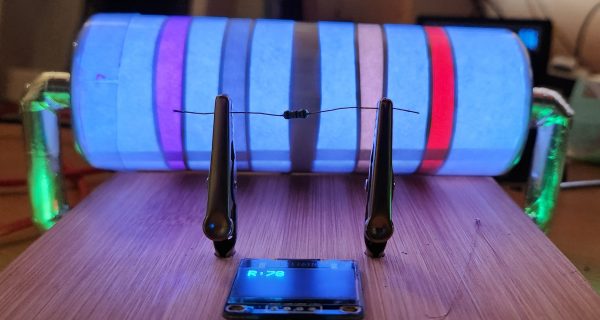
With surface-mount components quickly becoming the norm, even for homebrew hardware, the resistor color-code can sometimes feel a bit old-hat. However, anybody who has ever tried to identify a random through-hole resistor from a pile of assorted values will know that it’s still a handy skill to have up your sleeve. With this in mind, [j] decided to super-size the color-code with “The Great Resistor”.

Resistor color code from Wikipedia with white background
How the resistor color-code bands work

At the heart of the project is an Arduino Nano clone and a potential divider that measures the resistance of the test resistor against a known fixed value. Using the 16-bit ADC, the range of measurable values is theoretically 0 Ω to 15 MΩ, but there are some remaining issues with electrical noise that currently limit the practical range to between 100 Ω and 2 MΩ.

[j] is measuring the supply voltage to help counteract the noise, but intends to move to an oversampling/averaging method to improve the results in the next iteration.

The measured value is shown on the OLED display at the front, and in resistor color-code on an enormous symbolic resistor lit by WS2812 RGB LEDs behind.
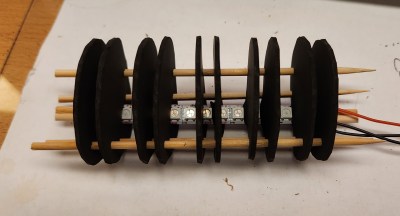
Inside view of the great resistor showing WS2812 LEDs and baffle plates
Inside The Great Resistor, the LEDs and baffle plates make the magic work

Precision aside, the project looks very impressive and we like the way the giant resistor has been constructed. It would look great at a science show or a demonstration. We’re sure that the noise issues can be ironed out, and we’d encourage any readers with experience in this area to offer [j] some tips in the comments below. There’s a video after the break of The Great Resistor being put through its paces!

If you want to know more about the history of the resistor color code bands, then we have you covered.  Alternatively, how about reading the color code directly with computer vision?

Continue reading “The Great Resistor Embiggens The Smallest Value”

Supercon Is On! Join Us!

Supercon is in high gear, after a full day of badge hacking that went well into the midnight hour. Now it’s time for the talks!

If you’re not here in person, you can still get in on the talks by following the 2022 Hackaday Supercon Livestream, which will be covering all the LACM stage action. We have a great lineup of speakers starting off with a keynote by Joe [Kingpin] Grand at 10:00 AM PDT and ending with the 2022 Hackaday Prize Awards at 7:00 PM — come see who won live!

Of course, talks are only one component of Supercon. The secret sauce has always been the people at the con. If you’re not joining us, we still need you to take part. There is a conference chat on Hackaday.io and on the Hackaday Discord server and all are welcome. Pop in and visit with people at the con, and others around the globe who wish they could have made it in person.

Make sure you’re on the live stream Saturday evening to watch as the Grand Prize is presented on stage during the Hackaday Prize Ceremony. Pop into the chat and ask for updates on badge hacking, the SMD Soldering Challenge, and all of the other shenanigans that make Supercon super.

The Seven-Segment Display That’s Also An Input Device

We’re used to seeing all manner of seven-segment displays, be they mechanical, electronic, or something in between. But what all these displays have in common is that they’re, you know, displays. Using them as inputs would just be crazy talk, right?

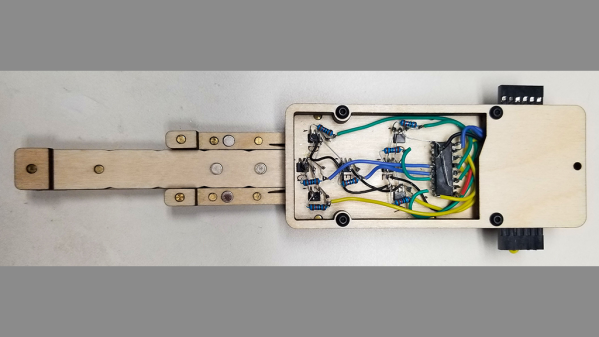
Perhaps, but we like where [Dave Ehnebuske] is going with “InSlide,” the seven-segment input device. The idea for this comes from the “DigiTag” display, which we covered back in October, and divides a standard seven-segment character into three vertical strips — two skinny ones for the outside vertical segments, and one wide strip holding the horizontal elements. By sliding these strips up and down relative to each other, the standard nine digits, plus a few other characters, can be composed.

[Dave]’s take on this theme started by building his display from laser-cut plywood pieces, which is a nice choice because of the good contrast between the white wood and the engraver segments. Next, he embedded rare earth magnets in the slides and installed seven Hall effect sensors in the frame. The sensors are connected to an Arduino Nano via a 74HC165 parallel-load shift register, which lets multiple modules be daisy-chained together. He also built an Arduino library to read the current state of the segments; it supports the full hexadecimal character set, or even duodecimal if you like.

[Dave] has shared the library, and it looks like you can get the build files for the mechanism from the original project. That’s good, because this looks ripe for hacking. It looks like it would be pretty easy to motorize a display like this by adding rack-and-pinion gearing and steppers — something like that could make an interesting clock.

Garage Door Opener Ejection Seat

[Scott Prints] had a familiar problem. His garage door opener was boring, and rattled around annoyingly in his car’s center console. This was obviously a major issue that needed to be dealt with. His solution was to install an ejector seat. Er, well, an ejector seat button. At least, that’s what it’s labeled. (That’s sure to be a great conversation starter for passengers.)

The end result looks slick and combines several build techniques. He started by taking measurements and 3D-printing a test piece for the center console nook. Turns out, that’s a more complicated shape than it seems. Rather than try to measure the exact angles and radii, Scott turned to the tried-and-true method of fiddling with the parameters and printing a second test. Close enough.

The coolest and most challenging element of the build was engraving and cutting the aluminum plate that forms the visible part of the build. Turns out, the online recommendations for milling aluminum are laughably optimistic when you don’t have an industrial CNC machine. Slower, shallower cuts got the job done, albeit slowly. A red paint-filled marker made the letters pop. The guts of the donor garage door opener are fitted into a 3d-printed shell, and then a Big Red Button threads into the print, holding the whole build together. A bit of solder later, and the project is done. Simple, effective, and very stylish! We approve. Come back after the break for the build video.
Continue reading “Garage Door Opener Ejection Seat”

Pieca Is A Pi Camera With Some Very Nice Lenses

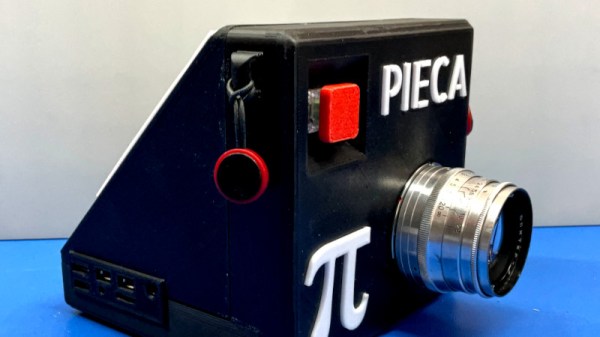
The advent of the high-quality version of the Raspberry Pi camera has given experimenters a good-enough quality camera system that they can use it to create better devices than mere snapshot cameras. It’s been used by experimenters for some exciting projects, but so far, very few of them have broken away from the Pi camera’s C-mount lens system. [Tom Schucker]’s Pieca is an interesting departure then, because it takes the Pi HQ camera into new territory by using Leica rangefinder lenses.

There are enough Pi camera projects that by now the process of setting one up should be pretty well known. This one is a bit different in its use of a focal length reducer, mounted inside a 3D-printed Leica lens mounting plate. The result is that the Leica lens is better matched to the much smaller size of the Pi camera sensor compared to a 35mm frame.

The camera’s aesthetic design is on the chunky side, probably because of the choice of a Pi 4 rather than a Pi Zero. It remains very usable though, and produces photographs with a distinctive feel. You can see more in the video below the break. Meanwhile if you aren’t lucky enough to own a stable of Leica lenses, perhaps you could think about adapting more common optics? We’ve seen it before with the original Pi camera.

Continue reading “Pieca Is A Pi Camera With Some Very Nice Lenses”

Keyboard One Is An Ear Of Corne

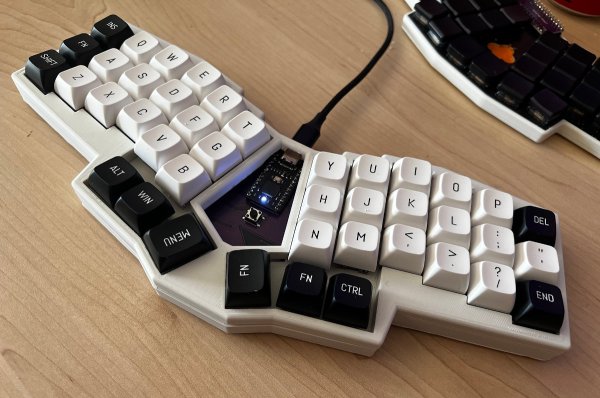
There are all kinds of avenues into the mechanical keyboarding hobby, and one of the more well-traveled ones runs between coworkers. [crsayen] aka [DrJamesOIncandenza] has one such relationship, and was turned on to the CRKBD a while back by an office mate. For the uninitiated, that’s short for Corne keyboard, which is a column-staggered 3×6 split keyboard with three thumb keys per hand.

While [JOI] liked the Corne well enough, especially with chocs, he got the occasional craving to slap (that’s what we’re calling typing on linears from now on — slapping vs. clacking) on some silent MX switches and so built this Corne-derivative monoblock split called Keyboard One. Aside from the more obvious differences,

We think this looks rather spanking for a first keyboard, sort of like a slightly smaller Alice or something. But you don’t have to go to great lengths to obtain [JOI]’s knowledge, for everything is on GitHub. [JOI] says they sort of regret going 3×6, but are already planning another build with more keys. See, that’s the spirit.

Via KBD #101

Hackaday Prize 2022: Ultratower Is A Powerful Gardening Vertical

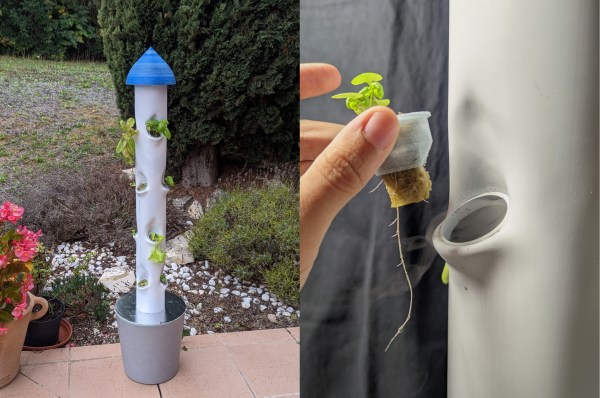
The more people we have on this planet, the more food we need. Naturally, this extends to water, another precious resource that generally plays a part in farming and food production. And honestly, we’d probably all eat a little better if it were really easy to grow healthy things like spinach. Well, that excuse doesn’t work anymore, thanks to [J Gleyzes]’ Ultratower. It’s a simple-to-use hydroponic tower that uses recycled mist to water plants, ultimately saving water in the process.

The ‘ultra’ part is a function of the way mist is created. In this case, it’s done with three piezoelectric disks mounted under a tank in the top of the PVC tube. Stick up to twelve plants in the little cubbies, and their roots will grow down the inside, where they’ll receive a fine shower of water at your command. Water that runs off the roots collects in a small tank at the bottom, where a pump starts the process over again.

At first, [J Gleyzes] had trouble with the piezo disks — using 1.7MHz disks created too much heat, warming the water up to nearly 40°C (104°F). Since cooking the spinach prematurely would be bad, they experimented with other values, finally landing on 108KHz. Be sure to check out the video after the break.

Continue reading “Hackaday Prize 2022: Ultratower Is A Powerful Gardening Vertical”