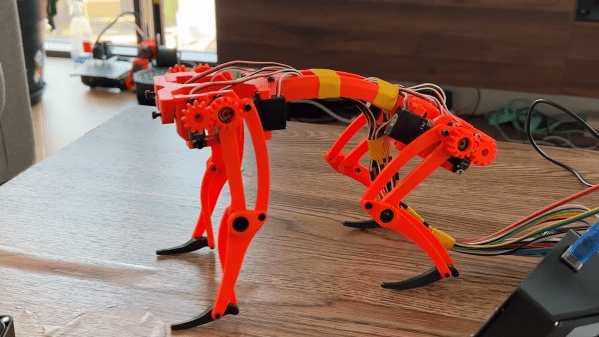
We keep hearing that the desktop computer is dying — everyone wants a mobile device like a laptop, a tablet, or a big horkin’ phone. We suppose [eponra] wants the same thing for 3D printers, since he’s provided plans for “flatpack” a portable 3D printer that can fit in a spool box.
As you might imagine, this isn’t going to give you maximum build volume. The printer’s folded down dimensions are 220x210x75mm. The build plate is fairly small at 120x114x144mm. However, it does have a heated bed and an LCD display. One note, though: you do need an external power supply that does not fit in the box. However, [eponra] notes that with an AC-powered bed, it would be possible to get everything in the box.
At first, she was determined to use Processing to create an interface for her sculpture by recreating the UI visually and adding some touch controls. However, she soon abandoned this tedious task after discovering MacintoshPi, which steps you through installing Mac OS 7, 8, and 9 emulators on a Raspberry Pi. [Joselyn] has also installed several retro games, including DOOM II, Carmen Sandiego, and Sim City, thanks to sites like Macintosh Garden and Macintosh Repository.
Next, [Joselyn] hopes to set it up to display her and her partner’s schedules, and to let friends play around with nostalgic games. This piece was made using hand building, but other cool ceramic techniques like this slip cast dog bowl and this stone 3D printer have us thinking about what other types of enclosures could be built!
The work will be multi-faceted, and include the print and digital materials we’d expect, as well as personal archives and oral histories from notable radio amateurs. For many of us this will provide a wealth of technical details and insights into taming the ionosphere, but for future historians it will be an invaluable reference on the first century of the hobby.
Amateur radio is perhaps the oldest hardware hacking pursuit of the electronic age, because certainly at the start, radio was electronics. Thus amateur radio’s long history has indirectly given us many of the things we take for granted today. Sure it has its moribund aspects, but we think if it continues to follow the growth of new technology as it has for so many years it will continue to be an exciting pursuit. We look forward to browsing this archive, and we hope to see it grow over the years.
Header image: Lescarboura, Austin C. (Austin Celestin), 1891-, No restrictions.
Before little two stroke motors became affordable, and long before electric motors and batteries were remotely possible, there weren’t a lot of options for powering your model aircraft. One technology that really took off was that of rubber band power. By winding a rubber band, it could store enough energy to turn a propeller for a short duration. With a 10 foot model taking the current world record, as you can see in the video below the break [ProjectAir] decided to see if he could beat it.
Rubber Band Powered Free Flight c1915 By Unknown author –
Starting with a successful free flight aircraft made of foam board, [ProjectAir] simply scaled it up to an eleven foot wing- one foot larger than the ten foot world record holder. Since there were now eight rubber band motors, a mechanism was created to release the propellers in sync, but this was problematic. Eventually a slightly heavy but solid solution was found.
[ProjectAir] did more testing, more problem solving, and through rapid iterations, he eventually was able to have a successful flight under radio control. His personal goal of a 12 second flight was exceeded, and then Guinness called! They’re interested in certifying his attempt as long as his plane can fly for at least 30 seconds- almost double his current ability. What will he do? Check the video, too, for [ProjectAir]’s challenge to the community to join him in trying to beat the world record. Sounds like fun!
Aside from powering world record attempting radio controlled aircraft, did you know that you can build a rubber band powered refrigerator? It’s true!
While the x86 architecture certainly isn’t going away anytime soon, it seems that each year more and more of our computing is done on ARM processors. It started with our smartphones, spread into low-cost Chromebooks, and now Apple’s gone all-in with their M1/M2 chips. But so far we haven’t seen too much movement in the desktop space, a fact which has arguably slowed the development of ARM-compatible software and operating systems.
But that doesn’t mean there aren’t options out there, and no, we don’t mean using a Raspberry Pi. [Wooty-B] has been documenting their efforts to switch over to a ARM desktop, which makes for fascinating reading even if you’re currently comfortable with your architecture choices. The key is the HoneyComb LX2K, a Mini-ITX ARM development board that offers enough expansion and raw power to meet most daily computing needs…assuming you’re willing to put in the effort. Continue reading “Exploring The Cutting Edge Of Desktop ARM Hardware”→
We’ve seen a lot of clever re-imagining of the classic 7-segment display, and proving there is still room for something new is [Jack]’s 7-segment “DigiTag” display.
This 3D printable device has a frame into which is slotted three sliders. These sliders can be adjusted individually, mixing and matching the visibility of colored and uncolored areas, to create digits 0-9. We’ve seen some unusual 7-segment-inspired displays before, using from one motor for the whole digit to ones that need one motor per segment, but nothing quite like this approach.
While this particular design relies on the user to manually “dial in” each digit, the resulting key-like assembly (and unique shape for each digit) seems like it could have some interesting applications — a puzzle box design comes to mind.
If you have any ideas of your own on how this could be used, don’t keep them to yourself! Let us know in the comments, below.
Last time, I’ve shown you how to create a local Git repository around your PCB project. That alone provides you with local backups, helping you never lose the changes you make to your files, and always be able to review the history of your project as it developed.
However, an even more significant part of Git’s usefulness is the ability to upload our creations to one of the various online Git repository hosting services, and keep it up to date at all times with a single shell command. I’d like to show you how to upload your project to GitHub and GitLab, in particular!