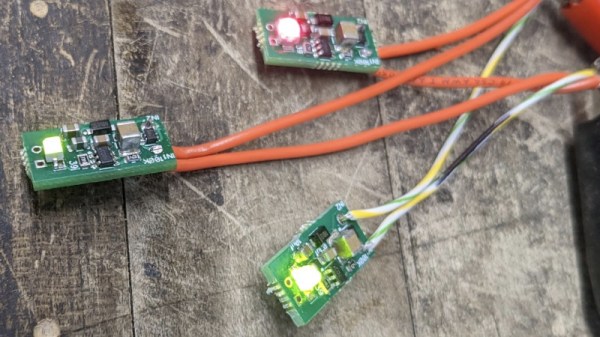
A PCB with several points highlighted by a projection system

Augmented Reality Workbench Helps You To Debug Your Boards

No matter how advanced your design skills, the chances are you’ll need to spend some time chasing bugs in your boards after they come back from the assembly house. Testing and debugging a PCB typically involves a lot of cross-checking between the board, the layout and the schematic, which quickly becomes tiresome even for mildly complex designs. To make this task a bit easier, [Ishan Chatterjee] and colleagues at the University of Washington have designed the Augmented Reality Debugging Workbench, or ARDW for short.

The ARDW is a setup consisting of a lab workbench with an antistatic mat, a selection of measurement instruments and a PC. You can simply place your board on the bench, open the schematic and layout in KiCAD and start measuring and debugging your design as you normally would, but the real magic happens when you select a new icon in KiCAD that exports the schematic and layout to the ARDW system. From that moment, you can select components in your schematic and have them highlighted not only on the layout, but on the physical board in front of you as well. This is perhaps best demonstrated visually, as the team members do in the video embedded below.

The real-life highlighting of components is achieved thanks to a set of cameras that track the motion of everything on the desk as well as a video projector that overlays information on top of the PCB. All of this enables a variety of useful debugging features: for example, there’s an option to highlight pin one on all components, enabling a simple visual check of each component’s orientation. You can select all Do Not Populate (DNP) instances and immediately see if all highlighted pads are empty. If you’re not sure which component you’re looking at, just point at it with your multimeter probe and it’s highlighted on the schematic and layout. You can even place your probes on a net and automatically log the voltage for future reference, thanks to a digital link between the multimeter and the ARDW software.

In addition to designing and building the ARDW, the team also performed a usability study using a group of human test subjects. They especially liked the ability to quickly locate components on crowded boards, but found the on-line measurement system a bit cumbersome due to its limited positional accuracy. Future work will therefore focus on improving the resolution of the projected image and generally making the system more compact and robust. All software is freely available on the project’s GitHub page, and while the current system looks a little complex for hobbyist use, we can already imagine it being a useful tool in production environments.

It’s not even the first time augmented reality has been used for PCB debugging: we saw a somewhat similar system at the 2019 Hackaday Superconference. AR can also come in handy during the design and prototyping phase, as demonstrated by this AR breadboard.

Continue reading “Augmented Reality Workbench Helps You To Debug Your Boards”

Faceless Clock Makes You Think Twice About How It Works

We love projects that make you do a double-take when you first see them. It’s always fun to think you see one thing, but then slowly realize everything is not quite what you expected. And this faceless analog clock is very much one of those projects.

When we first saw [Shinsaku Hiura]’s “Hollow Clock 4,” we assumed the trick to making it look like the hands were floating in space would rely on the judicious use of clear acrylic. But no, this clock is truly faceless — you could easily stick a finger from front to back. The illusion is achieved by connecting the minute hand to the rim of the clock, and rotating the whole outer circumference through a compact 3D printed gear train. It’s a very clever mechanism, and it’s clear that it took a lot of work to optimize everything so that the whole look of the clock is sleek and modern.

But what about the hour hand? That’s just connected to the end of the minute hand at the center of the clock’s virtual face, so how does that work? As it is with most things that appear to be magical, the answer is magnets. The outer rim of the clock actually has another ring, this one containing a pair of neodymium magnets. They attract another magnet located in the very end of the hour hand, dragging it along as the hour ring rotates. The video below shows off the secrets, and it gives you some idea of how much work went into this clock.

We’re used to seeing unique and fun timepieces and other gadgets from [Shinsaku Hiura] — this up-flipping clock comes to mind, as does this custom RPN calculator — but this project is clearly a step beyond.

Continue reading “Faceless Clock Makes You Think Twice About How It Works”

Hackaday Podcast 193: Found Computers, Internet Over WhatsApp, Two-Factor C64, Shifting Cars, And Self-Shooting Fighter Planes

This week, Editor-in-Chief Elliot Williams and Staff Writer Dan Maloney review the literature on a hack-packed week of action. We’ll find a Linux machine inside just about anything, including curb-side TVs and surprisingly secure EV chargers. No Internet? No problem — just tunnel IP through WhatsApp! We’ll see that 3D printers can be repurposed for lab automation of the cheap, build the worst — but coolest — 2FA dongle of all time, and see how a teetering tower of cards can make your old motherboard think any ISA card is plugged into it. Worried that driving an EV is going to be a boring experience? Don’t be — maybe you’ll still get to jam through the gears. But if you do, rest assured there’ll be plenty of careful engineering done to see if it’s safe. Err, at least we hope so…

Download the podcast for safe keeping.

Check out the links below if you want to follow along, and as always, tell us what you think about this episode in the comments!

Continue reading “Hackaday Podcast 193: Found Computers, Internet Over WhatsApp, Two-Factor C64, Shifting Cars, And Self-Shooting Fighter Planes”

Tiny RC Truck And Trailer Motors Around Tabletop

Most RC cars replicate real-world race cars or fantastical off-road buggies for outdoor escapades. [diorama111] is an expert at building tiny desk-roaming models, though, and built this exquisite micro semi-truck and trailer.

Based on a 1/150 scale truck and trailer model, the build starts with the tractor unit. It’s disassembled, and its plastic wheels are machined on a tiny lathe so they can be fitted with grippy rubber tires carved out of O-ring material. The front wheels are given hubs and mounted to a motor-driven screw-type steering assembly. A photodetector is used to aid in self-centering. The rear axle is fitted with a geared drivetrain, running off a small DC motor. Multiple gear stages are used to give the build plenty of torque for pulling the trailer. Remote control of the model is achieved over Bluetooth, with an ATtiny3217 tucked inside with motor drivers to run the show.

The microcontroller also runs a full set of driving, tail, and indicator lights. The trailer is fitted with an infrared receiver and a battery of its own. It receives signals from an infrared LED on the tractor unit, which tell the trailer when to turn on the taillights and indicators.

There aren’t too many modelers working in the RC space at the 1:150 scale. [diorama111] has form here, though, and we’ve featured a previous Toyota Crown build before.

Continue reading “Tiny RC Truck And Trailer Motors Around Tabletop”

This Week In Security: Mastodon, Fake Software Company, And ShuffleCake

Due to Twitter’s new policy of testing new features on production, the interest in Mastodon as a potential replacement has skyrocketed. And what’s not to love? You can host it yourself, it’s part of the Fediverse, and you can even run one of the experimental forks for more features. But there’s also the danger of putting a service on the internet, as [Gareth Heyes] illustrates by stealing passwords from, ironically, the infosec.exchange instance.
Continue reading “This Week In Security: Mastodon, Fake Software Company, And ShuffleCake”

Word Tour Map of High Altitude Balloon Launched at Hackaday Supercon.

Supercon Balloon W6MRR-26 Continues Its World Tour

[Martin Rothfield] and other amateur radio operators from San Francisco High Altitude Ballooning (SF-HAB) treated conference attendees to the 2022 Hackaday Supercon to the launch of two High Altitude Balloons (HABs). On the morning of November 6th, the two balloons were launched from a park across the street from Supplyframe DesignLab in Pasadena, California.

Seven days after its launch from Southern California, one of the balloons was over Tajikistan cruising eastward at an altitude of 42,000 feet (12,800 meters). Balloon W6MRR-26 was already approaching China where it will continue its wonderful world tour to parts unknown. The second balloon (call sign W3HAC-11) landed in northern Arizona where it has continued transmitting whenever it receives power from the sun.

Each balloon carries a tiny payload — a printed circuit board powered only by small photovoltaic cells. The board includes a microcontroller, a GPS module, and a Weak Signal Propagation Reporter (WSPR) radio transmitter.  The transmitted operates on the 20 meter amateur radio band at around 14 MHz.

WSPR beacons can provide time, altitude, and location information.  The WSPR telemetry is then relayed via WSPRgates using Automatic Packet Reporting System (APRS) onto the Internet. The collected information can be viewed and mapped on websites such as aprs.fi.

Continue reading “Supercon Balloon W6MRR-26 Continues Its World Tour”

Pop Your Way To A Fresh Roast Coffee

The preparation and consumption of coffee has become something of an art from in our community, with many people going to extravagant lengths to achieve the perfect cup. [Eric Sorensen] was keen to roast his own beans, but given the price of a dedicated roaster, instead made his own using a hot air popcorn popper.

The story unfolds in several parts, and starts with disabling the thermal cutout on the popper to be replaced with thermal sensors. An Arduino controls both the fan and the heating coil to regulate and vary the roasting temperature over time. Perhaps it’s the software and user interface that most makes this project shine, with a graphical interface on a 320 by 240 pixel touch screen, and a graphing profile interface more reminiscent of a reflow oven than a kitchen appliance. The whole thing is neatly packed away with its power supply in a slimline case, and while we’re no bean experts, we appreciate the uniform brown of the finished product.

Coffee roasters have appeared here numerous times over the years. One of the more recent was this wobble disk design.