Opinions vary as to what actually constitutes a “complete” shop, but one thing is for sure: the more tools, the better. That doesn’t mean running out to buy a tool every time you have a need, of course. Sometimes you can throw together what you need from scrap, as with this ad hoc sandblaster. (Video, embedded below.)
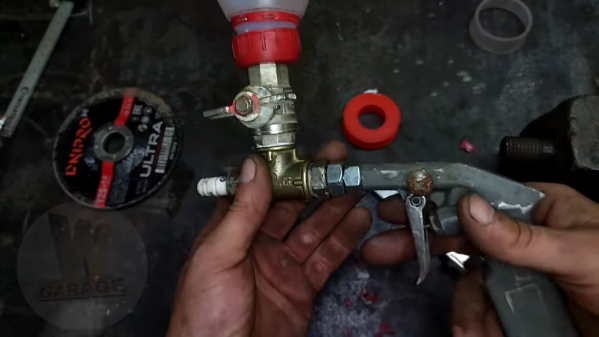
Fans of junk builds — and we mean that with the highest respect — will want to pay special attention to [GARAGEUA]’s video below. It looks like pretty much everything he uses to make this sandblaster comes from the junk pile — bits of old plumbing fixtures, a blow gun that’s seen much better days, some old nuts and bolts, and even a deceased spark plug all make an appearance. That last one is perhaps the most interesting, since with some clever dissection the spark plug’s body and its ceramic insulator were used for the nozzle of the sandblaster. And best of all, no lathe was needed for this job — everything was done with a hand drill and an angle grinder. Check out the build details in the video below; you might pick up some useful tips.
We’ve featured even junkier sandblaster builds before, but this one is a clever way to save a few bucks and flex a bit on your mechanical ingenuity. If you need a sandblaster and it’s something you’re going to use again and again, by all means go out and buy one — we won’t judge. But rolling your own is cool too.
On no planet is making your own X-ray tube a good idea. But that doesn’t mean we’re not going to talk about it, because it’s pretty darn cool.
And when we say making an X-ray tube, we mean it — [atominik] worked from raw materials, like glass test tubes, tungsten welding electrodes, and bits of scrap metal, to make this dangerously delightful tube. His tool setup was minimalistic as well– where we might expect to see a glassblower’s lathe like the ones used by [Dalibor Farny] to make his custom Nixie tubes, [atominik] only had a small oxy-propane hand torch to work with. The only other specialized tools, besides the obvious vacuum pump, was a homebrew spot welder, which was used to bond metal components to the tungsten wires used for the glass-to-metal seals.
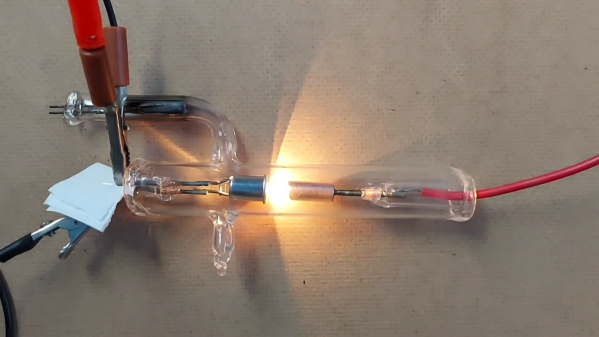
Although [atominik] made several versions, the best tube is a hot cathode design, with a thoriated tungsten cathode inside a copper focusing cup. Across from that is the anode, a copper slug target with an angled face to direct the X-rays perpendicular to the long axis of the tube. He also included a titanium electrode to create a getter to scavenge oxygen and nitrogen and improve the vacuum inside the tube. All in all, it looks pretty similar to a commercial dental X-ray tube.
The demonstration in the video below is both convincing and terrifying. He doesn’t mention the voltage he’s using across the anode, but from the cracking sound we’d guess somewhere around 25- to 30 kilovolts. The tube really gets his Geiger counter clicking.
Here’s hoping [atominik] is taking the proper precautions during these experiments, and that you do too if you decide to replicate this. You’ll also probably want to check out our look at the engineering inside commercial medical X-ray tubes.
While a machinist can put a beautiful finish on a piece of metal with their lathe or mill, to achieve the ultimate finish, a further set of polishing procedures are necessary. Successively finer abrasives are used in a process called lapping, which removes as far as possible any imperfections and leaves eventually a mirrored smoothness. It’s not without problems though, particularly at the edge of a piece it can result in rounded-off corners as the abrasive rubs over them. [Adam the machinist] has a solution, and he’s found it with a 3D printer.
To avoid the rounded edges, the solution involves fitting a piece of metal or wood flush with the surface to be lapped, such that the pressure doesn’t act upon the corner. This can be inconvenient, and the solution avoids it by 3D printing a custom piece that fits over the entire machined object providing a flat surface surrounding the edges. We see it being used with a demonstration piece that has three separate surfaces in the same plane to lap,something that would have been challenging without the 3D printed aid.
Where the comments went off the rails were people asking Hackaday to remove our discussion of the video, because the commenters thought that we were somehow implicitly encouraging open-toed footwear in the presence of machine tools. We certainly weren’t! We wanted you all to see the clever machining hack, and be inspired to build your own. We figure that you’ve got the safety angle covered.
Now don’t get me wrong – there were safety choices made in the video that I would not personally make. But it also wasn’t my shop and I wasn’t operating the machines. And you know who is ultimately responsible for the safety in my basement shop? Me! And guess who is responsible for safety in your shop.
But of course, none of us know everything about every possible hazard. (Heck, I wrote just that a few weeks ago!) So while we’re sympathetic with the “that’s not safe!” crew, we’re not going to censor inspiring hacks just because something done along the way wasn’t done in the way we would do it. Instead, it’s our job, in the comment section as in Real Life™, to help each other out and share our good safety tips when we can.
You’ll see some crazy stuff in videos, and none of it is to be repeated without thinking. And if you do see something dodgy, by all means point it out, and mention how you would do it better. Turn the negative example around for good, rather than calling for its removal. Use the opportunity to help, rather than hide.
But also remember that when the chips are flying toward your personal eyeballs, it’s up to you to have glasses on. We all do potentially hazardous things all the time, and it’s best to be thinking about the risks and their mitigation. So stay safe out there. Keep on learning and keep on hacking!
This article is part of the Hackaday.com newsletter, delivered every seven days for each of the last 200+ weeks. It also includes our favorite articles from the last seven days that you can see on the web version of the newsletter.
Want this type of article to hit your inbox every Friday morning? You should sign up!
First attempts involved heating in a microwave or chilling the cookies in the freezer. Neither helped in the slightest. A vacuum chamber only served to delaminate the cream from both sides of the cookie entirely, while water jet cutting made an awful mess.
[Ian] ended up realizing that crack propagation could be used to prepare Oreos for a perfect split. A knife was used to score a groove all around the cream layer, right down the middle. The Oreos were then frozen, turning the cream effectively solid. When the Oreo is then twisted, the groove serves as a starting point for a crack that propagates across the surface, splitting the cream neatly between both halves.
[Ian] took things further by building a 3D-printed lathe that grooves Oreos using a sterilized scalpel blade. This allows cookies to be quickly prepped for a perfect split. However, you are left eating frozen Oreos at the end of it, with some sacrifices to freshness.
It’s a neat way to approach the Oreo splitting problem, even if it’s only one step removed from simply using a knife. We’ve seen [Ian]’s work before, too, in the form of the radioactively-powered Game Boy. Video after the break.
Ask the average person about steam power and they’ll probably imagine a bygone era, a time when the sky was thick with smoke belched out by coal-burning locomotives and paddle-wheel ships. Steam is ancient technology they’ll say, and has as much to do with modern living as the penny-farthing.
Naturally, the real story is a bit more complex than that. Sure the reciprocating steam engine has fallen out of favor as a means of propulsion, but the concept of running machinery with steam is alive and well. In fact, unless you’re running on wind or solar power, there’s an excellent chance that a steam turbine is responsible for keeping the lights on in your house.
In honor of all things steam, we invited Quinn Dunki to host this week’s Hack Chat. Those who follow her exploits on YouTube will know that over the last several years she’s built a number of steam engines, from miniature scratch-built models to commercial kits that can do useful work. Who better to answer your burning steaming questions?
The first questions in the Chat were logical enough, with several users wanting to know just how hard it is to build a functional steam engine if you don’t have access to a mill or other means of high precision machining. According to Quinn, while better equipment will certainly allow you to build a more powerful and efficient engine, the basic premise is so simple that it doesn’t take much to get one going. If you’ve got a mini lathe and some bar stock, you’re half way there. In fact, they are so forgiving that she opines you’d struggle to build a steam engine that didn’t at least turn over — though that doesn’t mean it will necessarily run well.
Naturally some comparisons were drawn between the complexity of building a steam engine and putting together a small internal combustion engine (ICE). But while they might seem conceptually similar, Quinn cautions that building a working ICE from scratch is far more difficult and dangerous. She explains that steam engines have a tendency to fail gracefully, that is, mistakes in the design or poor tolerances generally result in little worse than wasted steam and extra noise. Comparatively, a faulty ICE design could easily turn into a bomb on your workbench.
Of course, that’s not to say working with steam is without danger. You certainly don’t want to underestimate high pressure steam, which is why boilers that are over 6 in (15 cm) in diameter or that produce more than 100 PSI will often require the operator to be licensed. They may also need to be inspected, though Quinn notes that your local government official probably won’t be able to make heads or tails of your homebrew build — so if you need an official stamp of approval, your best bet is to find a local model engineering club or society that would have the appropriate connections. All that being said, most hobbyists make it a point to try and get their engine running at the lowest pressure possible, so unless you’ve got something really massive in mind, you’ll probably never need to build up more than 60 PSI or so.
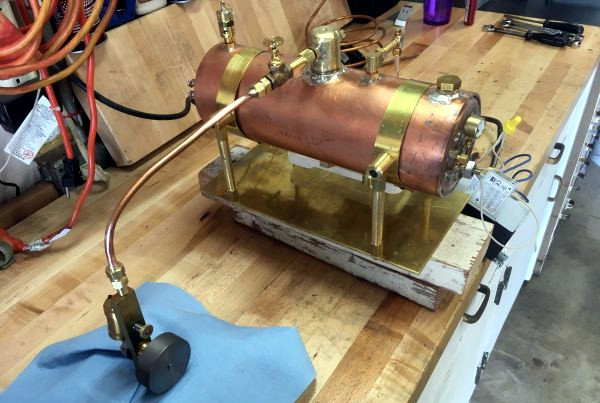
A DIY electric boiler and small steam engine.
Another topic of discussion was how to fuel the boiler itself. An electrically powered boiler is perhaps the easiest option, but is somewhat counterproductive if you hope to put your steam engine to useful work. Coal and wood fires are an option, and indeed were commonly used in the old days, but the soot and ash they produce can be a problem.
Quinn also notes that if you’re using such fuels, you need a way to quickly remove the firebox from the boiler in an emergency; something she likens to the starship Enterprise having to eject its warp core before it explodes. For her own projects, Quinn says she uses either an electric element or a camping gas burner.
While most of the questions during this Hack Chat had to do with the work Quinn has already featured on her blog and YouTube channel, naturally there were questions about where things go from here. After she completes the steam engine kit she’s working on currently, she says she’ll likely to back to another scratch-built engine. She also plans on coupling some of her engines to generators, as she’s gotten many requests about seeing these machines put to useful work. Looking further ahead Quinn says she’s interested in casting her own bronze and aluminum components, and specifically wants to work with “lost PLA” casting, which is a variant of lost wax casting that uses a mold based on a 3D printed part.
We’d like to thank Quinn Dunki for stopping by the Hack Chat and sharing some insights into this unique hobby. While a handcrafted boiler or a desktop steam reciprocating engine might not be on the average Hackaday reader’s list of future projects, it’s still fascinating to see how they work. We owe much of our modern life to steam power, so the least we can do is show it some respect.
The Hack Chat is a weekly online chat session hosted by leading experts from all corners of the hardware hacking universe. It’s a great way for hackers connect in a fun and informal way, but if you can’t make it live, these overview posts as well as the transcripts posted to Hackaday.io make sure you don’t miss out.
Admittedly, not a lot of people have a regular need to varnish coils. It’s mainly something that Tesla coil builders and other high-voltage experimenters are concerned with. But since that group probably constitutes a not insignificant fraction of the Hackaday audience, and because there are probably more applications for this homebrew coil varnishing setup, we figured it would be a good idea to share it.
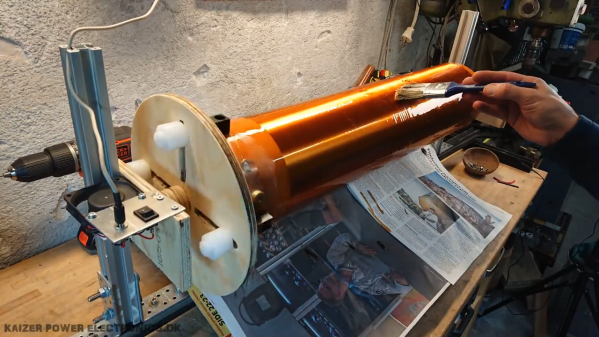
For [Mads Barnkob], coil maintenance isn’t something to take lightly. If you check out his Kaizer Power Electronics channel on YouTube, you’ll see that he has quite a collection of large, powerful Tesla coils, some of which are used for demos and shows, and others that seem to be reserved mainly for blowing stuff up. To prevent one of his coils from joining the latter group, keeping the coat of insulating varnish on the secondary coil windings in tip-top condition is essential.
The setup seen in the video below helps with that tedious chore. Built entirely from scraps and junk bin parts, the low-speed, low-precision lathe can be set up to accommodate coils of all sizes. In use, the lathe turns the coil very slowly, allowing [Mads] to apply an even coat of varnish over the coil surface, and to keep it from sagging while it dries.
[Mads]’ setup is probably not great for coil winding as it is, but for coil maintenance, it’s just the thing. If your needs are more along the lines of a coil winder, we’ve got a fully automated winder that might work for you.