Mini Wireless Thermal Printers Get Arduino Library (and MacOS App)

[Larry Bank]’s Arduino library to print text and graphics on BLE (Bluetooth Low Energy) thermal printers has some excellent features, and makes sending wireless print jobs to a number of common models about as easy as can be. These printers are small, inexpensive, and wireless. That’s a great mix that makes them attractive for projects that would benefit from printing out a hardcopy.

It’s not limited to simple default text, either. Fancier output can be done using Adafruit_GFX library-style fonts and options, which sends the formatted text as graphics. You can read all about what the library can do in this succinct list of concise functions.

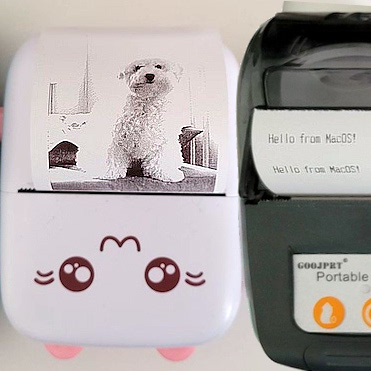
But [Larry] hasn’t stopped there. While experimenting with microcontrollers and BLE thermal printers, he also wanted to explore talking to these printers from his Mac using BLE directly. Print2BLE is a MacOS application that allows dragging image files into the application’s window, and if the preview looks good, the print button makes it come out of the printer as a 1-bpp dithered image.

Small thermal printers make for neat projects, like this retrofitted Polaroid camera, and now that these little printers are both wireless and economical, things can only get easier with the help of a library like this. Of course, if that’s all starting to look a little too easy, one can always put the thermal back in thermal printing by using plasma, instead.

Arduino Powered Heat Pump Controller Helps Warm Your Toes

Heat pump heating technology is starting to pop up more and more lately, as the technology becomes cheaper and public awareness and acceptance improves. Touted as a greener residential heating system, they are rapidly gaining popularity, at least in part due to various government green policies and tax breaks.

[Gonzho] has been busy the last few years working on his own Arduino Powered Open Source heat pump controller, and the project logs show some nice details of what it takes to start experimenting with heat pumps in general, if that’s your game. Or you could use this to give an old system a new lease of life with an Arduino brain transplant.

In essence they are very simple devices; some kind of refrigerant is passed through a source of heat, absorbing some of it, it then flows elsewhere, and is compressed, which increases its temperature, before that increased heat is lost where the increase in temperature is desired.

This heat source could be a river, a mass of pipes buried in the ground, or simply the air around you. The source and quality of the heat source as well as the desired system operating temperature dictate the overall efficiency, and with ground-source systems it’s even possible to dump excess heat directly into the ground and store it for when required later. This could be the result of a residential cooling system, or even directly sourced from a solar heated setup.

This heat pumping process is reversible, so it is possible to swap the hot and cold ends, just by flipping some valves, and turn your space heater into a space cooler. This whole process can trace its roots back to the super talented Scottish professor, William Cullen who in 1748 was the first person on record to demonstrate artificial refrigeration.

The power needed to run the compressor pump and control gear is usually electrically derived, at least in non-vehicular applications, but the total power required is significantly less than the effective heating (or cooling) power that results.

We’ve covered a few heat pump hacks before, like this guy who’s been heating his house geothermally for years, but not so many platforms designed for experimentation from the ground up.

The associated GitHub project provides the gerber files as well as the Arduino code, so you’ve got a great starting point for your own heat pumping builds.

Photo of a prototyping breadboard with an Arduino, whose analog inputs are connected to an array of four small op-amp circuits which perform the voltage slicing function of the Quantizer circuit described in this article.

Arduino Measures 20V Signals Using Quantizer

Canadian electronics geek and nascent YouTuber [Technoyaki] wanted to measure 20 volt signals on his Arduino. One might typically use a voltage divider to knock them down to the 5 volt range of the Arduino’s 10-bit A/Ds. But he isn’t one to take the conventional approach. Instead of using two resistors, [Technoyaki] decides to build an analog circuit out of sixteen resistors, four op amps and a separate 6 VDC supply.

Oscilloscope photo showing the output signals from each of the quantizer's four op amps. They are positioned staggered on the screen so that you can see the original sinusoidal signal clearly.

What is a quantizer? In the usual sense, a quantizer transforms an analog signal (with an infinity of possible values) to a smaller (and finite) set of digital values. An A/D converter is a perfect example of a quantizer. [Technoyaki], stretching the definition slightly, and uses the term to describe his circuit, which is basically a voltage slicer. It breaks up the 20 V signal into four separate 5 V bands. Of course, one could almost  accomplish this by just using an Arduino Due, which has a 12-bit A/D converter (almost, because it has a lower reference voltage of 3.3 V). But that wouldn’t be as much fun.

Why use all these extra components? Clearly, reducing parts count and circuit complexity was not one of [Technoyaki]’s goals. As he describes it, the reason is to avoid the loss of A/D resolution inherent with the traditional voltage divider. As a matter of semantics, we’d like to point out that no bits of resolution are lost when using a divider — it’s more accurate to say that you gain bits of resolution when using a circuit like the quantizer.  And not surprising for precision analog circuitry, [Technoyaki] notes that there are yet a few issues yet to be solved. Even if this circuit ultimately proves impractical, it’s a neat concept to explore. Check out the video below the break, where he does a great job explaining the design and his experiments.

Even though this isn’t quite a cut-and-paste circuit solution at present, it does show another way to handle large signals and pick up some bits of resolution at the same time. We wrote before about similar methods for doubling the A/D resolution of the Arduino. Let us know if you have any techniques for measuring higher voltages and/or increasing the resolution of your A/D converters.

Continue reading “Arduino Measures 20V Signals Using Quantizer”

Detect Lightning Strikes With An Arduino

Lightning is a powerful and seemingly mysterious force of nature, capable of releasing huge amounts of energy over relatively short times and striking almost at random. Lightning obeys the laws of physics just like anything else, though, and with a little bit of technology some of its mysteries can be unraveled. For one, it only takes a small radio receiver to detect lightning strikes, and [mircemk] shows us exactly how to do that.

When lightning flashes, it also lights up an incredibly wide spectrum of radio spectrum as well. This build uses an AM radio built into a small integrated circuit to detect some of those radio waves. An Arduino Nano receives the signal from the TA7642 IC and lights up a series of LEDs as it detects strikes in closer and closer proximity to the detector. A white LED flashes when a strike is detected, and some analog circuitry supports an analog galvanometer which moves during lightning strikes as well.

While this project isn’t the first lightning detector we’ve ever seen, it does have significantly more sensitivity than most other homemade offerings. Something like this would be a helpful tool to have for lifeguards at a pool or for a work crew that is often outside, but we also think it’s pretty cool just to have around for its own sake, and three of them networked together would make triangulation of strikes possible too.

Continue reading “Detect Lightning Strikes With An Arduino”

Arduino Caller ID Display Is Better Late Than Never

It’s no secret that the era of the landline telephone is slowly coming to a close. As of 2020, it was estimated that less than half the homes in America still subscribed to plain old telephone service (POTS). But of course, that still amounts to millions upon millions of subscribers that might get a kick out of this Arduino caller ID developed by [Dilshan Jayakody].

HT9032D caller ID decoder board
The completed HT9032D board.

Truth be told, until this point, we hadn’t really given a lot of thought to how the caller ID system works. But as [Dilshan] explains, you can actually pick up a dedicated IC that can decode incoming caller data that’s sent over the telephone line. In this case he’s using a Holtek HT9032D, which comes in a through-hole DIP-8 package and can be picked up for around $2 USD. The chip needs a handful of passives and a 3.58 MHz crystal to help it along on its quest, but beyond that, it’s really just a matter of reading the decoded data from its output pin.

To display the caller’s information, [Dilshan] is using an Arduino Uno and common 16×2 HD44780 LCD. As a nice touch, the code will even blink the Arduino’s onboard LED when you’ve missed a call. As a proof of concept there’s been no attempt to condense the hardware or ditch the breadboard, but it’s not hard to imagine that all the components could be packed into a nice 3D printed enclosure should you want something a bit more permanent.

We’ve seen caller ID data being collected in previous projects, but they used a USB modem combined with a software approach. We really like the idea of doing it with a cheap dedicated IC, though we’ll admit this demonstration would probably have been a bit more exciting a decade ago.

Continue reading “Arduino Caller ID Display Is Better Late Than Never”

Arduino Finds Treasure

A beach is always a relaxing summer vacation destination, a great place to hang out with a drink and a book or take a swim in the ocean. For those who need a more active beach-going activity with an electronics twist, though, metal detecting is always a popular choice too. And, of course, with an Arduino and some know-how it’s possible to build a metal detector that has every feature you could want from even a commercial offering.

This build comes to us from [mircemk] who built this metal detector around an Arduino Nano and uses a method called induction balance detection to find metal. Similar to how radar works, one coil sends out a signal and the other listens for reflections back from metal objects underground. Building the coils and determining their resonant frequency is the most important part of this build, and once that is figured out the rest of the system can be refined and hidden treasure can easily be unearthed.

One of the more interesting features of this build is its ability to discriminate between ferrous and non-ferrous metals, and it can detect large metal objects at distances of more than 50 cm. There are improvements to come as well, since [mircemk] plans to increase power to the transmission coil which would improve the range of the device. For some of [mircemk]’s other metal detectors, be sure to check out this one which uses a smartphone to help in the metal detection process.

Continue reading “Arduino Finds Treasure”

Avoid Awkward Video Conference Situations With PIR And Arduino

Working from home with regular video meetings has its challenges, especially if you add kids to the mix. To help avoid embarrassing situations, [Charitha Jayaweera] created Present!, a USB device to automatically turn of your camera and microphone if you suddenly need to leave your computer to maintain domestic order.

Present consists of just a PIR sensor and Arduino in a 3D printed enclosure to snap onto your monitor. When the PIR sensor no longer detects someone in range, it sends a notification over serial to a python script running on the PC to switch off the camera and microphone on Zoom (or another app). It can optionally turn these back on when you are seated again. The cheap HC-SR501 PIR module’s range can also be adjusted with a trimpot for your specific scenario. It should also be possible to shrink the device to the size of the PIR module, with a small custom PCB or one of the many tiny Arduino compatible dev boards.

For quick manual muting, check out the giant 3D printed mute button. Present was an entry into the Work from Home Challenge, part of the 2021 Hackaday Prize.