Commodore C64: The Most Popular Home Computer Ever Turns 40

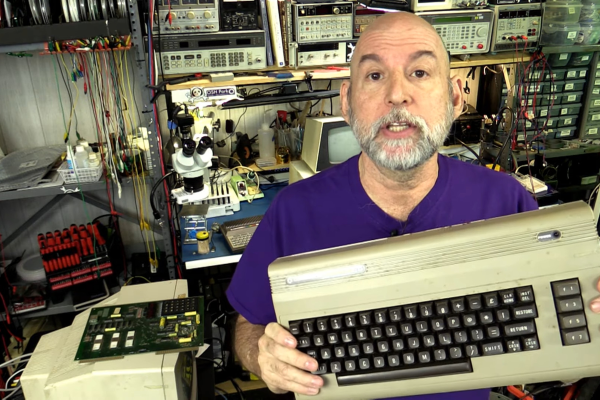
This year marks the anniversary of the most popular selling home computer ever, the Commodore 64, which made its debut in 1982. Note that I am saying “home computer” and not personal computer (PC) because back then the term PC was not yet in use for home computer users.

Some of you have probably not heard of Commodore, which is kind of sad, though there is a simple reason why — Commodore is no longer around to maintain its legacy. If one were to watch a documentary about the 1980s they may see a picture of an Apple computer or its founders but most likely would not see a picture of a Commodore computer in spite of selling tens of millions of units.

To understand the success of the C64 I would first back up and talk about the fabled era of home computers which starts with understanding the microprocessor of the day, the venerable 6502. Check out the video and follow along below.

Continue reading “Commodore C64: The Most Popular Home Computer Ever Turns 40”

Gaskets, Can They Be 3D Printed?

Anyone who’s owned an older engine, whether it be in a car, motorcycle, or garden machine, will at some time have been faced with the need for a gasket. Even when the gasket is readily available there may be an imperative to fix the engine rather than wait for the part to arrive, so it’s common to make your own replacements. Simple ones are easy to cut from thin card, but if you’ve ever tried to do this with a really complex one you’ll know the pain of getting it right. This is the problem tackled in a video from [the_eddies], who has explored the manufacture of replacement gaskets by 3D printing.

The advantages of CAD and easy manufacture are obvious, but perhaps many common plastics might not perform well in hot or oily environments. For that reason he settles on TPU filament, and gives it a test in a bath of 2-stroke fuel mix to see how well it resists degradation. It passes, as it does also when used with a carburetor, though we’d be curious to see the results of a long-term test. We’ve placed the video below the break, so reach your own conclusions.

Gaskets have featured here before, and if you’re interested then there are other machines which can be used to make them.

Continue reading “Gaskets, Can They Be 3D Printed?”

Developing Your Own Digital Film

In the olden days, you would have a roll of film that you could take to your local drug store and have them develop it. But a serious photographer would likely develop their own photos to maintain complete creative control. While photo editing software has largely replaced the darkroom of old, the images are still held on physical media, and that means there’s room for improvement and customization. In an article for photofocus, [Joseph Nuzzo] shows how you can make your own CFexpress card — the latest and greatest in the world of digital camera storage tech — for less than $100 USD.

The idea here is pretty simple, as CFexpress uses PCIe with a different connector. Essentially all you have to do is get a M.2 2230 NVMe drive and put it into an adapter. In this case [Joseph] is using a turn-key model from Sintech, but we’ve shown in the past how you can roll your own.

Now you might not give it much thought normally, but NVMe devices get pretty hot. This usually isn’t problem inside a large computer case, where they often have large amounts of air blowing over them. But inside a camera you need to dissipate that heat, so thermal compound is a must. With everything screwed together, you have your own card that’s faster and cheaper than commercial offerings.

It’s no secret that there’s a lot of love for NVMe. It’s easy, fast, and adaptable. Since the M.2 slot format includes SATA and PCIe, there’s a likely chance there is a PCIe bus in many cameras. The PCIe bus on the Pi has been convenient for hacking, and we wonder what sort of hacks are out there for cameras.

the full charger with gas tank and engine

Charge Your Apple With Apples

When you think of ethanol, you might think of it as a type of alcohol, not alcohol itself. However, in reality, it is the primary ingredient in adult beverages. Which means humans have gotten quite good at making it, as we’ve been doing for a long time. With this in mind, [Sam Barker] decided to make ethanol out of apples to power a small engine to charge his phone.

The steps for making pure ethanol is quite similar to making alcoholic cider. A friend of [Sam’s] had an orchard and a surplus of apples, so [Sam] boiled them down and stored the mush in jugs. He added activated dry yeast to start the fermentation process. A dry lock allowed the CO2 gas that was being created to escape. Over a few weeks, the yeast converted all the sugar into ethanol and gas. In the meantime, [Sam] sourced a chainsaw and adapted the engine to run on ethanol, as ethanol needs to run richer than gasoline. The video below the break tells the story.

Continue reading “Charge Your Apple With Apples”

Micromachining With A Laser

[Breaking Taps] has a nice pulsed fiber laser and decided to try it to micromachine with silicon. You can see the results in the video below. Silicon absorbs the IR of the laser well, although the physical properties of silicon leave something to be desired. He also is still refining the process for steel, copper, and brass which might be a bit more practical.

The laser has very short duration pulses, but the pulses have a great deal of energy. This was experimental so some of the tests didn’t work very well, but some — like the gears — look great.

Continue reading “Micromachining With A Laser”

OLED Display Kicks Knob Up Several Accurate Notches

As far as input devices go, the potentiometer is pretty straightforward: turn it left, turn it right, and you’ve pretty much seen all there is to see. For many applications that’s all you need, but we can certainly improve on the experience with modern technology. Enter this promising project from [upir] that pairs a common potentiometer with a cheap OLED display to make for a considerably more engaging user experience.

To save time, the code is fine tuned in a simulator.

The basic idea is to mount the display over the potentiometer knob so you can show useful information such a label that shows what it does, and a readout of the currently detected value. But you’ll likely want to show where the knob is currently set within the range of possible values as well, and that’s where things get interesting.

In the video after the break, [upir] spends a considerable amount of time explaining the math behind details like the scrolling tick marks. The nearly 45 minute long video wraps up with some optimization, as getting the display to move along with the knob in real-time on an Arduino UNO took a bit of extra effort. The final result looks great, and promises to be a relatively cheap way to add an elegant and functional bit of flair to an otherwise basic knob.

With the code and this extensive demonstration of how it all works, adding a similar capability to your next knob-equipped gadget shouldn’t be too much of a challenge. Perhaps it could even be combined with the OLED VU meters we’ve covered previously. Be sure to let us know if you end up using this technique, as we’d love to see it in action.

Continue reading “OLED Display Kicks Knob Up Several Accurate Notches”

Custom-Fit Small Shop Crane Lightens The Load

On the shortlist of workshop luxuries, we’d bet a lot of hackers would include an overhead crane. Having the ability to lift heavy loads safely and easily opens up a world of new projects, and puts the shop into an entirely different class of capabilities.

As with many of us, [Jornt] works in a shop with significant space constraints, so the jib crane he built had to be a custom job. Fabricated completely from steel tube, the build started with fabricating a mast to support the crane and squeezing it into a small slot in some existing shelves in the shop, which somehow didn’t catch on fire despite being welded in situ. A lot of custom parts went into the slewing gear that mounts the jib, itself a stick-built space frame that had to accommodate a pitched ceiling. A double row of tubing along the bottom of the jib allows a trolley carrying a 500 kg electric winch to run along it, providing a work envelope that looks like it covers the majority of the shop. And hats off for the safety yellow and black paint job — very industrial.

From the look of the tests in the video below, the crane is more than up to the task of lifting engines and other heavy loads in the shop. That should prove handy if [Jornt] tackles another build like his no-compromises DIY lathe again.

Continue reading “Custom-Fit Small Shop Crane Lightens The Load”