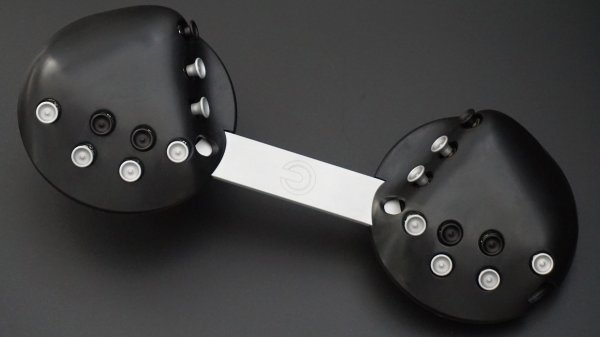
Lego Submarine Gets Balloon Ballast System

Lego is a fun building block which vast numbers of the world’s children play with every day. However, the mechanical Technic line of Lego building blocks has long offered greater options to the budding engineer. [Brick Experiment Channel] is one such soul, working hard on their latest Lego submarine.

The sub is built inside of a glass food container, chosen for its removable plastic lid with a watertight seal. This keeps all the mechanics dry, as well as the custom electronics built to allow a 27MHz RC controller to send signals to the Lego electronics. This is key as higher frequency radios such as Bluetooth or WiFi can’t penetrate water nearly as well.

A magnetic coupling fitted to a Lego motor is used to drive the propeller in the water without the leaks common when trying to seal a rotating shaft. A second coupling on a Lego servo along with a creative steering arrangement allows the propeller to be turned to steer the craft.

The ballast system is simple. A balloon is filled by a Lego motor running an air pump, capable of 3.0 mL a second and capable of creating a maximum pressure of 2.0 bar. When the balloon is inflated, the buoyancy goes up and the sub rises. Run the motor the other way and the balloon is emptied by a clever clutch and valve arrangement, reducing buoyancy and causing the sub to sink.

The sub isn’t perfect. Maintaining a set depth underwater can be difficult with the rudimentary ballast system, perhaps as the balloon changes shape with varying water pressure. Sometimes, Lego axles slip out of their gears, too, and the radio only works for a few meters under water.

However, simply building a Lego sub of any sort is a remarkable feat. It’s interesting to see the variances in the design compared to earlier projects from [Brick Experiment Channel], too, as we’ve featured their earlier subs before. Video after the break.

Continue reading “Lego Submarine Gets Balloon Ballast System”

Optical Theremin Makes Eerie Audio With Few Parts

[Fearless Night]’s optical theremin project takes advantage of the kind of highly-integrated parts that are available to the modern hacker and hobbyist in all the right ways. The result is a compact instrument with software that can be modified using the Arduino IDE to take it places the original Theremin design could never go.

The design is based on a ‘Blue Pill’ STM32 MCU development board and two Avago APDS-9960 gesture sensor breakout boards, along with a few other supporting components. Where the original Theremin sensed hand proximity using two antenna-like capacitive sensors to control note frequency and volume, this design relies on two optical sensors to do the same job.

[Fearless Night] provides downloads for the schematic, code, parts list, and even 3D models for the enclosure. PCB files are also included for a convenient assembly, but since the component count is fairly low, a patient hacker should be able to get away with soldering it up by hand without much trouble.

This project creates the audio using the STM32’s Direct Digital Synthesis (DDS) capability and a simple low-pass filter, and has several ways to fine-tune the output. What’s DDS? Our own Elliot Williams explains it in terms of audio output for microcontrollers, and if you’d like a more comprehensive overview, Bil Herd will happily tell you all about it.

Electric “Radial” RC Aircraft Motor

For a long time radial aircraft engines, with their distinctive cylinder housings arranged in a circle, were a common sight on aircraft. As an experiment, [KendinYap], wanted to see if he could combine 3 small DC motors into a usable RC aircraft motor, effectively creating an electric radial engine.

The assembly consists of three “180” type brushed DC motors, mounted radially in a 3D printed casing. A 3D printed conical gear is attached to each motor shaft, which drives a single output gear and shaft mounted in the center with two bearings. The gear ratio is 3:1. A variety of propellers can be mounted using 3D printed adaptors. As a baseline, [KendinYap] tested a single motor on a scale with a 4.25-inch propeller on a scale, which produced 170 g of thrust at 21500 RPM. Once integrated into the engine housing, the three motors produced 490 g of thrust at 5700 RPM, with a larger propeller. Three independent motors and propellers should theoretically provide 510 g of thrust, so there are some mechanical losses when combining 3 of them in a single assembly. However, it should still be capable of powering a small RC plane. It’s also not impossible that a different propeller could yield better results.

While there is no doubt that it’s no match for a brushless RC motor, testing random ideas just to see if it’s possible is usually fun and an excellent learning experience. We’ve seen some crazy flyable RC power plants, including a cordless drill, a squirrel-cage blower, and a leaf blower.

Continue reading “Electric “Radial” RC Aircraft Motor”

We’d Like, Totally Carry This Retro Boombox Cyberdeck On Our Shoulder

Cyberdeck. For those of a certain age, the ‘deck’ part conjures visions of tape decks, be they cassette, 8-track, or quarter-inch, and we seriously have to wonder why haven’t seen this type of build before. But here we are, thanks to [bongoplayingmonkey]’s Sanyo Cyberdeck, a truly retro machine built into a cool old boombox.

According to [bongoplayingmonkey], this was a unicorn of a build wherein everything more or less came together, soup to nuts. Right now, [bongoplayingmonkey] is cracking the nuts of a few remaining issues, like calibrating the analog VU meter that inspired the build in the first place. The plan is to use that to indicate various analog things such as battery power and the WiFi signal.

Luckily, everything survived the teardown, parts-wise. That huge knob has a new life has a rotary encoder for scrolling and middle click. And the VU meter made it too, thank Zod. This baby has full mouse controls thanks to a PS/2 joystick and a pair of vintage momentary buttons are likely chrome and bakelite to round out the look.

So apparently [bongoplayingmonkey]’s personal jury is still out on whether this is a blasphemous build or a divine ‘deck, but we say one thing is for sure: this is definitely art.

Unfortunately, the cassette deck didn’t survive. Otherwise, we might have to question its categorization — is it still a boombox if the tape deck works? This, however, is definitely a laptop that grew up to be a cyberdeck.

Thanks for the tip, [Blasto]!

Dynamicland Makes The Whole Building The Computer

Every once is a while a research project comes along that has the potential to totally shake up computing and what it even means to interact with a system. The project Dynamicland.org, is a result of [Bret Victor]’s research journey over the years, looking into various aspects of human computer interaction and what it even means to think like a human.

One of the overhead projectors tied to a realbox
In Realtalk, paper is your programming medium

Dynamicland is an instantiation of a Realtalk ecosystem, deployed into a whole building. Tables are used as computing surfaces, with physical objects such as pieces of paper, notebooks, anything which can be read by one of the overhead cameras, becoming the program listing, as well as the user interface. The camera is associated with a projector, with the actual hardware hooked into so-called ‘Realboxes’ which are Linux machines running the Realtalk software. Separate Realboxes (and other hardware such as a Raspberry Pi, running Realtalk) are all federated together using the Realtalk protocol, which allows communication from hardware in the ceiling, to any on the desk, and also to other desks and computing surfaces.

Realtalk itself is described as an environment for authoring and using computation media. The Realtalk system provides a language extension to Lua. Together these form a domain-specific language. Realtalk is also a kind of reactive database, which means that the emphasis is on the flow of data and connections between data producing things, and data consuming things. For a bit more explanation of how reactive programming can be used with modern relational databases, check out this article on the subject.

For a good overview of how this works in practice, from a programming perspective, checkout [Omar Rizwan]’s article about his ‘Geokit’ project. Another interesting read is the work by [Andrés Cuervo.]

Continue reading “Dynamicland Makes The Whole Building The Computer”

Line Following Robot Uses PID For Speed

While a line-following robot may not be the newest project idea in the book, this one from [Edison Science] is a clean build using modern components and gets a good speed thanks to PID control feedback instead of the more traditional bang-bang control you see in low-end robots.

Of course, PIDs need tuning and that seems to be the weak link — you’ll have to experiment with the settings. The sensors also require calibration, but we bet both of those issues could be fixed pretty easily.

Continue reading “Line Following Robot Uses PID For Speed”

Cast-in-Concrete Clock Upgraded After Thirteen Years

Proving that an old design cast in concrete can indeed be changed, [Hans Jørgen Grimstad] has revisited his Nixie clock from 2008, cleaned up the electronics and packaging, and turned it into a kit. Not that he has plans to enter the kit-making business, but he just thought it would be fun to learn how to make kits. In the video below the break, he’s a bit embarrassed to reveal the inside of his first Nixie clock design, housed in a cast-concrete electronics enclosure. Although it still works, the internal wiring is a flaky, untidy, and perhaps a bit dangerous.

But [Hans] has improved his game over the years, making a number of different clock designs. The latest incarnation is pleasant to look at, built on a PCB which is visible inside a custom acrylic case. Three versions are available to support different types of tubes. The documentation he prepared for the project and the kit is very thorough. He walks you through the unboxing and assembly process in the videos below. Firmware is in C, and runs on a Raspberry Pi Zero W. If you are interesting in making electronics kits, [Hans]’s project would be a good example to follow.

All the necessary information to build the clock is published on the project’s GitHub repository. If you’re looking for enclosure ideas other than concrete or acrylic sheet, check out this write-up on hand-forging artistic Nixie clock enclosures.

Continue reading “Cast-in-Concrete Clock Upgraded After Thirteen Years”