DIY Laser Tag System Comes With All The Bells And Whistles

While VR is becoming really immersive, it still can’t compete with a game of good old laser tag to get the blood pumping and spending quality time with friends. [Xasin] has been working on a DIY laser tag system for a while now, and it has grown to include an impressive array of features and customizability.

Named LZRTag, the project started back in 2018 with simple ATmega328 based prototypes on breadboards. It has since evolved to a fully-featured system with ESP32s in the 3D printed pistol communicating with a Raspberry Pi/Linux game server over MQTT. Each pistol also features an accelerometer, I2S audio amp and speaker for game sounds, and WS2812 RGP LEDs for light effects. IR Lasers are used as emitters to target wearable IR receivers with more RGB LEDs wired to the pistol.

A Ruby server on a Linux machine takes care of all the communications, game management, shot validation, and scoring. It can handle up to 255 players and is designed to be extremely customizable for game modes, weapons classes, or any other feature you would like to have. [Xasin] has also created IR beacons to add even more possibilities, such as capture the flag, safe zones, and revive zones.

We really like the flexibility of the system, and it would make an awesome group project for a hackerspace. You could also add a shock module to motivate players a bit more to avoid getting shot. If you want more gun, take a look at the laser tag rifle with a HUD we featured earlier in the year Continue reading “DIY Laser Tag System Comes With All The Bells And Whistles”

Simple Christmas Tree Christmas Tree Ornament

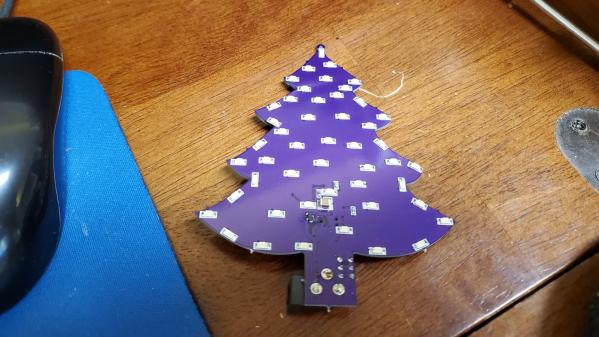
When the only tool you have is a hammer, every problem looks like a nail. An LED ornament for the Christmas tree can be built in any manner of simple, easy implementations. You certainly don’t need an ARM Cortex M4 CPU running at 120MHz having a mouthful of three letter features like FPU, ETM, ETB, ECC, RWW, TCM, EIC, AES, CAN bus and much, much more. But [Martin Held] built a super simple LED Christmas tree ornament using the ATSAME51 series micro-controller, which he regularly works with and had on hand, and lots of bi-color LEDs. He already had schematic symbols and programmers for the device from other projects where he uses it more extensively, so putting it all together in time for the festive season was that much faster for him, despite the fact that the micro-controller was most likely the cheapest part of the BOM, besides the passives.

At this point it might be tempting to argue that it would have been so much simpler to use addressable LED’s, such as the WS2812B or the APA102C. You can drive them using a more basic micro-controller, and not require so many GPIO pins. But using such “smart pixel” LED’s for hand assembled prototypes can sometimes lead to unexpected results. If they are not stored in sealed tape/reel form, then storage conditions can have an adverse effect leading to dead pixels. And, they need a specific baking procedure before being soldered. Doing that for a few LEDs at home can be tricky.

So for the LED’s, he again went a bit off the beaten path, selecting to use three different color styles of bi-color LED’s with easy to hand-solder, 1206 footprints. This allows him to get a fairly random mix of colors in the completed ornament.
The LED array is pseudo-charlieplexed. One terminal of each LED goes to a GPIO pin on the micro-controller and the other terminal of all the LED’s are connected to a single complimentary pair of N-channel/P-channel MOSFETs — connected in totem-pole fashion. Depending on which MOSFET is switched on via a GPIO pin driving the gate pin high or low, the second terminal of each LED gets connected to either supply or ground. In combination with the GPIO pins being driven high/low, this allows the bi-color LED to be biased in either direction. Getting each LED to emit one color is simple enough — setting all LED GPIOs low, and MOSFET gate GPIO high will bias the LEDs in one direction. Reverse the GPIO logic, and the LEDs will be biased in the other direction. If this is done slow enough, the two colors can be differentiated easily. If the driving logic is made fast, changing states every 10us, the two separate colors merge to form a third hue. With some clever bit of code, he also adds some randomness in the GPIO output states, resulting in a more appealing twinkling effect. [Martin] does a detailed walk through in the video embedded below.

If you have the same bunch of parts lying around and wish to replicate the project, be warned that the KiCad source files will need some work to clean up errors — [Martin] was in a hurry and knew what he was doing so there are some intentional mistakes in the schematic such as using the same symbol for the N-channel and P-channel MOSFETs, and uni-directional LED symbol in place of the bi-directional one. And for programming, you will need one of these pricey pogo-pin style cables, unless you decide to edit the PCB before sending off the Gerbers.

[Martin] built just three of these bespoke ornaments, retaining one and giving away the other two to a neighbour and a co-worker. But if you would really like to build a tree ornament with addressable LEDs, then check out the Sierpinski Christmas Tree which can be cascaded to form an array of tree ornaments.

Continue reading “Simple Christmas Tree Christmas Tree Ornament”

LEDs-On-Chips Will Give Us Lower Cost Optoelectronics

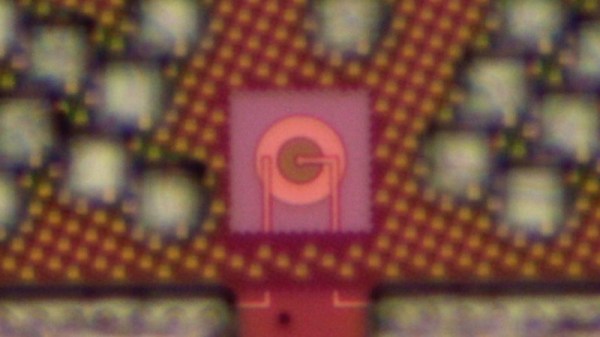
The LED is one of those fundamental building block components in electronics, something that’s been in the parts bin for decades. But while a simple LED costs pennies, that WS2812 or other fancy device is a bit expensive because internally it’s a hybrid of a silicon controller chip and several LEDs made from other semiconductor elements. Incorporating an LED on the same chip as its controller has remained something of a Holy Grail, and now an MIT team appear to have cracked it by demonstrating a CMOS device that integrates a practical silicon LED. It may not yet be ready for market but it already displays some interesting properties such as a very fast switching speed. Perhaps more importantly, further integration of what have traditionally been discrete components would have a huge impact on reducing manufacturing costs.

Anyone who has read up on the early history of LEDs will know that the path from the early-20th-century discoveries of semiconductor luminescence through the early commercial devices of the 1960s and up to the bright multi-hued devices of today has been a long one with many stages of the technology reaching the market. Thus these early experimental silicon LEDs produce light in the infrared spectrum often useful in producing sensors. Whether we’ll see an all-silicon Neopixel any time soon remains to be seen, but we can imagine that some sensors using LEDs could be incorporated on the same die as a microcontroller. It seems there’s plenty of potential for this invention.

This research was presented earlier this month at the IEDM Conference in a talk entitled Low Voltage, High Brightness CMOS LEDs. We were not able to find a published paper, we’d love read deeper so let us know in the comments below if you have info on when this will become available. In the meantime, anyone with any interest in LED technology should read about Oleg Losev, the inventor of the first practical LEDs.

Weather Note Tells You What You Need To Know, And No More

Smartphones are portals to an overwhelming torrent of information. Yes, they’re a great way to find out the time, your bus schedule, and the weather, but they’re also full of buzzers and bells going off every three minutes to remind you that your uncle has reposted a photo of the fish he caught ten years ago. Sometimes, it’s better to display just the essentials, and that’s what Weather Note does.

It’s built around the Adafruit Feather Huzzah, a devboard built around the venerable ESP8266. It’s a great base for an Internet of Things project like this one, with WiFi built-in and ready to go. The Weather Note talks to a variety of online platforms to scrape weather data and helpful reminders, with the assistance of If This Then That, or IFTTT. Reminders to walk the dog or get some milk are displayed on a small OLED screen, while there’s also a bunch of alphanumeric displays for other information. WS2812 LEDs are used behind a shadowbox to display weather conditions, with cute cloud, rain, and sun icons. It’s all wrapped up in a tidy frame perfect for the mantlepiece or breakfast table.

It’s a great build to learn about programming for the Internet of Things, and with those bright LED displays, it’s probably a viable nightlight too. It’s a rare project that can both tell you about the weather and keep you from stubbing your toe in the kitchen, after all. Those desiring a stealthier build should consider going down the smart mirror route instead. Video after the break.

Continue reading “Weather Note Tells You What You Need To Know, And No More”

Animatronic Saturn V Launch Tower Sends Lego Model To The Moon

When it comes to their more adult-oriented models, Lego really knocked it out of the park with their Saturn V rocket model. Within the constraints of the universe of Lego parts, the one-meter-tall model is incredibly detailed, and thousands of space fans eagerly snapped up the kit when it came out.

But a rocket without a launchpad is just a little sad, which is why [Mark Howe] came up with this animatronic Saturn V launch pad and gantry for his rocket model. The level of detail in the launchpad complements the features of the Saturn V model perfectly, and highlights just what it took to service the crew and the rocket once it was rolled out to the pad. As you can imagine, extensive use of 3D-printed parts was the key to getting the look just right, and to making parts that actually move.

When it’s time for a launch, the sway control arm and hammerhead crane swing out of the way under servo control as the Arduino embedded in the base plays authentic countdown audio. The crew catwalk swings away, the engines light, and the service arms swing back. Then for the pièce de résistance, the Saturn V begins rising slowly from the pad on five columns of flame. [Mark] uses a trio of steppers driving linear actuators to lift the model; the flame effect is cleverly provided by strings of WS2812s inside five clear plastic tubes. We have to say it took some guts to put the precious 1,969-piece model on a lift like that, but the effect was well worth the risk.

This project has a great look and is obviously a labor of love, and a great homage to the Apollo program’s many successes. We’ve got a ton of other Apollo-era hacks on our pages, including a replica DSKY, a rejuvenated AGC, and a look behind the big boards of mission control.

Continue reading “Animatronic Saturn V Launch Tower Sends Lego Model To The Moon”

ESP32 Spectrum Analyzer Taps Into Both Cores

We probably don’t need to tell the average Hackaday reader that the ESP32 is a powerful and extremely flexible microcontroller. We’ve seen some incredible projects using this affordable chip over the last few years, and by the looks of it, the best is yet to come. That’s because it always takes some time before the community can really figure out how to get the most out of a piece of hardware.

Take for example the Bluetooth audio player that [squix] was recently working on. Getting the music going was no problem with the esp32-a2dp library, but when he wanted to add some visualizations the audio quality took a serious hit. Realizing that his Fast Fourier transform (FFT) code was eating up too much processor power, it seemed like a great time for him to explore using the ESP32’s second core.

[squix] had avoided poking around with the dual-core nature of the ESP32 in the past, believing that the second core was busy handling the WiFi communication. But by using the FreeRTOS queue system, he wrote some code that collects audio data with one core and runs the actual FFT magic on the other. By balancing the workload like this, he’s able to drive the array of 64 WS2812B LEDs on the front of the Icon64 seen in the video after the break.

Even if you’re not terribly interested in running your own microcontroller disco, this project may be just the example you’ve been waiting for to help get your mind wrapped around multitasking on the ESP32. If you want to master a device with this many tricks up its sleeve, you’ll need all the help you can get.

Continue reading “ESP32 Spectrum Analyzer Taps Into Both Cores”

Slim RGB Matrix Puts LEDs Inside The PCB

Sometimes all that’s required to build something interesting is to put the same old pieces together differently. [Sayantan Pal] did this for the humble RGB LED matrix, creating an extra-thin version by recessing WS2812b NeoPixel LEDs inside a PCB.

The popular WS2812B is 1.6 mm in height, which happens to be the most commonly used PCB thickness. Using EasyEDA, [Sayantan] designed a 8×8 matrix with modified WS2812B footprints. A slightly undersized cutout was added to create a friction-fit for the LEDs, and the pads were moved to the back side of the panel just outside the cutout, and their assignment were flipped. The PCB is assembled face down, and all the pads are soldered by hand. Unfortunately this creates rather large solder bridges which slightly increases the overall thickness of the panel, and is probably also unsuitable for production with conventional pick-and-place assembly.

We’ve seen some similar methods with PCB assemblies that use layered PCBs. Manufacturers are starting to even embed components inside multilayer PCBs.