Adaptive Macro-Pad Uses Tiny OLED Screens As Keycaps

When we first laid eyes on Keybon, the adaptive macro keyboard, we sort of wondered what the big deal was. It honestly looked like any other USB macro keyboard, with big icons for various common tasks on the chunky keys. But looks can be deceiving, and [Max Kern] worked a couple of surprises into Keybon.

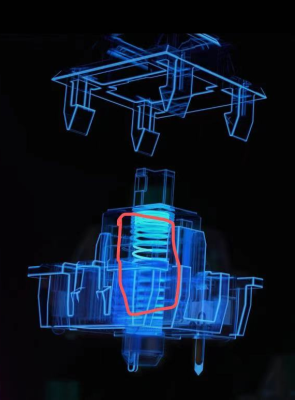
First of all, each one of Keybon’s buttons is actually a tiny OLED display, making the keycaps customizable through software. Each of the nine 0.66″ displays has a resolution of 64 x 48 pixels, which is plenty for all kinds of icons, and each is mounted over an SMD pushbutton switch. He had to deal with the problem of the keycaps just wobbling around atop the switch button without depressing it; this was solved with a 3D-printed cantilever frame that forced the keycaps to pivot only in one axis, resulting in clean, satisfyingly clicky keypresses.

The other trick that Keybon has is interactivity. By itself, it boots up with a standard set of icons and sends the corresponding keystrokes over USB. But when used with its companion Windows application, the entire macro set can be switched out to accommodate whatever application is being used. This gives the users access to custom macros for a web browser, EDA suite, CAD applications, or an IDE. The app supports up to eight macro sets and can be seen in action in the video below.

We love the look and the functionality [Max.K] has built into Keybon, but we wonder if e-ink displays would be a good choice for the keycaps too. They’re available for a song as decommissioned store shelf price tags now, and they might be nice since the icon would persist without power.

Continue reading “Adaptive Macro-Pad Uses Tiny OLED Screens As Keycaps”

Remoticon Video: How To Use Max In Your Interactive Projects

When you want to quickly pull together a combination of media and user interaction, looking to some building blocks for the heavy lifting can be a lifesaver. That’s the idea behind Max, a graphical programming language that’s gained a loyal following among anyone building art installations, technology demos (think children’s museum), and user Kiosks.

Guy Dupont gets us up to speed with a how to get started with Max workshop that was held during the 2020 Hackaday Remoticon. His crash course goes through the basics of the program, and provides a set of sixteen demos that you can play with to get your feet under you. As he puts it, if you need sound, video, images, buttons, knobs, sensors, and Internet data for both input and output, then Max is worth a look. Video of the workshop can be found below.

Continue reading “Remoticon Video: How To Use Max In Your Interactive Projects”

How To Get Into Cars: Drag Racing Mods

While some love to carve up mountain roads, and others relish the challenge of perfectly apexing every corner at the track, many crave a different challenge. Drag racing is a sport all about timing, finesse, and brute power. Like any other discipline in motorsport, to compete you’ll need a vehicle finely honed for the task at hand. Here’s how you go about getting started on your first quarter-mile monster.

It’s All About Power, Right?

It’s true that if you want to go faster, having more power on tap is a great way to do it. If that’s what you’re looking for, we’ve covered that topic in detail – for both the naturally aspirated and forced induction fans. However, anyone that’s been to the drag strip before will tell you that’s only part of the story. All of the power in the world isn’t worth jack if you can’t get it down to the ground. Even if you can, you’ve still got to keep your steering wheels planted if you intend to keep your nose out of the wall. So, if you want more power, consider the articles linked above. For everything else that’s important in drag racing, read on below.

Continue reading “How To Get Into Cars: Drag Racing Mods”

Animatronic Saturn V Launch Tower Sends Lego Model To The Moon

When it comes to their more adult-oriented models, Lego really knocked it out of the park with their Saturn V rocket model. Within the constraints of the universe of Lego parts, the one-meter-tall model is incredibly detailed, and thousands of space fans eagerly snapped up the kit when it came out.

But a rocket without a launchpad is just a little sad, which is why [Mark Howe] came up with this animatronic Saturn V launch pad and gantry for his rocket model. The level of detail in the launchpad complements the features of the Saturn V model perfectly, and highlights just what it took to service the crew and the rocket once it was rolled out to the pad. As you can imagine, extensive use of 3D-printed parts was the key to getting the look just right, and to making parts that actually move.

When it’s time for a launch, the sway control arm and hammerhead crane swing out of the way under servo control as the Arduino embedded in the base plays authentic countdown audio. The crew catwalk swings away, the engines light, and the service arms swing back. Then for the pièce de résistance, the Saturn V begins rising slowly from the pad on five columns of flame. [Mark] uses a trio of steppers driving linear actuators to lift the model; the flame effect is cleverly provided by strings of WS2812s inside five clear plastic tubes. We have to say it took some guts to put the precious 1,969-piece model on a lift like that, but the effect was well worth the risk.

This project has a great look and is obviously a labor of love, and a great homage to the Apollo program’s many successes. We’ve got a ton of other Apollo-era hacks on our pages, including a replica DSKY, a rejuvenated AGC, and a look behind the big boards of mission control.

Continue reading “Animatronic Saturn V Launch Tower Sends Lego Model To The Moon”

Tech Hidden In Plain Sight: The Ballpoint Pen

Would you pay $180 for a new type of writing instrument? Image via The New York Times

On a crisp fall morning in late October 1945, approximately 5,000 shoppers rushed the 32nd street Gimbel’s department store in New York City like it was Black Friday at Walmart. Things got so out of hand that fifty additional NYPD officers were dispatched to the scene. Everyone was clamoring for the hottest new technology – the ballpoint pen.

This new pen cost $12.50, which is about $180 today. For many people, the improved experience that the ballpoint promised over the fountain pen was well worth the price. You might laugh, but if you’ve ever used a fountain pen, you can understand the need for something more rugged and portable.

Ballpoint pens are everywhere these days, especially cheap ones. They’re so ubiquitous that we don’t have to carry one around or really think about them at all. Unless you’re into pens, you’ve probably never marveled at the sheer abundance of long-lasting, affordable, permanent writing instruments that are around today. Before the ballpoint, pens were a messy nuisance.

A Revolutionary Pen

A ballpoint, up close and personal. Image via Wikipedia

Fountain pens use gravity and capillary action to evenly feed ink from a cartridge or reservoir down into the metal nib. The nib is split in two tines and allows ink to flow forth when pressed against paper. It’s not that fountain pens are that delicate. It’s just that they’re only about one step above dipping a nib or a feather directly into ink.

There’s no denying that fountain pens are classy, but you’re playing with fire if you put one in your pocket. They can be a bit messy on a good day, and the cheap ones are prone to leaking ink. No matter how nice of a fountain pen you have, it has to be refilled fairly frequently, either by drawing ink up from a bottle into the pen’s bladder or inserting a new cartridge. And you’re better off using it as often as possible, since a dormant fountain pen will get clogged with dried ink.

Early ballpoint pens were modeled after fountain pens, aesthetically speaking. They had metal bodies and refillable reservoirs that only needed a top-up every couple of years, compared to once a week or so for fountain pens. Instead of a nib, ballpoints have a tiny ball bearing made of steel, brass, or tungsten carbide. These pens rely on gravity to bathe the ball in ink, which allows it to glide around in the socket like a tiny roll-on deodorant.

Continue reading “Tech Hidden In Plain Sight: The Ballpoint Pen”

Fancy Filament Joiner Has Promise, But Ultimately Fails

[Proper Printing] has been trying to 3D print rims for his car for quite some time. However, the size of the print has led to problems with filament spools running out prior to completion. This led to endless headaches trying to join several smaller lengths of filament in order to make a single larger spool. After his initial attempts by hand failed, a rig was built to try and bring some consistency to the process. (Video, embedded below.)

The rig consists of a heater block intended to melt the ends of two pieces of filament so that they can be fused together. A cheap set of brass calipers was modified with a tube in order to form a guide for the filament, ensuring that it gets bonded neatly without flaring out to a larger size. Fan coolers are then placed either side of the heating area to avoid turning the whole filament into a hot mess.

Unfortunately, the rig simply didn’t work. The initial design simply never got the filament hot enough, with the suspicion being that heat was instead being dumped into the calipers instead of the filament itself. Modifications to reduce this sadly didn’t help, and in the end, more success was had by simply holding a lighter below a length of brass tube.

While the project wasn’t a success, there’s still value in the learning along the way. We can’t see any fundamental reason why such a rig couldn’t be made to work, so if you’ve got ideas on how it could be improved, sound off in the comments. We’ve seen other successful builds using hair straighteners in a relatively simple setup, too.

Continue reading “Fancy Filament Joiner Has Promise, But Ultimately Fails”

A SNES, Ray Tracing

A trick famously used by Nintendo to keep its slowly aging SNES console fresh against newer competition was to produce new games with extra support chips in the cartridge to push out hitherto-unthinkable performance. Chips such as the famous SuperFX gave us 3D polygonal graphics, but it would have been a few more years before even much faster platforms could achieve real-time ray-tracing. Nintendo may not have managed it, but here in 2020 [Ben Carter] has a SNES on his bench rendering a complex 3D ray-traced world.

Ray tracing refers to the practice of rendering a scene with accurate lighting by tracing the rays of light that go towards making each pixel. It can achieve results that even approach photorealism, but it remains an extremely computationally intensive job for any computer. To do this with a SNES he hasn’t resorted to a modern computer like the excellent Raspberry-Pi-based NES DOOM cartridge, instead he’s tried to create something that might have graced a Nintendo custom chip back in the 1990s. The tool may be a thoroughly modern DE10-Nano FPGA dev board, but what it implements could conceivably have been made as a 1990s-spec ASIC. In it are three ray tracing cores that do the work, but the final rendering is handled by the SNES itself. At 200 x 160 pixels and 256 colours it’s no graphical powerhouse, but the maximum frame rate of 30 fps makes it no slouch for the day. The video below the break supplies extra detail.

Perhaps an unexpected takeaway of the rendered scene lies in how of its era it seems. It comes from an age in which checker-board floors, mirrored balls, and azure blue skies looked so futuristic, and just before the likes of Toy Story redefined what the general public might expect from 3D rendering. If Nintendo had produced a ray-traced SNES game using a chip like this one, it would have certainly been a defining moment for gaming in that decade.

Continue reading “A SNES, Ray Tracing”